


Containers are awesome, allowing you to package your application along with its dependencies and run it anywhere. Starting with Docker in 2013, containers have been making the lives of software developers much easier.
One of the downsides of Docker is it has a central daemon that runs as the root user, and this has security implications. But this is where Podman comes in handy. Podman is a daemonless container engine for developing, managing, and running OCI Containers on your Linux system in root or rootless mode.
There are other articles on Fedora Magazine you can use to learn more about Podman. Two examples follow:
If you have worked with Docker, chances are you also know about Docker Compose, which is a tool for orchestrating several containers that might be interdependent. To learn more about Docker Compose see its documentation.
What is Podman Compose?
Podman Compose is a project whose goal is to be used as an alternative to Docker Compose without needing any changes to be made in the docker-compose.yaml file. Since Podman Compose works using pods, it’s good to check a refresher definition of a pod.
A Pod (as in a pod of whales or pea pod) is a group of one or more containers, with shared storage/network resources, and a specification for how to run the containers.
Pods – Kubernetes Documentation
The basic idea behind Podman Compose is that it picks the services defined inside the docker-compose.yaml file and creates a container for each service. A major difference between Docker Compose and Podman Compose is that Podman Compose adds the containers to a single pod for the whole project, and all the containers share the same network. It even names the containers the same way Docker Compose does, using the ‐‐add-host flag when creating the containers, as you will see in the example.
Installation
Complete install instructions for Podman Compose are found on its project page, and there are several ways to do it. To install the latest development version, use the following command:
pip3 install https://github.com/containers/podman-compose/archive/devel.tar.gz
Make sure you also have Podman installed since you’ll need it as well. On Fedora, to install Podman use the following command:
sudo dnf install podman
Example: launching a WordPress site with Podman Compose
Imagine your docker-compose.yaml file is in a folder called wpsite. A typical docker-compose.yaml (or docker-compose.yml) for a WordPress site looks like this:
version: "3.8"
services:
  web:
    image: wordpress
    restart: always
    volumes:
      - wordpress:/var/www/html
    ports:
      - 8080:80
    environment:
      WORDPRESS_DB_HOST: db
      WORDPRESS_DB_USER: magazine
      WORDPRESS_DB_NAME: magazine
      WORDPRESS_DB_PASSWORD: 1maGazine!
      WORDPRESS_TABLE_PREFIX: cz
      WORDPRESS_DEBUG: 0
    depends_on:
      - db
    networks:
      - wpnet
  db:
    image: mariadb:10.5
    restart: always
    ports:
      - 6603:3306

    volumes:
      - wpdbvol:/var/lib/mysql

    environment:
      MYSQL_DATABASE: magazine
      MYSQL_USER: magazine
      MYSQL_PASSWORD: 1maGazine!
      MYSQL_ROOT_PASSWORD: 1maGazine!
    networks:
      - wpnet
volumes:
  wordpress: {}
  wpdbvol: {}

networks:
  wpnet: {}
If you come from a Docker background, you know you can launch these services by running docker-compose up. Docker Compose will create two containers named wpsite_web_1 and wpsite_db_1, and attaches them to a network called wpsite_wpnet.
Now, see what happens when you run podman-compose up in the project directory. First, a pod is created named after the directory in which the command was issued. Next, it looks for any named volumes defined in the YAML file and creates the volumes if they do not exist. Then, one container is created per every service listed in the services section of the YAML file and added to the pod.
Naming of the containers is done similar to Docker Compose. For example, for your web service, a container named wpsite_web_1 is created. Podman Compose also adds localhost aliases to each named container. Then, containers can still resolve each other by name, although they are not on a bridge network as in Docker. To do this, use the option –add-host. For example, –add-host web:localhost.
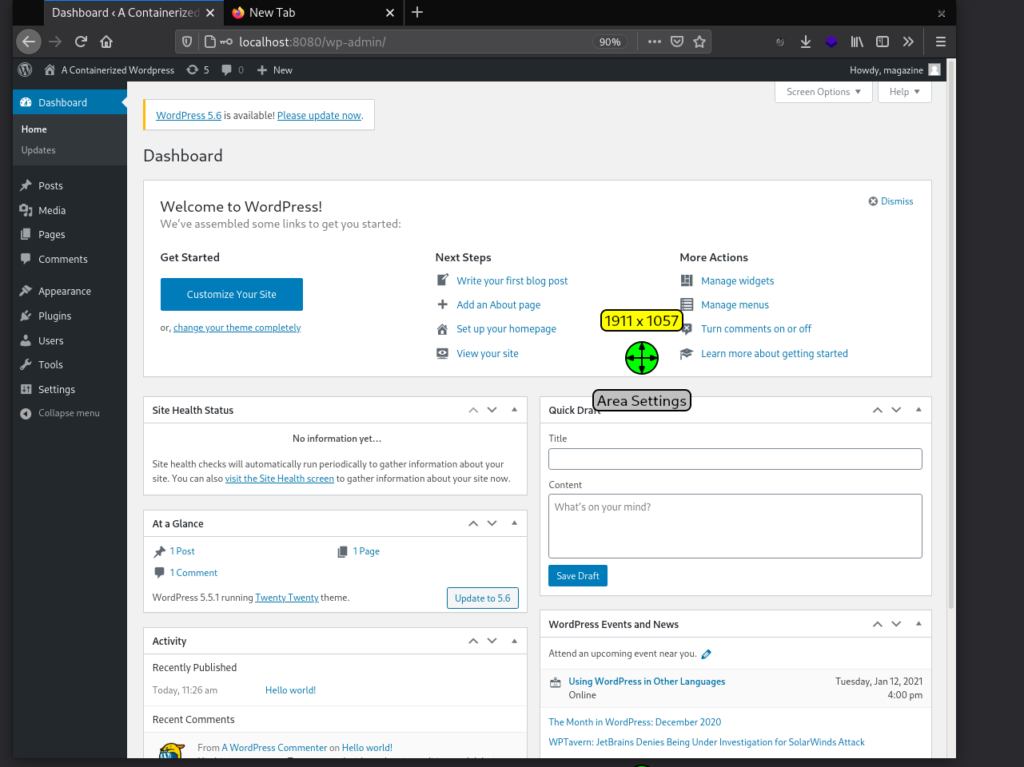
Note that docker-compose.yaml includes a port forwarding from host port 8080 to container port 80 for the web service. You should now be able to access your fresh WordPress instance from the browser using the address http://localhost:8080.
Controlling the pod and containers
To see your running containers, use podman ps, which shows the web and database containers along with the infra container in your pod.
CONTAINER ID  IMAGE                               COMMAND               CREATED      STATUS          PORTS                                         NAMES

a364a8d7cec7  docker.io/library/wordpress:latest  apache2-foregroun...  2 hours ago  Up 2 hours ago  0.0.0.0:8080->80/tcp, 0.0.0.0:6603->3306/tcp  wpsite_web_1

c447024aa104  docker.io/library/mariadb:10.5      mysqld                2 hours ago  Up 2 hours ago  0.0.0.0:8080->80/tcp, 0.0.0.0:6603->3306/tcp  wpsite_db_1

12b1e3418e3e  k8s.gcr.io/pause:3.2
You can also verify that a pod has been created by Podman for this project, named after the folder in which you issued the command.
POD ID        NAME             STATUS    CREATED      INFRA ID      # OF CONTAINERS

8a08a3a7773e  wpsite           Degraded  2 hours ago  12b1e3418e3e  3
To stop the containers, enter the following command in another command window:
podman-compose down
You can also do that by stopping and removing the pod. This essentially stops and removes all the containers and then the containing pod. So, the same thing can be achieved with these commands:
podman pod stop podname
podman pod rm podname
Note that this does not remove the volumes you defined in docker-compose.yaml. So, the state of your WordPress site is saved, and you can get it back by running this command:
podman-compose up
In conclusion, if you’re a Podman fan and do your container jobs with Podman, you can use Podman Compose to manage your containers in development and production.

Oscar
Thanks. Another way to do the more or less the same is https://www.redhat.com/sysadmin/compose-podman-pods
Mehdi Haghgoo
Yes Oscar, that’s also another useful feature of Podman. However, in order for “podman kube generate” to work, a pod needs to be running with the containers added to it manually. It’s very interesting though, and I might write a future article about it on Fedora Magazine.
James
Thanks, that’s really useful to me as I am working with podman to create a django site, using a pod. I have used podman build to build the container images, and have added their containers to a pod using the podman run command with the –pod switch.
I recently switch to using Silverblue, but on both Silverblue and Workstation 33 if I forgot to stop the pod when closing down, it would take an absolute age, something like 2 minutes, before the laptop finally shut down.
So, I made a simple systemd service file to shutdown podman on power off of the laptop…
[Unit]
Description=Podman shutdown service
DefaultDependencies=no
Before=poweroff.target halt.target shutdown.target
[Service]
Type=oneshot
User=dev
ExecStart=/usr/bin/podman pod stop --all
RemainAfterExit=yes
TimeoutStartSec=0
TimeoutSec=3600
[Install]
WantedBy=shutdown.target halt.target
I enabled the service using ‘sytemctl enable podman-shutdown.service’ and now my laptop shuts down cleanly and immediately.
I just have one question left. Is there a way to open ports individually to running containers inside a pod?
With the publish option when creating a pod, a port mapping is created, but that port is then open for all the containers, not just one, and without peeking, I seem to recall that only one port can be published.
Mehdi Haghgoo
James, for your use case, if you don’t want to use podman-compose, you can use “podman generate kube” feature to generate a kubernetes YAML that you will be able to run using “podman play kube” later on to quickly restore your pod and its containers.
Regarding your question to individually map ports of a container within a pod to a specific host port, it is not possible as far as I know. Instead, you configure port mapping in the form of HOST_PX:CON_PX on the pod when creating it. Later, when you run a container inside the pod that exposes port CON_PX, that port from the container will automatically be published to HOST_PX on the host.
Gwyn Ciesla
podman-compose is also installable in Fedora via dnf.
Mehdi Haghgoo
Yes Gwyn, but the latest developer version has to be installed from GitHub, as we did.
Gwyn Ciesla
It’s actually in rawhide and updates-testing for f33.
Laszlo Jagusztin
Unfortunately podman compose unable to handle anything that newer than Docker compose 1.0
Most of the projects use newer syntax
Mehdi Haghgoo
Laszlo I have not had problem with it so far working with my podman-compose.yml files. Do you have specific commands that are not supported by Podman Compose?
Stefano Stagnaro
I often appreciate Fedora Magazine blog posts but this time I must respectfully disagree. Podman Compose is nothing more than an (awesome) experimental project. There are dozen of forgotten issues and unmerged pull requests and moreover, it’s hard to deal with most of the docker-compose.yml found on the net. Since Podman 3.0 is now GA with the new RESTful API, there aren’t any strong reasons for not using the original Docker Compose directly with Podman… except for this three:
1) Compose is bad, DON’T COMPOSE! Docker Compose works well with Docker ecosystem only, therefore it lacks support for modern container features like Pods and other Kubernetes resources. Unlike Docker, Podman can definitely deal with them but unfortunately not through Compose.
2) Compose is a Docker-only provisioning system, while IT guys usually prefers all-around automation technologies like Ansible. Just write an Ansible playbook with Podman modules instead of the docker-compose.yml. Same effort, only benefits.
3) Compose and Docker may works for developers, certainly not when it comes to enterprise application deployment. Even if Kubernetes is the preferred way for container deployments, in specific contexts a stand-alone Podman managed by systemd units and monitored by journald will do the trick.
In conclusion, since I’m a big Fedora fan, I can’t help but suggesting an awesome new article for Fedora Magazine called… DON’T COMPOSE 😀
Erik Sjölund
The upcoming Podman 3.0 supports the Docker REST API well enough to be used as back-end for docker-compose. It is planned to be released in a few weeks.
Caveats:
Running Podman as root is supported, but not yet running as a normal user, i.e. running “rootless”. (See feature request https://github.com/containers/podman/issues/9169)
Functionality relating to Swarm is not supported
To enable Podman as the back-end for docker-compose, run
sudo systemctl enable –now start podman.socket
Podman will then listen on the UNIX domain socket /var/run/docker.sock
See also: https://www.redhat.com/sysadmin/podman-docker-compose
Mehdi Haghgoo
Stefano I appreciate your arguments regarding Podman and against Podman-Compose. As far as I know the new Podman 3.0 feature allowing running docker-compose.yaml files only works in root mode. I don’t think many people prefer rootless containers.
Personally, I have found docker-compose super useful for development environments. Then, thanks to Podman Compose, I was able to switch back and forth from macOS to Fedora for development very easily. It is amazing!
Viktor Ransmayr
@Mehdi : I assume you wanted to say “I do think many people prefer rootless containers”. – Correct?
Mehdi Haghgoo
That is right. Unfortunately, I didn’t have the option to revise the comment. Thank you Viktor for correcting.
Werner
I had some issues running a simple nginx pod using podman-compose on Fedora 33: it was impossible to access the volume mounts for http document root. Adding a
privileged: true
solved the security issues. Probably there is a better solution, though I was not able to find one. Tried even to make it world readable did not help. Just in case somebody has the same problem.
Mehdi Haghgoo
Yes Werner, it happens with volumes and it is caused by SELinux. I used to solve it using setenforce 0, but “privileged: true” seems a better option.
Thanks for sharing.
Blake
Hi, @Werner @Mehdi Another way which I believe is more suitable for the volume issue mentioned here is mapping the volume with :z at the end.
E.g: podman -v /my/host/path:/etc/containerpath:z
https://www.redhat.com/sysadmin/user-namespaces-selinux-rootless-containers