


Sun Aug 14 10:36:37 2016, this is the birth date of BespokeSynth. Since that date, BespokeSynth has grown a lot; both in terms of its user base and the size of its codebase. BespokeSynth is an application for performing modular synthesis. Because it has been written by a newcomer to modular synthesis, it is quite different from the usual modular synthesizer. Note: I am the manager of the LinuxMAO / Audinux Copr repository.
Installation
Disclaimer: Copr is not officially supported by Fedora infrastructure. Use packages at your own risk.
That said, let’s have some fun.
To install BespokeSynth, use the linuxmao (for Fedora 33, 34) / audinux (for Fedora 35) Copr repository.
$ dnf copr enable ycollet/audinux # For Fedora 35 and above
$ dnf copr enable ycollet/linuxmao # For Fedora 33 and 34
Then, as the root user:
$ dnf install BespokeSynth
Rapid Overview
Here is what BespokeSynth looks like at startup:
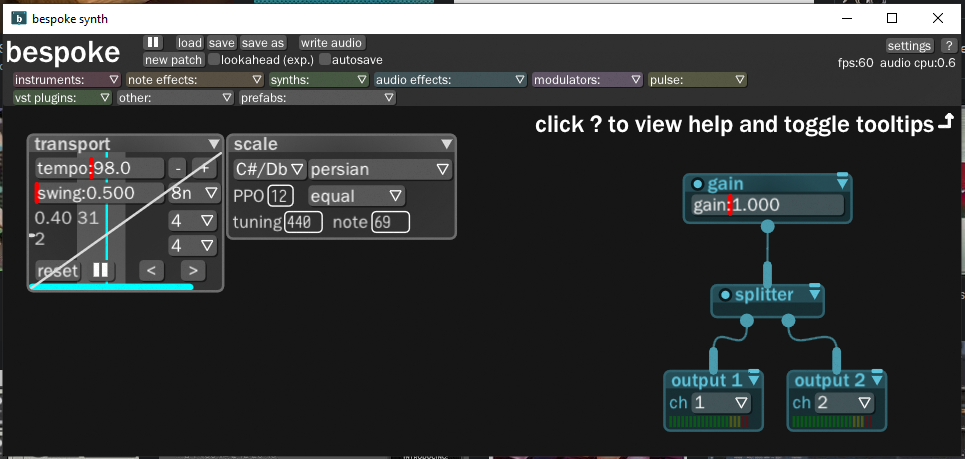
Some groups of modules populate the BespokeSynth canvas by default:
- a transport module to control the tempo/measure;
- a scale module to control the harmony of the noters played by some modules;
- a gain/splitter/outputs to export the sound produced in BespokeSynth to the outside.
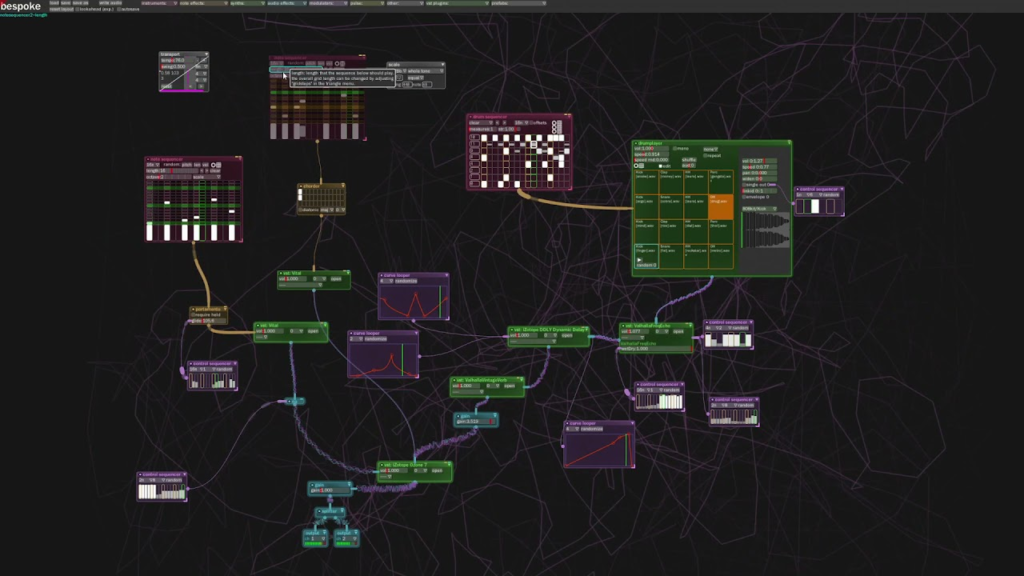
By default, BespokeSynth draws a Lissajous figure in the background of the canvas during audio playback.
The menu has a play/pause button to trigger the audio process, and some standard menus for file operations (like a menu for settings, and some menus to access the various BespokeSynth modules).
Some shortcuts are really useful to improve your workflow under BespokeSynth:
- Ctrl + wheel : Zoom;
- Space + mouse : translate canvas;
- Letter key in the canvas : shows a list of modules with name beginning with this letter;
- Click + drag : select an area;
- Click on a selected area + drag : move the selected modules;
- Backspace : delete a module or a selection;
- Alt+Click on module+Drag : duplicate a module.
How to draw a wire
Click on the circle output of a module and, while the button is clicked, move the mouse to the module you want to connect to.
How to delete a wire
Click on the wire and push Backspace.
Autoconnect two modules
Grab a module by the title bar and hold Left Shift while the module is grabbed. Move the mouse so that the output circle of the grabbed module touches the module you want to connect to.
You can access some additional parameters for a module by clicking on the right arrow icon in the title bar of the module.

You now have enough information about BespokeSynth to be able to perform some experiments. Start with a really simple experiment. This experiment will be gradually completed by the remainder of this guide.
A simple experiment
As a first experiment, put a notesequencer module, an oscillator, and an effect chain on the BespokeCanvas.
Connect the notesequencer to the oscillator by dragging a wire between these two modules. Or by using the auto-connect procedure described above.
The auto-connect procedure is particularly useful in the live context because it allows connecting modules without any interruption in the generated noise.
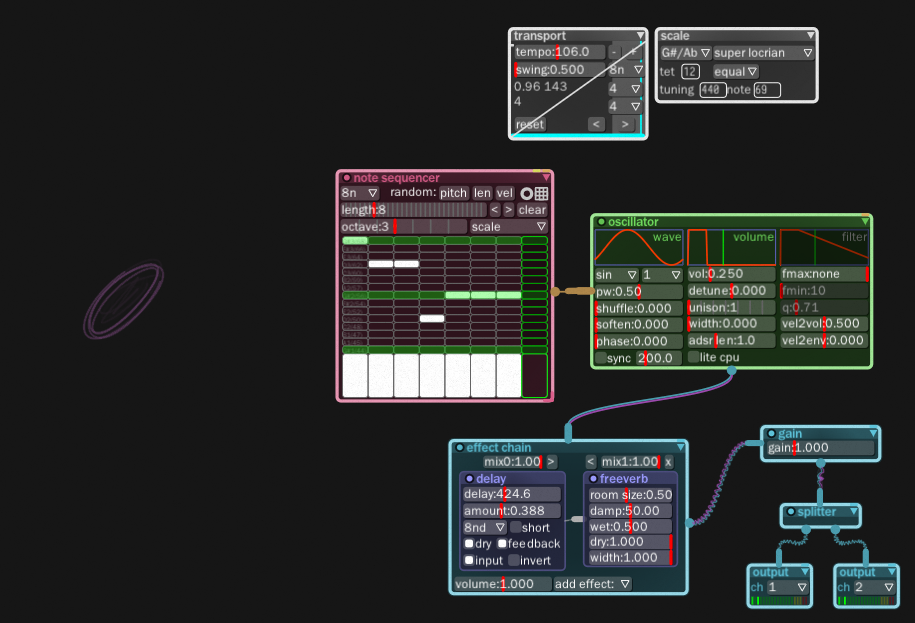
Next, Connect the output of the oscillator to the effect chain and the output of the effect chain to the gain module. Add an effect to the effect chain module by clicking on the add effect drop-down menu of the effect chain and then select delay. Repeat this procedure to add the freeverb effect. In the delay effect, click the amount area and set the value to about 0.3.
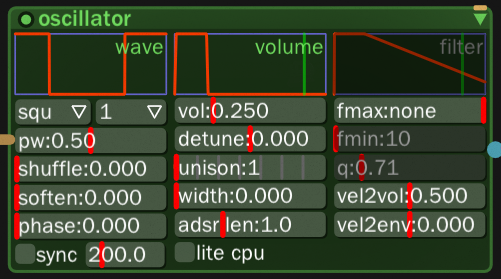
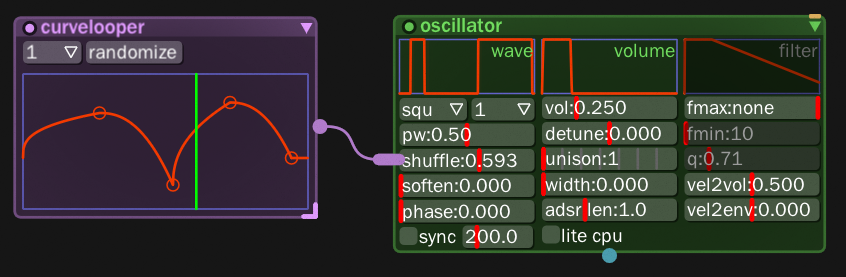
Setting the oscillator
Try changing some parameters on the oscillator/notesequencer/effect chain modules like the unison/detune and the shuffle/soften parameters. You can also try to change the scale and check what changed after that.
Press the play button in the menu bar to generate your new sound.
Check the help page and look for oscillator and notesequencer:
Setting the notesequencer

In the notesequencer, you can click on each cell to activate a note and click on the lower row cells to adjust the volume of the note. You can also click on the buttons pitch, len or vol to set a random value for each of these parameters. The length of the sequence can be set in the length area.
Enhancing your first patch
Some good modules
You can now complete your patch (the whole set of modules + connections is called a patch) and add some more modules. You have the possibility to use drums with the following modules:
- drumsequencer: it the same kind of modules as the notesequencer with the difference that drums don’t require notes, just triggers which makes it a lot easier to use to program rythms;
- drumplayer: a samples based drum synthesizer which uses samples you just have to drag and drop in this module. There are some samples available in your Documents/BespokeSynth/drums directory;
- drumsynth: a pure synthesized drum which is based on noise and sine generators;
- Multitrack recorder: you can use this module if you want to record several audio tracks from you patch (we call patch a set of interconnected modules);
- Arpegiator: this module can create a nice sequence of notes using just one triggering note;
- Seaofgrain: this module use a “section” of a sample as a source wave to be transformed into sound generator;
- Fubble: with this module, you can draw at hand the temporal evolution of some parameters;
- Circlesequencer: a 4 notes sequencer with some habilities for polyrythms;
- Polyrythms: a polyrythms sequencer;
- Chorder: yes, as its name suggests, you can manage chord with BespokeSynth.
Playing with drums
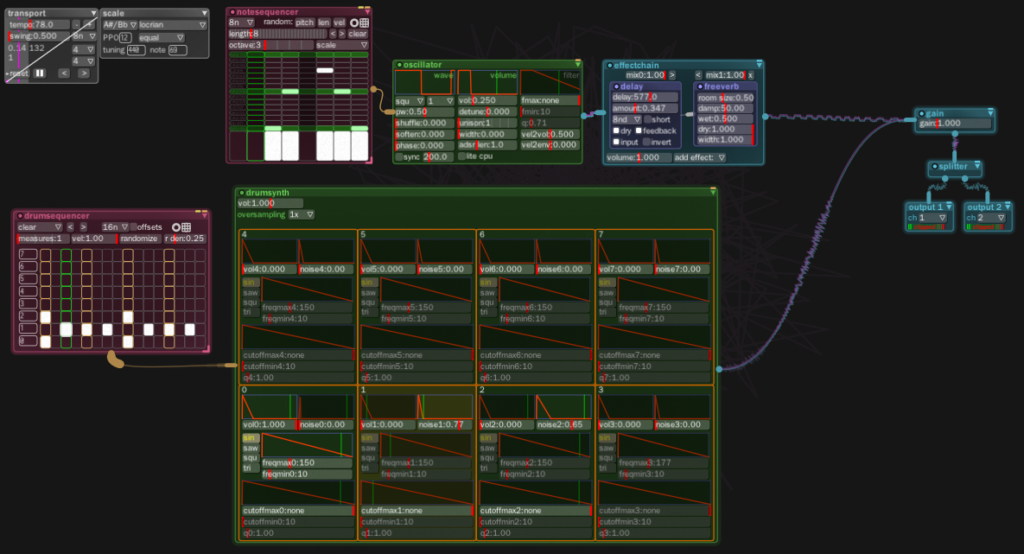
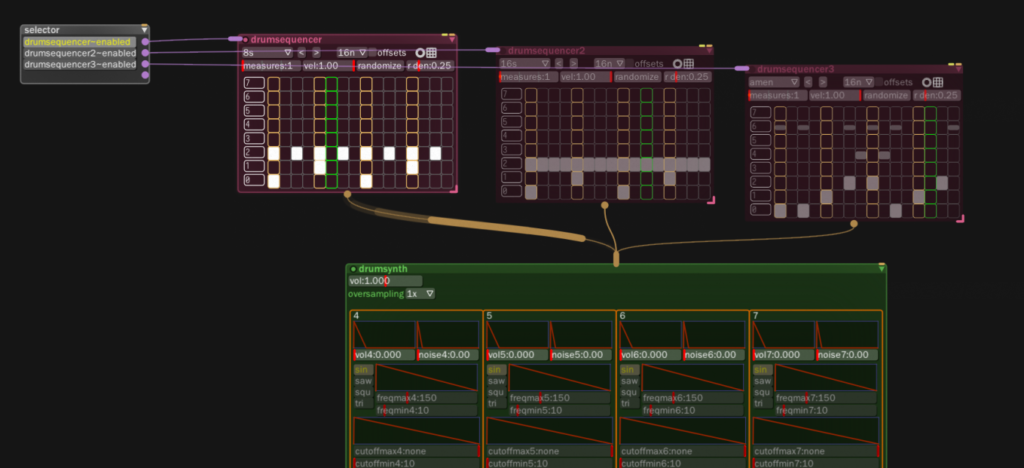
Connect the drumsequencer to the drumsynth and connect the drumsynth to the gain. The drumsequencer is organized by row. The bottom row corresponds to row 0 and the top row is row 7. Row 0 of drumsequencer will control the bottom left cell of drumsynth.
Setting a drum synthesizer
The drumsynth is composed of two audio sources:
- a sound generator (sin, saw, square, triangle);
- a noise generator.
The first areas of a cell are dedicated to the sound envelope.
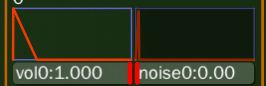
When you click on the first half of an envelope, you can change the position of the envelope peak. When you click on the second half of the envelope, you can change the slope of the envelope.
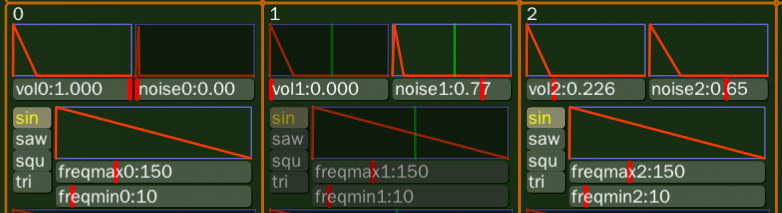
To set the sound of your drum, tune the envelopes and volumes as shown above.
You can achieve the same result by using a drumplayer and drag and dropping some drum samples which are available in your Documents/BespokeSynth/drums directory.

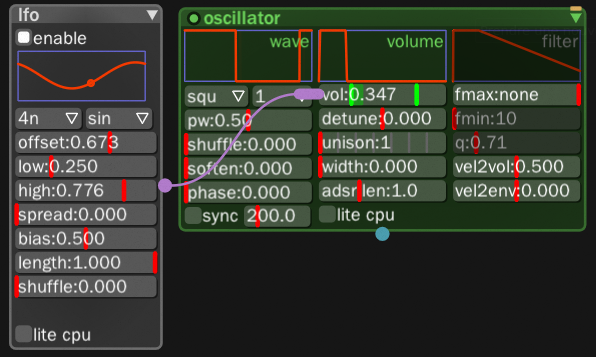
Using LFO / automation on modules parameters
Every parameter in BespokeSynth can be modulated by a LFO. To access the LFO parameters, right-click on a parameter you want to modulate and a LFO window will be displayed which can be detached from the parameter window by clicking on pin.
You can also perform some kind of automation control of a parameter using a curvelooper module.
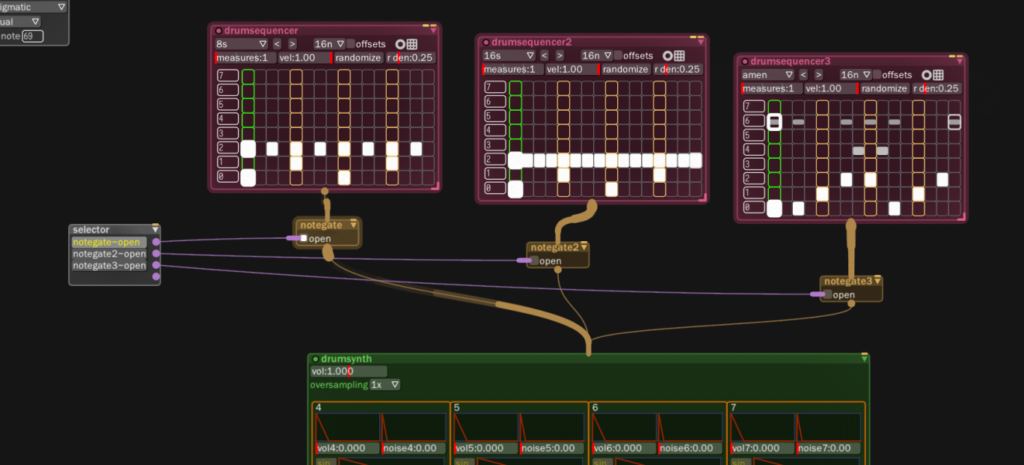
Organizing songs
All the modules can be activated/deactivated by clicking on the little circle on the left of the title bar.
To organize a song, you can use a selector module that can send an activation signal to various parameters in general and to this activation button in particular.
For example, to manage a three drum part, you can use the following patch.
Another approach is to use a notegate to enable/disable the note flow from the drumsequencer.
Communication with the outside
Three shapes of midicontroller
First, drop a midicontroller in the BespokeSynth canvas.
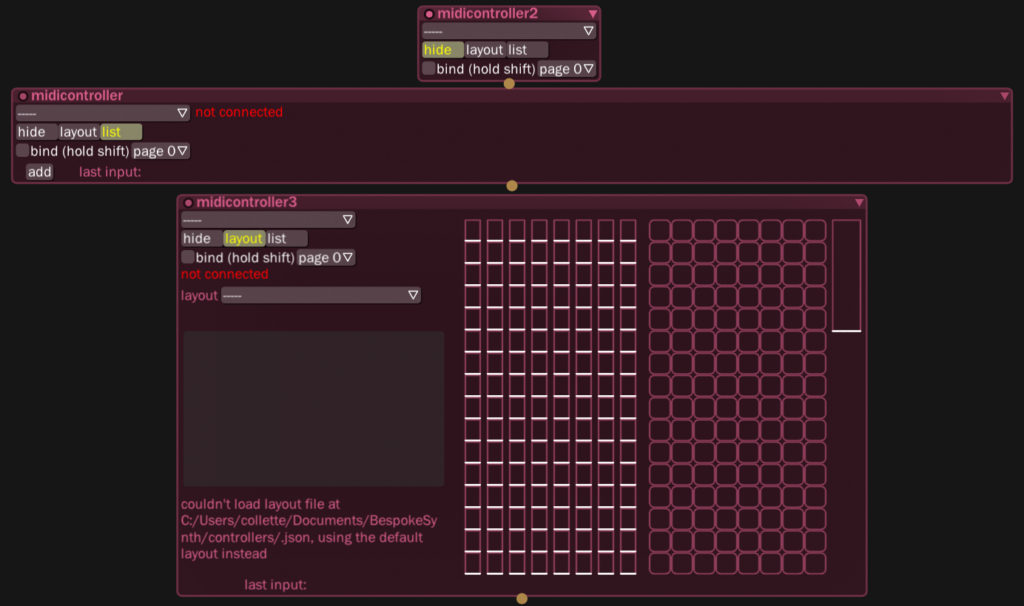
The midicontroller can have various shapes depending on the hide/layout/list checked. For this experiment, use the list shape. The midicontroller is quite powerful. You can write a JSON file to customize the shape of the midicontroller GUI:

The Akai LPD8 MIDI controller
For this experiment, I will use the Akai LPD8 MIDI controller which has eight knobs and eight event triggers:
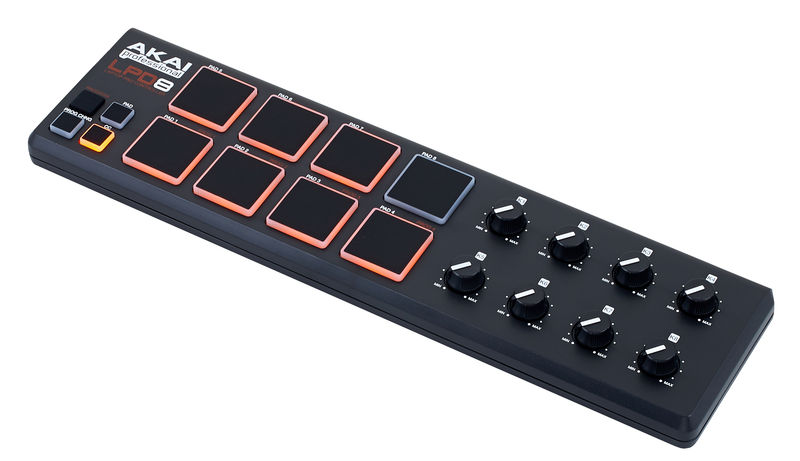
The event triggers can be used to send a note to a module. They can also be used for program change.
Connecting everything
First, set the controller in the first drop-down menu of the midicontroller to LPD8 (the one I connected to the PC). Then, click on the add button.
Next, play with the button so that the MIDI identity of the button is displayed at the bottom of the module. Here, the button has MIDI cc 10. So enter 10 in the first cell (the one next to the cc label).
To connect this button to the delay parameter of the delay effect, click on the little button on the left of the slider label and drag and drop it onto the delay parameter.
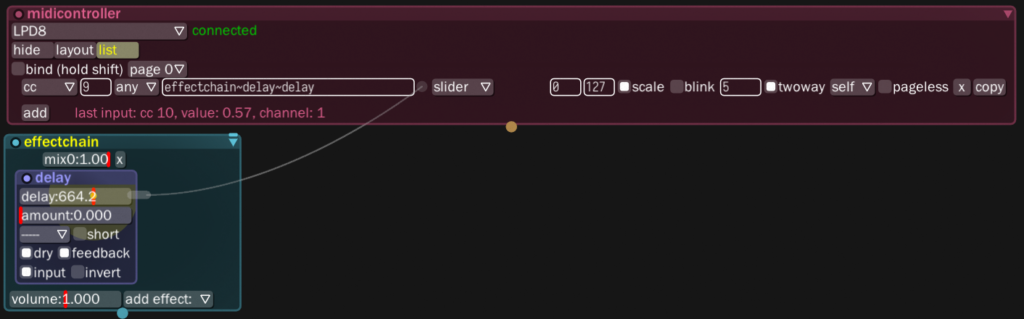
Now that the LPD8 MIDI knob is connected to the delay parameter, it can be used to change the value of the delay effect.
In the videorama section below, there is a tutorial made by Ryan Chalidor about the use of MIDI things in BespokeSynth.
A demo with sound
Here is a small demo of a connection of an Akai LPD8 to BespokeSynth from my YouTube channel:
In the above example, I used a knob of the LPD8 to control the value of the delay effect. To avoid a staircase effect due to the discrete nature of the evolution of the MIDI control signal, I used a smoother to transform this staircase signal into a continuous one.
Recording
You can record your work by clicking on the writing menu entry. This will record your session in the recording directory (~/Documents/BespokeSynth).
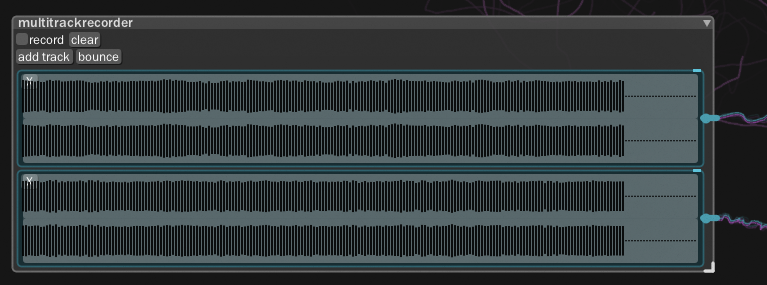
You can also use the multitrackrecorder module to record several tracks. You can add more tracks via the “add track” button:
- The record button triggers the recording;
- The clean button cleans everything (all the tracks);
- The bounce button will write all the tracks in separated files in your recording directory.
Videorama
Here is a quick overview of BespokeSynth by the developer of BespokeSynth (Ryan Chalidor).
Here is a Bespoke Midi mapping tutorial from the developer of BespokeSynth (Ryan Chalidor).

Andrew
None of the urls work when trying the install command on Fedora 35.
Yann Collette
I just tried the following commands on a fresh Fedora 35 installation:
as a root user:
$ dnf copr enable ycollet/audinux
$ dnf install BespokeSynth
And it worked.
What is your error message ?
Andrew
The error:
Error: Error downloading packages:
Cannot download 02869572-BespokeSynth/BespokeSynth-1.0.0-7.fc35.x86_64.rpm: All mirrors were tried
Not sure if it was because of another comment below and you fixed something, but I tried the install again today and it worked. Thanks.
Daron
On a side note, that COPR repo has packages that have suffixes with older Fedora versions. Is that common?
Yann Collette
Thanks odd. Every package is rebuilt of each version of Fedora.
So, on a Fedora 35, the suffix should be f35 … and not f34 or f33.
Daron
Nevermind, was looking at the COPR web ui, and the packages listed under there had suffixes for the old versions.
After enabling the repo, the packages listed by dnf had the f35 suffix. Thanks.
C-
This looks like a great project that I’ll have to check out.
BTW, the code base URL should go to https://github.com/BespokeSynth/BespokeSynth/ instead of https://github.com/Bespoke
Gregory Bartholomew
Thanks C. I’ve updated the link.
Yann Collette
Thanks Gregory for the update !
M.
Any documentation on how to connect external devices such as (music) keyboards? Is there a compatiblity list?
Haven’t seen any information on this topic yet, even on the homepage
Yann Collette
The video about midi mapping in the videorama section is certainly the best first thing to read / watch. After that, if you keyboard us “usb class compliant”, there will be no problem for the connection under Linux.
For more specific questions, I will recommend to reach the BespokeSynth discord channel. I will have a quick and accurate answer to your questions.
Rob
Yann, your articles are some of absolute favorite contributions to fedora magazine!! I’m looking forward to following your guide today!
Yann Collette
Thanks a lot for this comment. I reaaaallllyyy appreciate to read that 🙂
I hope this article will allow you to have a better first experience with BespokeSynth.
Markus
Hi Yann, thanks for the article. I found a link to a video on the history of trackers on your Audinux page, which I really liked. As an addition, the Radium Tracker (https://github.com/kmatheussen/radium) might be mentioned, which tries to modernize the concept of the tracker.
Yann Collette
I have Radium in the list of tools to be packaged. But it’s a complicated one.
A non free tools which is great to play with: renoise: https://www.renoise.com/
Markus
I couldn’t even compile Radium, and the demo version was extremely unstable for me because it used OpenGL excessively, which didn’t work well with my old graphics card and the Nouveau driver. Renoise, on the other hand, ran extremely stable, but pushed my CPU to its limits. Sunvox (https://warmplace.ru/soft/sunvox/) ran best on my old hardware, but unfortunately there is no source code for this.