


OS chroot command allows you to mount and run another Gnu/Linux from within your current Gnu/Linux. It does this by mounting nested partition(s) within your system and it gives you a shell which allows access to this chrooted OS. This will allow you to manage or debug another Gnu/Linux from your running Fedora Linux
Intro
Disclaimer: When I say chroot, I mean the command, and chrootDir a folder. OSext is the external OS to work with. All the following commands are executed as superuser. For extra readability I removed the sudo at the beginning, just don’t forget to be superadmin when performing the tasks. […] means I cut some terminal output.
First I’m going to review how to do a chroot on a classic filesystem (ext4, xfs, fat, etc) and then we’ll see how to do it on our brand new standard Btrfs and its subvolumes.
The process is similar to that used to change the root password, or that we may use to repair a corrupted fstab (it happens, trust me). We can also use the chroot command to mount a Gnu/Linux in our Fedora Linux in order to perform operations (updates, file recovery, debugging, etc).
A few explanations
The chroot command lets you “change” temporarily the root location. This lets you partition a service or a user in the directory tree.
When you use chroot to run a mounted Gnu/Linux OS, in order for it to be fully functional, you have to mount the special system folders in their “original places in the directory tree” in the chrootDir. This allows the chrooted OS to talk to the kernel.
These special system folders are:
- /dev for the devices;
- /proc which contains the information about the system (kernel and process);
- /sys which contains the information about the hardware.
For example, /dev has to be mounted in chrootDir/dev.
As I always learn better by practicing, let’s do some hands on.
Filesystems without btrfs subvolumes
The classic method
In the following example, the partition we are going to mount is the OSext root (/). This is located in /dev/vda2 and we will mount it in the chrootDir (/mnt) directory. /mnt is not a necessity, you can also mount the partition somewhere else.
# mount /dev/vda2 /mnt
# mount --bind /dev /mnt/dev
# mount -t proc /proc /mnt/proc
# mount -t sysfs /sys /mnt/sys
# mount -t tmpfs tmpfs /mnt/run
# mkdir -p /mnt/run/systemd/resolve/
# echo 'nameserver 1.1.1.1' > /mnt/run/systemd/resolve/stub-resolv.conf
# chroot /mnt
The –bind option makes the contents accessible in both locations, -t defines the filesystem type. See the manpage for more information.
We will mount /run as tmpfs (in the memory) because we are using systemd-resolved (this is the default now in Fedora). Then we will create the folder and the file stub-resolv.conf, which is associated by a symbolic link to /etc/resolv.conf. This file contains the resolver IP. In this example, the resolver is 1.1.1.1, but you can use any resolver IP you like.
To exit the chroot, the shell command is exit. After that, we unmount all the folders we just mounted:
exit
# umount /mnt/dev
# umount /mnt/proc
# umount /mnt/sys
# umount /mnt/run
# umount /mnt
The case of lvm
In the case of lvm, the partitions are not available directly and must be mapped first.
# fdisk -l /dev/vda2
Disk /dev/vda2: 19 GiB, 20400046080 bytes, 39843840 sectors
[...]
I/O size (minimum/optimal): 512 bytes / 512 bytes

# mount /dev/vda2 /mnt/
mount: /mnt: unknown filesystem type 'LVM2_member'.
As you can see, we are not able to mount /dev/vda2 directly. We will now use the lvm tools to locate our partitions.
# pvscan
PV /dev/vda2   VG cl              lvm2 [<19.00 GiB / 0    free]
Total: 1 [<19.00 GiB] / in use: 1 [<19.00 GiB] / in no VG: 0 [0]

# vgscan
Found volume group "cl" using metadata type lvm2

# lvscan
ACTIVE            '/dev/cl/root' [10.00 GiB] inherit
ACTIVE            '/dev/cl/swap' [2.00 GiB] inherit
ACTIVE            '/dev/cl/home' [1.00 GiB] inherit
ACTIVE            '/dev/cl/var' [<6.00 GiB] inherit
So here we can see where the logical volumes are mapped /dev/cl and we can mount these partitions like we did before, using the same method:
# mount /dev/cl/root /mnt/
# mount /dev/cl/home /mnt/home/
# mount /dev/cl/var /mnt/var/
# mount --bind /dev /mnt/dev
# mount -t proc /proc /mnt/proc
# mount -t sysfs /sys /mnt/sys
# mount -t tmpfs tmpfs /mnt/run
# mkdir -p /mnt/run/systemd/resolve/
# echo 'nameserver 1.1.1.1' > /mnt/run/systemd/resolve/stub-resolv.conf
# chroot /mnt
Btrfs filesystem with subvolumes
Overview of a btrfs partition with subvolumes
Let’s have a look at the filesystem.
Fdisk tells us that there are only two partitions on the physical media.
# fdisk -l
Disk /dev/vda: 20 GiB, 21474836480 bytes, 41943040 sectors
 […]
 Device Boot Start End Sectors Size Id Type
 /dev/vda1 * 2048 2099199 2097152 1G 83 Linux
 /dev/vda2 2099200 41943039 39843840 19G 83 Linux
Here are the contents of the target system’s fstab (OSext):
UUID=3de441bd-59fc-4a12-8343-8392faab5ac7 /     btrfs subvol=root,compress=zstd:1 0 0
UUID=71dc4f0f-9562-40d6-830b-bea065d4f246 /boot ext4 defaults 1 2
UUID=3de441bd-59fc-4a12-8343-8392faab5ac7 /home btrfs subvol=home,compress=zstd:1 0 0
Looking at the UUIDs in the fstab, we can see that there are two different ones.
One is an ext4, used here for /boot and the other is a btrfs containing two mount points (the subvolumes), / and /home.
Overview of a btrfs filesystem with subvolumes
Let’s have a look at what is in the btrfs partition (/dev/vda2 here) by mounting it directly:
# mount /dev/vda2 /mnt/
# ls /mnt/
home root

# ls /mnt/root/
bin dev home lib64 media opt root sbin sys usr
boot etc lib lost+found mnt proc run srv tmp var

# ls /mnt/home/
user

# umount /mnt
Here we can see that in the mounted partition there are two folders (the subvolumes), that contain lots of different directories (the target file hierarchy).
To get this information about the subvolumes, there is a much more elegant way.
# mount /dev/vda2 /mnt/

# btrfs subvolume list /mnt
ID 256 gen 178 top level 5 path home
ID 258 gen 200 top level 5 path root
ID 262 gen 160 top level 258 path root/var/lib/machines

# umount /mnt
Practical chroot with btrfs subvolumes
Now that we’ve had a look at the contents of our partition, we will mount the system on chrootDir (/mnt in the example). We will do this by adding the mount type as btrfs and the option for subvolume subvol=SubVolumeName. We will also add the special system folders and other partitions in the same way.
# mount /dev/vda2 /mnt/ -t btrfs -o subvol=root

# ls /mnt/
bin dev home lib64 media opt root sbin sys usr
boot etc lib lost+found mnt proc run srv tmp var

# ls /mnt/home/
<it's still empty>

# mount /dev/vda2 /mnt/home -t btrfs -o subvol=home

# ls /mnt/home/
user

# mount /dev/vda1 /mnt/boot
# mount --bind /dev /mnt/dev
# mount -t proc /proc /mnt/proc
# mount -t sysfs /sys /mnt/sys
# mount -t tmpfs tmpfs /mnt/run
# mkdir -p /mnt/run/systemd/resolve/
# echo 'nameserver 1.1.1.1' > /mnt/run/systemd/resolve/stub-resolv.conf
# chroot /mnt
When the job is done, we use the shell command exit and unmount all previously mounted directories as well as the chrootDir itself (/mnt).
exit
# umount /mnt/boot
# umount /mnt/sys
# umount /mnt/proc
# umount /mnt/sys
# umount /mnt/run
# umount /mnt
Conclusion
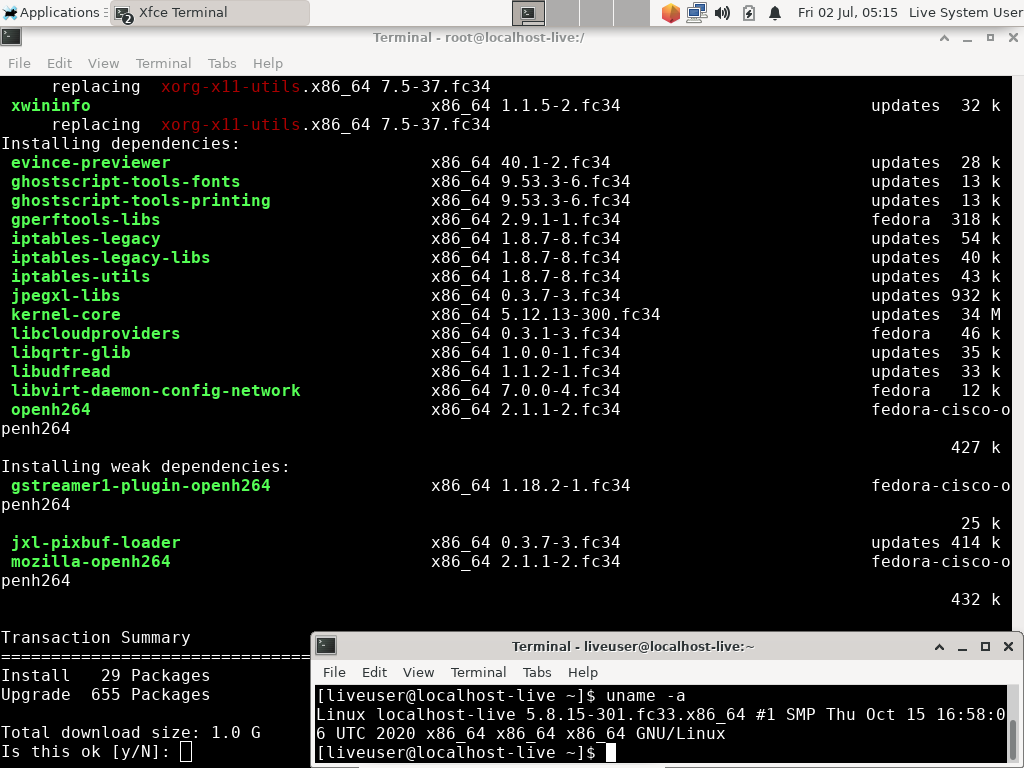
As you can see on the screenshot below, I performed a dnf update on a Fedora Linux 34 Workstation from a live Fedora 33 security lab CD, that way, if a friend needs you to debug his/her/their Gnu/Linux, he/she/they just have to bring the hard drive to you and not the whole desktop/server machine.
Be careful if you use a different shell between your host OS and OSext (the chrooted OS), for example ksh <-> bash. You can specify the shell you want to run on OSext by adding the path to this shell at the end of your chroot command. For example:
# chroot /mnt /usr/bin/bash
I hope this will be useful to anyone needing to debug, or if you just need to update your other Fedora Linux in your dual boot and don’t want to have to restart 😉
This article just referred to a part of btrfs, for more information you can have a look at the the wiki which will give you all the information you need.
Have fun chrooting.

hammerhead corvette
Great Job Yannick ! Maybe in the future an “updated” systemd-nspawn is in the making?! Great use and example of the Fedora Security spin, I have used it to inspect, fix partitions, and many other things.
yannick duclap
Hi hammerhead, Thank you so much.
jose c s de medeiros
Very very fine.
Adam I
or just specify the chroot shell as an argument to chroot,
chroot /mnt /bin/bash
man chroot
[…]
yannick duclap
Hi Adam, you’re right, and, as it’s written in the first line of the manpage I should have paid more attention to it.
I’ll see about making a change to that sentence. Thanks again.
sharon
First, thank you
I have recently tried using chroot and have encountered a number of issues such as:
Run systemctl
Create a private network for the purpose of the machine in chroot
and so’
So I saw that there are:
systemd-nspawn
Which gives a great answer to many of the problems
But in the end his main problem
That when I do a CPU test it works very slowly in relation to the main machine
In chroot
The CPU test shows the same speed as in the main machine
Thanks again
yannick duclap
Hi Sharon, thanks for your feedback which is very interesting.
I’ll keep it in mind for my future use and research.
Jared G
I have many btrfs volumes and recently had to do a lot of troubleshooting via Fedora Rescue CD as I began encrypting them. It quickly became a real pain having to remount all of the volumes manually each time I rebooted into the rescue environment, so I devised a script to nearly fully automate the process. In case it saves anybody else a few hours of precious time, I’ve uploaded the final product of my efforts here: https://pastebin.com/FGKHTXDd . (As always, don’t go blindly running a program someone else wrote… “Trust, but verify!”)
The only requirement to run this script (named
/etc/fstab’ file, from which the script reads to mount all remaining mount points that you configured. Simply execute
MOUNT_PT’ is the path to which you want to mount the full chroot environment, e.g. `/mnt’. One last pro-tip for those of you who aspire to the pinnacle of laziness: if you copy your fstab to a removable drive, you won’t even have to mount the root volume anymore! Anyway, here’s hoping this helps someone else out of a jam. Cheers!
yannick duclap
Hi Jared, thanks a lot, and your idea of backing up the fstab on a removable drive is brilliant.
I downloaded your script. I also saw that you use –rbind for recursion, and it’s true that it’s cleaner. I should have mentioned it.
I also see that you use –make-rslave, which I don’t know even if it’s indicated in the Red Hat documentation. I invite the readers to go and read the sharedsubtree.txt page on kernel.org to learn more about this option. if you think another source is more relevant, please mention it in reply.
Phoenix
I think I spotted a typo: “(ext4, xft, fat, etc)”
I think the second one in the listing should have been “xfs”.
Other than that, a very useful article.
Richard England
Thanks for catching that. It has been corrected.
newton
estamos esperando muito internautas nesta nova grande iniciativa seja um grande representante Fedora plasma um novo modelo de um grande sistema para grandes tecnologias ou grandes computadores
Lee
Thank you, very informative.
Greg
Thanks Yannick fort this article. It is clear and precise. Much appreciated.
Just a typo I guess:
mount /dev/vda1 /boot
Should be:
mount /dev/vda1 /mnt/boot
Right?
Regards,
Greg
yannick duclap
Hi Greg, glad you enjoyed it and thanks for finding that typo. It’s fixed now.
Uche
Fedora seems to have assumed that we all moved to the new file system, on upgrading to the latest Fedora versions.
Some of us upgraded from ext4, and that old file system was preserved on upgrade, however the old ext4 file checks, have been removed from the repository.
yannick duclap
Hi Uche,
On an ext4 filesystem, you can use what I called “The classic method”, maybe it was not clear.
I’m a simple Fedora Linux user, I can’t speak for the Fedora Project and I have no legitimacy to speak about the filesystem evolution choices.
But I am surprised about the filesystem verification tools, I have fsck , e2fsck, debugfs and tune2fs in my Fedora 34 repos for Workstation. To find them I used the dnf option whatprovides, for exemple:
$ dnf whatprovides fsck
Ralf
Thanks a lot, very helpful article.