


This article has been checked and updated in January 2020 for correctness.
There are many ways to give Fedora a try if you are currently using another operating system. One way that will have little impact on your current operating system is to create a live USB of Fedora, and boot directly into it. Alternatively, you could use virtualization technology such as VirtualBox to run a Fedora install. The virtualization approach allows you work on on your Fedora install without having to to reboot the system every time you need to use Fedora. Additionally, even if your main operating system is Fedora or not, and you want to do some hack or test some software on a spare installation without harming your main system, having the option to start from zero again and again without losing your other works. You can even restore a backup of your virtualized system if something in your test goes wrong.
Note that if you are currently running Fedora as your main machine, VirtualBox may not be the best choice for virtualization, because it is not in the Fedora repositories. In this case, using KVM / Libvirt is probably a better approach. However, if your main system is Windows or OSX, you can use VirtualBox to create a Fedora guest.
What is VirtualBox
Oracle VM VirtualBox is, as stated in the homepage “a powerful x86 and AMD64/Intel64 virtualization product for enterprise as well as home use“. Virtualization lets you to run an entire operating system inside a virtual machine. A virtual machine is a piece of software that runs on top of your system and, in brief, emulates a PC hardware (however, in reality the subject is a little bit more complex).
You can install the VirtualBox software, configure a virtual machine, and run another operating system, like installing it on another PC. You can configure the virtual machine (VM) configuring various kind of hardware: how much RAM, what kind of chipset (PIIX3 or ICH9), how many (virtual) CPUs, up to four network cards and which model, how many (virtual) hard disks, boot order, audio device and a bunch of other things.
You can install as many VMs you want, and run them at the same time, well, in this case as many as your physical hardware is able to support (you can imagine what happens if you try to start ten VMs with 1GB of RAM each, and your PC have 4GB of RAM).
VirtualBox is a multi platform software: in the sense that it is released for a lot of operating systems (Linux, Windows, MacOS and Solaris/Illumos). VirtualBox is developed by Oracle and, since version 4, it is free software released under the GNU General Public License version 2 (GPLv2).
Installing Fedora as a VirtualBox guest
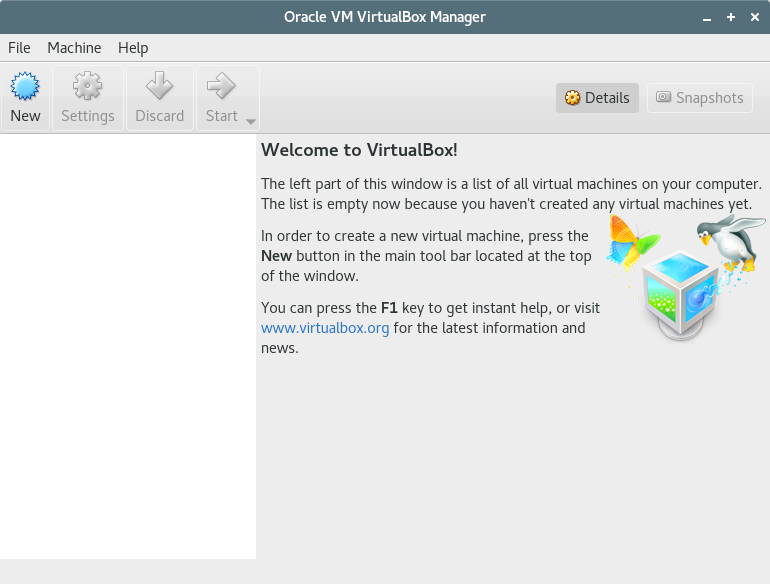
Start Oracle VM VirtualBox Manager
In this tutorial, we assume you already have VirtualBox installed. It is a straightforward task: download the Windows or MacOS X installer from the VirtualBox website. Generally speaking, the version that you can download from the Oracle VirtualBox website is more recent than the one you can find in 3rd party repositories.
Once VirtualBox is installed, start it, and you will see the configuration and management dashboard: Oracle VM VirtualBox Manager. Also this interface is pretty simple and straightforward.
Download the Fedora ISO
In order to install Fedora, you need the installation media. You can download Fedora from https://getfedora.org/ Any of the Fedora downloads will work. You can grab the full Fedora Workstation ISO, the slim netinstall ISO, or even a spin of the Fedora desktop environment: maybe XFCE or LXDE desktop environment will runs smoothly inside a virtualized platform.
Create an empty virtual machine
The graphical interface will guide you through the VM creation. Basically the default options should fit your basic needs.
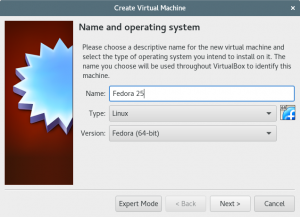
Click on the “New” icon. Write the name of the VM. Type and Version should be automagically reflect the operating system you are going to install: based on this, some basic options will be automatically adapted to fit the operating system minimal requirements.
Click on “Next”. Now you must select the amount of RAM to assign to the VM. Please note that the more you assign to the VM, the lesser will remains to your host operating system: if there is a lack of available memory on the host OS, the system will start to swap, affecting even the VM performances. So pay attention in balancing the RAM size of the VM: however the configuration interface will alert you if you are exaggerating. By the way 1024 MB is a good starting point.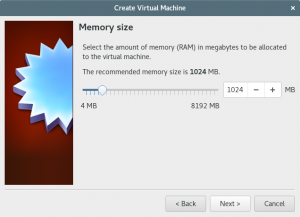
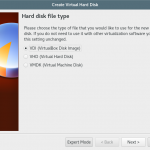
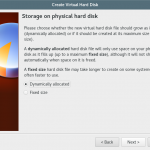
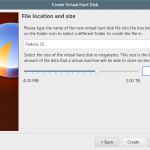
Now it is time to configure the VM disk. Default choices are ok, except for the size: 8GB is too small for a usable Fedora workstation, so let’s use at least 20GB. Also in this case, you are taking up space to the host system: you must take that into account if you are planning to use many virtual machines or you’re short in disk space.
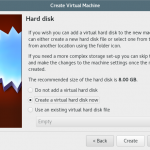
Remember that you can add as many (virtual) disks as you want. So, for instance, if you end up filling the virtual machine disk space, you can add a second disk. It is more easy than adding an hard disk to your desktop PC or your notebook.
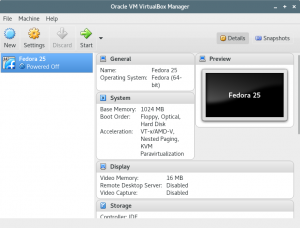
Ready to start with the machine configuration
The virtual machine is now ready. You can change some options by clicking the Settings option from the toolbar.
Network
The network options allow you to configure more than one interface, and the kind of network. You can configure your VM mainly in these ways:
- NAT: the VM will be like in a private network not accessible from the outside. It can freely reach the same sites you are allowed to with your host syestem. The VM will get an IP from the VirtualBox internal DHCP, then, to go on the network, such address will be translated in the IP of the host system. This option is suitable if you have not to reach the VM from the rest of the network, i.e. you don’t run network services on the VM. At the same time you can reach the outside network.
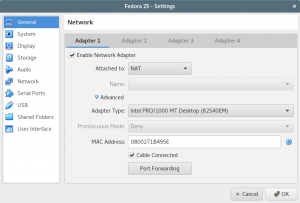
- Bridged Adapter: in this case you must think as a new network card on your host PC. The VM is directly attached to your LAN, so you must assign a static IP in the same subnetwork of the host system, or use your LAN DHCP. In this way the VM will have a reachable IP, at least from the LAN, so you can configure some network services and reach them from any host in the LAN.
There is a third way that worth mentioning. You can configure the main interface as NAT, and a second interface as Host-only Adapter: in that way the VM can reach the outside network using NAT, but it is at the same time reachable, but unlike Bridged mode, it is reachable solely and exclusively from your PC.
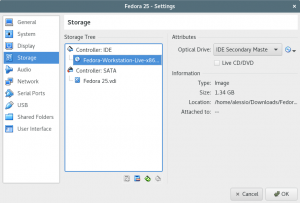
Installation media
You need to select the installation disk. So go in Storage and select the ISO file previously downloaded.
Select Empty in the IDE controller, then the CD icon. Select the ISO image and press OK.
Start up the VM and let’s install Fedora
It is now the time to start the virtual machine. By default it will start from the virtual CD. You must think to a virtual machine, like it is a physical one: you can boot up, shut down gently, abruptly power off, it has memory, disks, network card, and even a sound card if you want.
Let’s click on the green arrow. The virtual machine will start.
You can ignore the overlay message complaining something related to mouse pointer and keyboard integration. We will manage to solve that later.
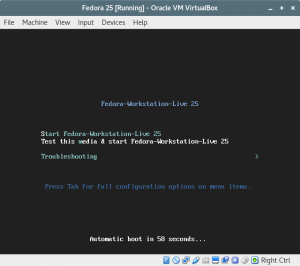
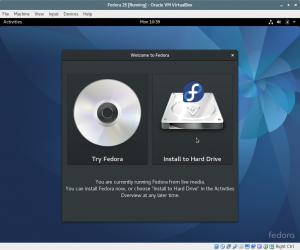
The boot process begins and you can go ahead with the normal installation process.
You will see the (virtual) network interface, and the 20GB (virtual) Hard Disk.
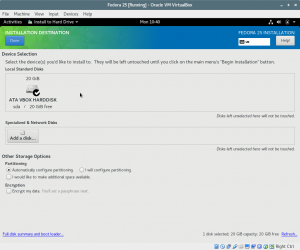
It is a good choice to leave the default partitioning scheme. In fact by default Fedora will set up a LVM, logical volume manager. LVM could be useless in a notebook, where you will never add a second hard drive. In a virtual machine you can easily add pretty as many disks as you want, as said before, so using LVM is a good choice in order to further expand available filesystem space inside the VM.
Go ahead with the installation process and reboot the system.
Final steps
Update Fedora
As for every installation, inside a VM or not, the first thing to do is a system update. Then login on Fedora with the user configured during the installation process and complete the first login steps. To update the Fedora install in your VM, open a Terminal and type:
sudo dnf -y update
Installing the Guest Additions
VirtualBox Guest Additions are device drivers and system applications that help to optimize the operating system installed inside the VM, useful for better performance and usability, like a better mouse and keyboard integration, window scaling and resizing, better video performances, and clipboard integration. Guest Additions need to be installed inside the VM, not on your host OS.
Then let’s insert the Guest Additions CD, by clicking on Devices -> Insert Guest Additions CD image… A window should appear asking you if you want to allow autorun of the CD content.
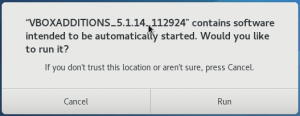
Click on “Cancel” because you need to install some additional packages in order to fully install the Guest Additions.
Open a terminal and type, even if some packages may be already installed:
sudo dnf -y install gcc automake make kernel-headers kernel-devel perl
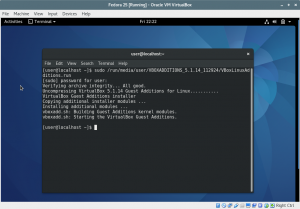
Once finished, actually install the Additions by running the script
sudo /run/media/user/VBOXADDITIONS*/VBoxLinuxAdditions.run
Reboot the VM.
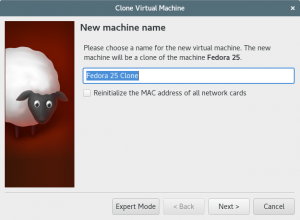
Make a clone
The clone is a copy of the newly created machine. When you are ready, stop the VM. In the Manager select the VM and in the Machine drop down menù, select “Clone…”
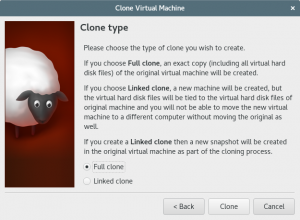
The main difference between Full and Linked clones is that latter cloning process is faster and consumes less size on your hard disk, at least initially, by contrast you cannot delete the virtual disk of the source VM, and cloned VMs cannot be exported to a different computer without moving the original as well.
Final thoughts
VirtualBox is a very convenient way to try Fedora if you don’t already use it, without having to partition or format your PC or configuring dual booting. If you already are a Fedora user, VirtualBox is a very effective way for testing purposes without the fear to break your system: you can reinstall the VM as many times as you want, or better, as stated before, you can use clones to restart your test from a fresh installation without wasting time in the installation process.

Joao Rodrigues
Another way to install the guest additions is to enable the rpmfusion-free repo and install them as any other package:
$ sudo dnf install https://download1.rpmfusion.org/free/fedora/rpmfusion-free-release-$(rpm -E %fedora).noarch.rpm
$ sudo dnf install VirtualBox-guest-additions
Jamin Samuel
Excellent post
But i prefer Gnome Boxes 🙂
eexpss
Just as I tested the boxes today, it’s okay to start two iso. But it doesn’t have any set of parameters, and doubts will not work well.
PaulC
That was a very nice article I’ve been using virtualbox for many years and in the last several years it’s gotten so good it’s truly amazing especially considering that it’s free. Recently I downloaded and created a new VM for Linux Mint 18.
PatrickF
Nice article, but it should be noted that the user in:
sudo /run/media/user/VBOXADDITIONS*/VBoxLinuxAdditions.run
should be replaced by the user name of the logged in user of the vm. Also maybe add dkms to automatically build the guest additions kernel module when Fedora updates the kernel.
Maciej
If you already are a Fedora user, why would you possibly want to use VirtualBox? Virtual Machine Manager is a better piece of software in every single way, and a Linux KVM hypervisor is probably one of the best that exists on the market.
Joao Rodrigues
How does one install Fedora as a guest. The host can be anything else. VirtualBox also runs on Windows and MacOS.
Harry E Smith Jr
VBox was a standard for putting Fedora or any other Linux. The problem is that it is not with the Guest but with the Host. Since the advent of Win 10 (Standard and Pro). As best I can determine the problem is Hyper Y.
I hope someone can tell me how to do.
David
Many thanks for this, very helpful for those of us not using Fedora as host OS. The extra step required before installing VirtualBox additions is particularly helpful.
Ralph Amelia
I’m unable to get the Guest Additions installed. I get the following error when clicking Device –> “Unable to insert the virtual optical disk C:\Program Files\Oracle\VirtualBox\VBoxGuestAdditions.iso into the machine Fedora 25.
Could not mount the media/drive ‘C:\Program Files\Oracle\VirtualBox\VBoxGuestAdditions.iso’ (VERR_PDM_MEDIA_LOCKED).”
I can run “sudo dnf -y install gcc automake make kernel-headers kernel-devel perl” fine but when I run “sudo /run/media/user/VBOXADDITIONS/VBoxLinuxAdditions.run” I get the error “sudo /run/media/user/VBOXADDITIONS/VBoxLinuxAdditions.run: command not found”.
Any thought? I have the VBoxGuestAdditions.iso in C:\Program Files\Oracle\VirtualBox.
Beavis
You might already have an image mounted, unmount the current virtual cd then mount the guest tools
Ralph Amelia
Thanks.
Xavier
You may want to consider the VDI format for your disk storage (see the Virtual Box manual explanations – I believe it is the default choice when you configure the virtual guest). The great thing about VDI is that even if you can declare really huge disk storage, it will actually only use the amount that the guest need, dynamically allocating physical bytes as you need it. So, to make your Fedora life simple, fell free to allocate significant VDI disk size for each virtual machine you create. That will no cost you more in terms of how many actual disk space is used on your physical hard drive, and will greatly simplify your life should you need more than initially expected !
As an example, I currently type this message from a Fedora 25 guest on virtual box. The Fedora guest sees 500 Gb of disk, out of which less than 10% are used. On my Windows10 hosts, the .vdi file that emulates this 500Gb disk currently occupies only 62 Gb. That’s it !
Dan Himes
When I reboot it wants to reinstall- I’m caught in a loop.
Dan Himes
^^ you have to remove the installation disk from the virtual optical drive (I created a new optical drive first).
Marc
I followed the instructions but when I reboot after installing the Virtualbox additions I can’t log into the Gnome desktop. I enter the password and when I hit enter it goes right back to the username / password prompt but it is full screen at least. If I click the gear next to the Sign In button and select Gnome Classic I am able to log in. This happens on my Windows 7 desktop and Ubuntu Mate 16.04 laptop both using Virtualbox.