From modal text editor to full-featured IDE on Fedora Workstation
Are you a Fedora user who values open-source software and customization options? Are you a software engineer, developer, data scientist, sysadmin, or a student? In this tutorial, we’ll guide you through the process of installing Neovim on Fedora for efficient and effective coding in languages like Rust, Python, Go, and TypeScript. This is not a ‘How to Use Vim’ tutorial — we’re focusing on the power and flexibility of Neovim for language-specific development. Let’s dive in and supercharge your coding experience!
Downloading Neovim
To start, download and install Neovim on Fedora using dnf:
sudo dnf install neovim
Or build from source
# install dependencies
sudo dnf -y install ninja-build cmake gcc make unzip gettext curl glibc-gconv-extra
# clone repo
git clone https://github.com/neovim/neovim &&
cd neovim
# build and install package
make CMAKE_BUILD_TYPE=Release
sudo make install
After installation, Neovim is initiated by typing nvim in the terminal or selecting the application in the applications menu.
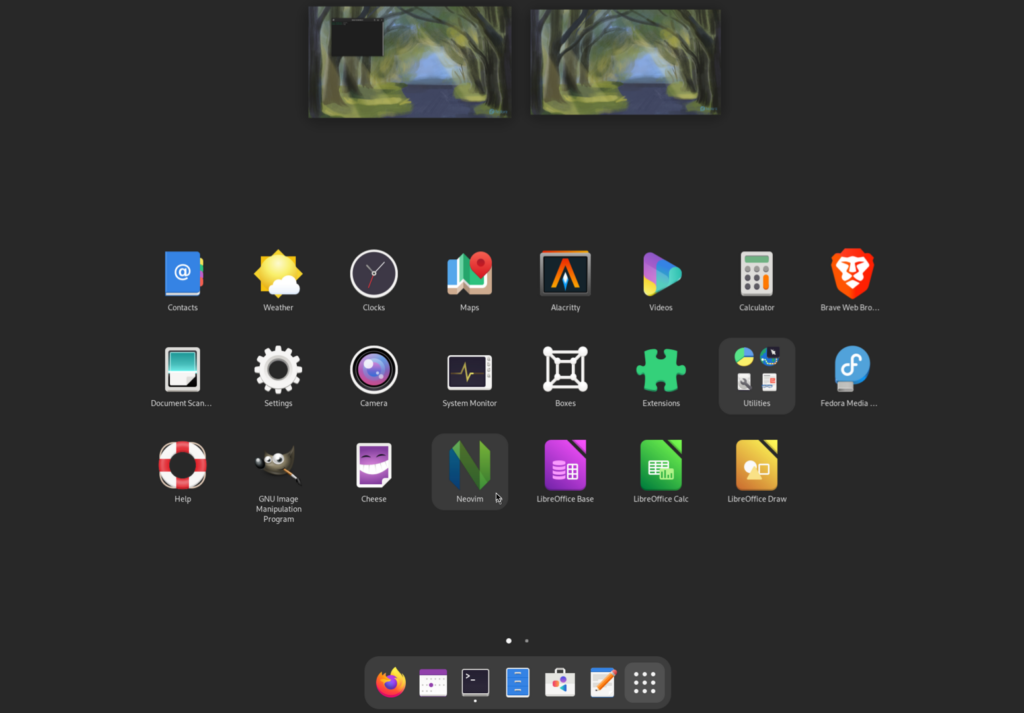
Note: If you build from source, the icon won’t appear in the applications menu.
With Neovim installed, it’s time to create your local configuration.
The local configuration directory structure
Understanding the directory structure can be a headache for new users. When Neovim launches, it searches first for the ~/.config/nvim directory and expects the following files and directories to be present.
Note: The list of searched-for directories can also be found by typing :h runtimepath on the Neovim command line
~/.config/nvim/
            ╰- init.lua                 <-- init file
            ╰- after/plugin/            <-- directory for plugin configurations
            ╰- lua/config/
                         ╰-lazy.lua     <-- plugin manager file
- The /after directory contains files to be loaded after the init.lua script has run.
- The /lua directory contains the plugins configured in Lua.
- Both /plugin and /config directories are searched for runtime files.
The following script will build the basic directory structure and source the lazy.lua file:
mkdir -p ~/.config/nvim/after/plugin/ ~/.config/nvim/lua/config &&
touch ~/.config/nvim/lua/config/lazy.lua &&
touch ~/.config/nvim/init.lua &&
echo "require('config.lazy')" >> ~/.config/nvim/init.lua
The Lazy plugin manager
Regardless of your desired development language(s), the Lazy.nvim plugin manager makes it easy to install and manage all of your plugins. Inside of your ~/.config/nvim/lua/config/lazy.lua file, copy the following starter script:
-- ~/.config/lua/config/lazy.lua

local lazypath = vim.fn.stdpath("data") .. "/lazy/lazy.nvim"
if not (vim.uv or vim.loop).fs_stat(lazypath) then
  vim.fn.system({
    "git",
    "clone",
    "--filter=blob:none",
    "https://github.com/folke/lazy.nvim.git",
    "--branch=stable", -- latest stable release
    lazypath,
  })
end
vim.opt.rtp:prepend(lazypath)

vim.g.mapleader = " " -- the leader key is used in many keymaps,

local plugins = {
    -- plugins go here
}

require("lazy").setup(plugins, {})
Save the lazy.lua file and restart Neovim. Enter :Lazy on the command line to bring up the Lazy plugin manager interface.
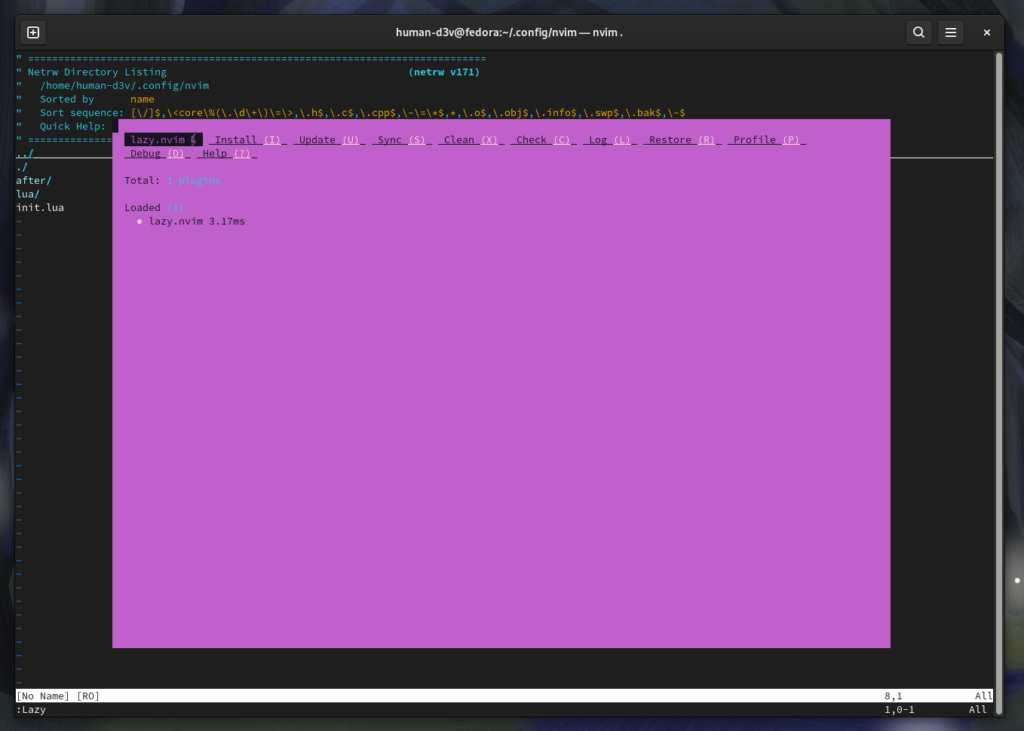
Add plugins:
Lua is an easy-to-read, dynamically-typed programming language typically used for scripting in programs and games. Most plugins for Neovim are written in Lua, so some familiarity with the language is good, but is not a requirement.
The basic workflow for adding a new plugin to Neovim is as follows:

Regardless of the programming language, the following plugins are helpful:
- plenary.nvim – for additional functions (including asynchronous requests) in Neovim.
- nvim-treesitter – provides treesitter support for language parsers, queries, and additional
features like syntax highlighting, indentation, and more. - nvim-telescope – a fuzzy finder for searching projects, repositories, and files.
- harpoon — a ui/cl utility for switching between files quickly.
- undotree — a visual representation of the changes made to a file, making it easy to switch between undo branches.
- vim-fugitive — a git repository management tool.
- mason.nvim — a language server (lsp) management utility.
- nvim-cmp — for autocompletion support.
- LuaSnip — for snippet engine support.
- A color scheme like NeoSolarized, tokyonight, papercolor, kanagawa, or any of the myriad of other themes available.
Add these plugins to the plugins table in ~/.config/nvim/lua/config/lazy.lua.
-- partial file

local plugins = {
    "nvim-lua/plenary.nvim",
    {"nvim-treesitter/nvim-treesitter", build = ":TSUpdate"},
    {"nvim-telescope/telescope.nvim", tag = '0.1.6',
        requires = { {"nvim-lua/plenary.nvim"}}},
    {"ThePrimeagen/harpoon", branch = "harpoon2",
        dependencies = {"nvim-lua/plenary.nvim"}},
    {"mbbill/undotree"},
    {"tpope/vim-fugitive"},
    --lsp configuration
        {"neovim/nvim-lspconfig"}, --lsp configs
        {"hrsh7th/cmp-nvim-lsp"}, -- autocompletion
        {"hrsh7th/nvim-cmp"}, --additional autocompletion
        {"L3MON4D3/LuaSnip", version = "v2.*", build = "make install_jsregexp", dependencies = {'saadparwaiz1/cmp_luasnip','rafamadriz/friendly-snippets'}}, --snippet engine
        {"williamboman/mason.nvim"}, --lsp package manager
        {"williamboman/mason-lspconfig.nvim"}, --lsp package manager configs
    --color scheme
    {'rebelot/kanagawa.nvim'},
}

require("lazy").setup(plugins, {})
Close and reopen Neovim to make the Lazy plugin manager download all of the above plugins.
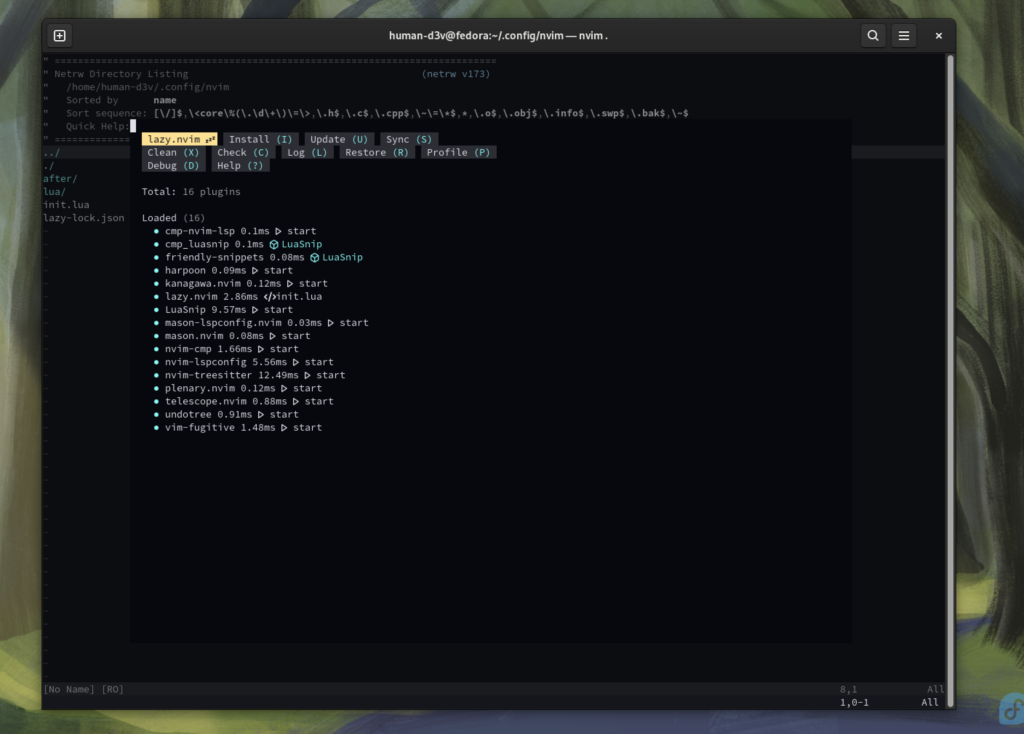
Configure the plugins after they are loaded
After plugins are loaded using Lazy, Neovim looks for files in the ~/.config/nvim/after/plugin/ directory to configure them. Every .lua file in this directory is sourced for configuration regardless of naming convention. While this means that you could configure all the plugins in a single file called single_file.lua, this file would be disorganized, large, and difficult to navigate.
Instead, organize plugin configurations either by function or by name.
Example of organization by function:
| Function | File | Plugin(s) configured in file |
| Navigating files, git repos, and fuzzy finding | nav.lua | vim-fugitive, harpoon, telescope |
| Syntax parsing, LSP, autocompletion | lsp.lua | treesitter, mason, nvim-cmp, nvim-lsp, luasnip |
| Color scheme | colors.lua | kanagawa (or comparable colorscheme) |
| Fixing mistakes | undo.lua | undotree |
The resulting directory structure looks like this:
~/.config/nvim/
            ╰- init.lua
            ╰- after/plugin/
                           ╰- nav.lua
                           ╰- colors.lua
                           ╰- lsp.lua
                           ╰- undo.lua
            ╰- lua/config/
                         ╰-lazy.lua
Example of organzation by plugin name:
| Function | FIle | Plugin(s) configured in file |
| Autocompletion | cmp.lua | nvim-cmp |
| Color scheme | colors.lua | kanagawa (or comparable colorscheme) |
| File jumping | harpoon.lua | harpoon |
| LSP support | lsp.lua | mason, nvim-lsp, luasnip |
| Fuzzy finding | telescope.lua | telescope |
| Language parsing | treesitter.lua | treesitter |
| Fixing mistakes | undotree.lua | undotree |
The resulting directory structure looks like this:
~/.config/nvim/
            ╰- init.lua
            ╰- after/plugin/
                           ╰- cmp.lua
                           ╰- colors.lua
                           ╰- harpoon.lua
                           ╰- lsp.lua
                           ╰- telescope.lua
                           ╰- treesitter.lua
                           ╰- undotree.lua
            ╰- lua/config/
                         ╰-lazy.lua
Note: The following sections are written through an ‘organization by plugin name’ paradigm.
treesitter.lua
require("nvim-treesitter.configs").setup({
    ensure_installed = {"lua", "python","rust","go", "vimdoc", "c"}, --any language parsers you want installed
    sync_install = false, --if you want to load the parsers synchronously
    auto_install = true,
    highlight = {
        enable = true,
        disable = {}, --include any languages you want to disable highlighting
        disable = function(lang, buf)
            local max_filesize = 100 * 1024 -- 100 KiB
            local ok, stats = pcall(vim.loop.fs_stat, vim.api.nvim_buf_get_name(buf))
            if ok and stats and stats.size < max_filesize then
                return true
            end
        end,
        additional_vim_regex_highlighting = false,
    }
})
telescope.lua
local builtin = require("telescope.builtin")
vim.keymap.set('n', '<leader>ff', builtin.find_files, {})
vim.keymap.set('n', '<leader>fg', builtin.git_files, {})
vim.keymap.set('n', '<leader>ps', function()
    builtin.grep_string({search = vim.fn.input(":Grep > ")})
end)
This sets the following keymaps for use with telescope as a fuzzy finder:
- leader + ff : Find files
- leader + fg : Find git files
- leader + ps : Grep for string
Your leader key is mapped to the space key in your ~/.config/nvim/lua/config/lazy.lua file.
harpoon.lua
local harpoon = require("harpoon")

-- REQUIRED
harpoon:setup()
-- REQUIRED

vim.keymap.set("n", "<leader>a", function() harpoon:list():add() end) --add file to end of ui list
vim.keymap.set("n", "<C-e>", function() harpoon.ui:toggle_quick_menu(harpoon:list()) end)

vim.keymap.set("n", "<C-h>", function() harpoon:list():select(1) end)
vim.keymap.set("n", "<C-t>", function() harpoon:list():select(2) end)
vim.keymap.set("n", "<C-n>", function() harpoon:list():select(3) end)
vim.keymap.set("n", "<C-s>", function() harpoon:list():select(4) end)

-- Toggle previous & next buffers stored within Harpoon list
vim.keymap.set("n", "<C-S-P>", function() harpoon:list():prev() end)
vim.keymap.set("n", "<C-S-N>", function() harpoon:list():next() end)
undotree.lua
vim.keymap.set("n", "<leader>u", vim.cmd.UndotreeToggle)
This sets leader + u to open the undotree ui.
colors.lua
This file can be as simple as setting the colorscheme, or as complex as changing individual components. The typical implementation is setting the background color and colorscheme.
Simple configuration using kanagawa
-- assuming you added {'rebelot/kanagawa.nvim'} to your lazy.lua file for your colorscheme
-- ~/.config/nvim/after/plugin/colors.lua

vim.o.background = 'dark'
vim.cmd.colorscheme('kanagawa')
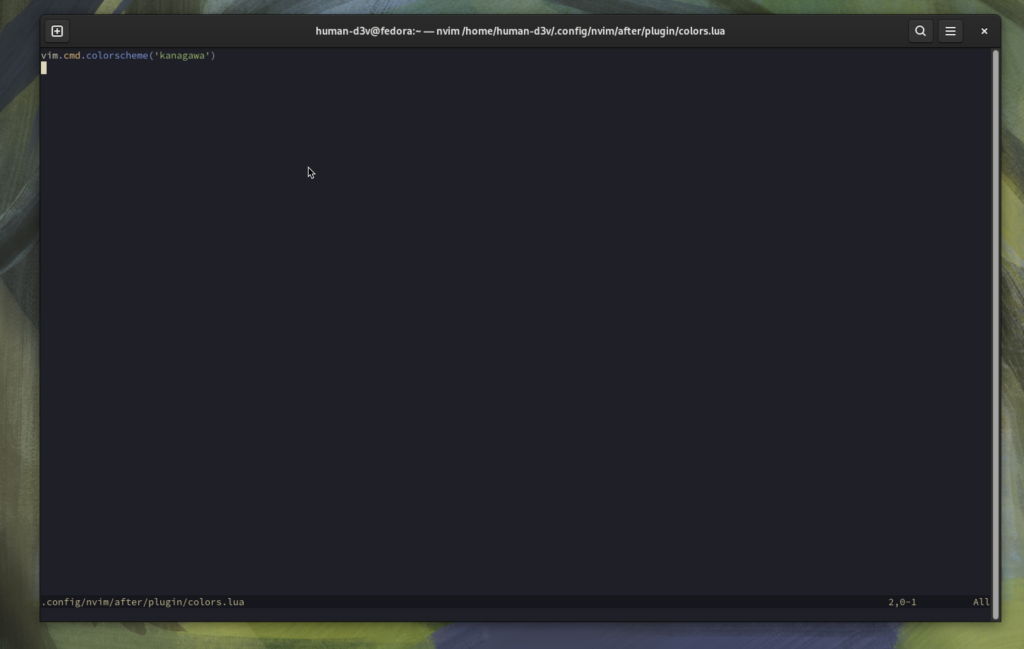
Other Examples:
NeoSolarized:
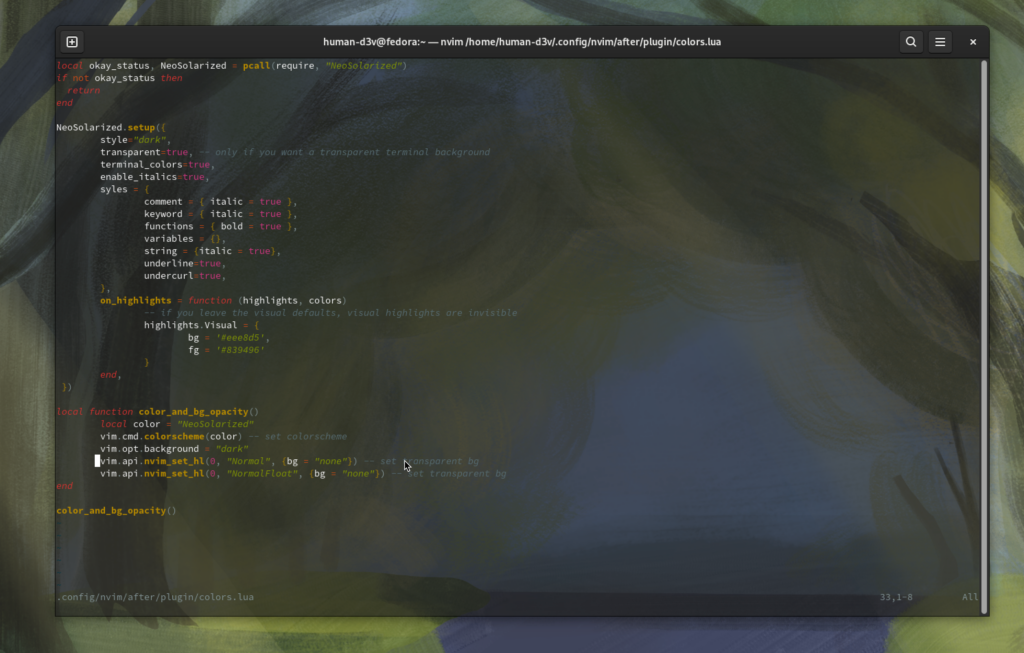
Everforest:

lsp.lua
require("mason").setup({})
require("mason-lspconfig").setup({
    handlers = {
        function(server_name)
            local capabilities = require("cmp_nvim_lsp").default_capabilities()
            require("lspconfig")[server_name].setup({
                capabilities = capabilities
            })
        end,
    },
})

vim.api.nvim_create_autocmd("LspAttach", {
    callback = function(args)
        local bufnr = args.buf
        local opts = {buffer = bufnr, remap = false}
		vim.keymap.set("n","gd",function() vim.lsp.buf.definition() end, opts) --go to definition
		vim.keymap.set('n','K',function() vim.lsp.buf.hover() end, opts) -- hover
		vim.keymap.set('n','<leader>vws', function() vim.lsp.buf.workspace_symbol() end, opts) --view workspace
		vim.keymap.set('n','<leader>vd', function() vim.diagnostic.open_foat() end, opts) --view diagnostic
		vim.keymap.set('n','[d',function() vim.diagnostic.goto_next() end, opts)
		vim.keymap.set('n',']d',function() vim.diagnostic.goto_prev() end, opts)
		vim.keymap.set('n','<leader>vca', function() vim.lsp.buf.code_action() end, opts) --view code action
		vim.keymap.set('n','<leader>vrn', function() vim.lsp.buf.rename() end, opts) --rename variables
		vim.keymap.set('n','<leader>vrr', function() vim.lsp.buf.references() end, opts)
		vim.keymap.set('n','<leader>h', function() vim.lsp.buf.signature_help() end, opts)
    end
})
This configures the LSP servers. This specific implementation offloads all setup and management to mason.
When a file is opened, the parsers provided by treesitter trigger the LSP to attach to the buffer. The above autocmd configures the keymaps for the LSP to the following:
- gd – Go to definition
- K – Hover
- leader + vws – View workspace
- leader + vd – View diagnostic
- [d – Next diagnostic
- ]d – Previous diagnostic
- leader + vca – View code action
- leader + vrn – Rename variables
- leader + vrr – View references
- leader + h – View signature help
cmp.lua
local cmp = require("cmp")

require('luasnip.loaders.from_vscode').lazy_load()

cmp.setup({
    snippet = {
        expand = function(args)
            require('luasnip').lsp_expand(args.body)
        end,
    },
    window = {
        -- uncomment the following if you want bordered completion options
        -- completion = cmp.config.window.bordered(),
        -- documentation = cmp.config.window.bordered(),
    },
    mapping = cmp.mapping.preset.insert({
	    ['<C-p>'] = cmp.mapping.select_prev_item({select = true}),
	    ['<C-n>'] = cmp.mapping.select_next_item({select = true}),
	    ['<C-Space>'] = cmp.mapping.complete(),
	    ['<C-y>'] = cmp.mapping.confirm({select = true}),
    }),
    sources = cmp.config.sources({
        {name = 'nvim_lsp'},
        {name = 'luasnip'},
    }, {
        {name = 'buffer'},
    })
})
There are many ways to configure lsp and completion support. From loading each server and configuring individual capabilities to creating custom language servers and linking them to custom filetypes. This is meant only as an easy-to-implement approach.
Language-specific plugins and configurations
The power of Neovim lies in its unparalleled customization, allowing you to tailor your coding experience to suit your needs, workflow, and preferences. The sheer range of customization options can be overwhelming at first. The following language-specific plugins and configurations will help you get started.
Rust
Install Rust on Fedora with rustup:
## install rustup on Fedora
curl --proto '=https' --tlsv1.2 -sSf https://sh.rustup.rs | sh -s -- --default-toolchain none -y
After installation, source the new environment file by entering . $HOME/.cargo/env or close the terminal and reopen it:
## install the nightly (or stable) toolchain and component clippy
rustup toolchain install nightly --allow-downgrade --profile minimal --component clippy
After installing the nightly toolchain, install the rust-analyzer:
## install the rust-analyzer LSP component from rustup
rustup component add rust-analyzer
LSP Support:
When writing rust in Neovim using the rustaceanvim plugin, it’s important to avoid installing rust-analyzer via Mason, instead, use the rustup component add rust-analyzer command above. This will properly install the LSP to function with rustaceanvim. This avoids downloading the rust-analyzer with the wrong toolchain.
Load plugins:
The two plugins to load with Lazy are:
- rustaceanvim — for a host of extra tools, including lsp, man pages, advanced running capabilities and more.
- nvim-dap — (Debug Adapter Protocol) for added debugging capabilities.
-- for Rust Programming
{'mrcjkb/rustaceanvim', version = '^4', lazy = true, ft = {rust}},
{'mfussenegger/nvim-dap'},
To load the plugins, add them to the plugins table of the ~/.config/nvim/lua/config/lazy.lua file.
--- partial file
-- ~/.config/nvim/lua/config/lazy.lua

local plugins = {
    "nvim-lua/plenary.nvim",
	{"nvim-treesitter/nvim-treesitter", build = ":TSUpdate"},
	{"nvim-telescope/telescope.nvim", tag = "0.1.1",
		requires = { {"nvim-lua/plenary.nvim"}}},
	{"ThePrimeagen/harpoon",branch = "harpoon2",
		dependencies = {"nvim-lua/plenary.nvim"}},
	{"mbbill/undotree"},
	{"tpope/vim-fugitive"},
	--lsp configuration
		{"neovim/nvim-lspconfig"},
		{"hrsh7th/cmp-nvim-lsp"}, --autocompletion
		{"hrsh7th/nvim-cmp"}, --additional autocompletion
		{"L3MON4D3/LuaSnip", version = "v2.*", build = "make install_jsregexp",
			dependencies = {'saadparwaiz1/cmp_luasnip',
				'rafamadriz/friendly-snippets'}}, --snippet engine
		{"williamboman/mason.nvim"}, --lsp manager
		{"williamboman/mason-lspconfig.nvim"}, --lsp configs manager
	--colorscheme
    {'rebelot/kanagawa.nvim'},
    -- for Rust programming
	{'mrcjkb/rustaceanvim', version = '^4', lazy = true, ft = {rust}},
	{'mfussenegger/nvim-dap'},
}
Configure plugins:
In your .config/nvim/after/plugin/ directory, add a rust.lua file for Rust-specific configuration. This example sets up keymaps for the rust-analyzer and dap.
-- ~/.config/nvim/after/plugin/rust.lua

-- find local buffer
local bufnr = vim.api.nvim_get_current_buf()

-- FileType specific keymaps
vim.api.nvim_create_autocmd("FileType", {
  pattern = {"rust", "rs", "Rust"},
  callback = function ()
    vim.schedule(function ()
      vim.keymap.set("n", "<leader>rr", ":RustRun<CR>", {buffer = true})
	  --rustaceanvim remaps
		--code actions
		vim.keymap.set("n", "<leader>ca", function ()
		  vim.cmd.RustLsp('codeAction')
		end, {silent = true, buffer = bufnr})
	  -- hover actions
		vim.keymap.set("n", "<leader>K", function ()
			vim.cmd.RustLsp { 'hover', 'actions' }
        end, {silent = true, buffer = bufnr})
	  --explain error
		vim.keymap.set("n", "<leader>e", function ()
		  vim.cmd('explainError')
		    end, {silent = true, buffer = bufnr})
	end)
  end
})

-- for debugging

local dap = require('dap')
dap.adapters.gdb = {
	type = "executable",
	command = "gdb",
	args = {"-i", "dap"}
}

dap.configurations.rust = {
  {
	name = "Launch",
	type = "gdb",
	request = "launch",
	program = function()
		return vim.fn.input('Path to executable: ', vim.fn.getcwd() .. '/', 'file')
	end,
	cwd = "${workspaceFolder}",
	stopAtBegginingOfMainSubProgram = false,
  }
}
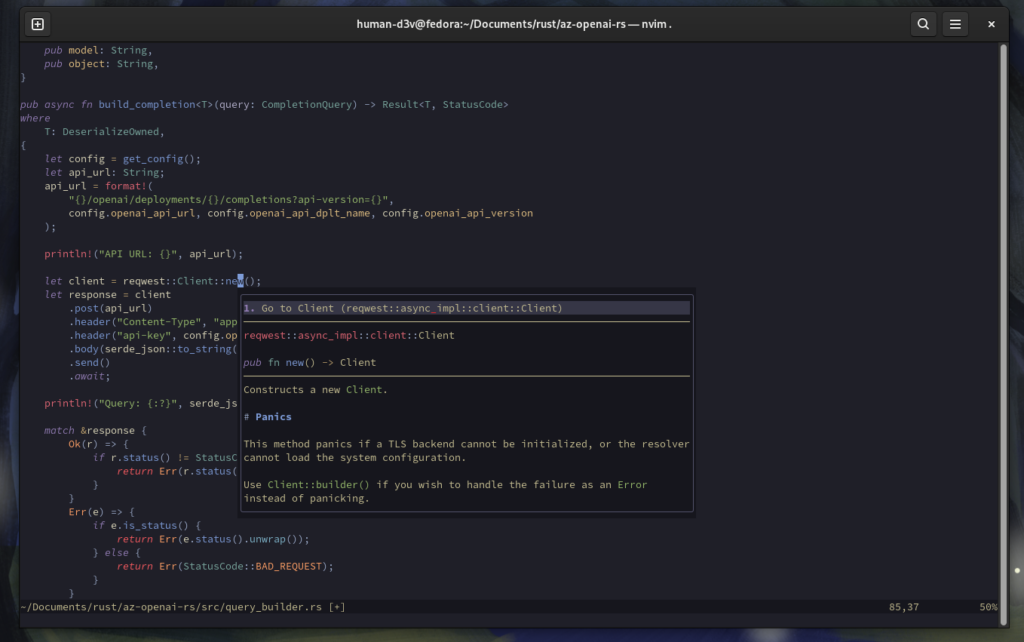
This remaps the following for Rust files using rustaceanvim:
- leader + rr to the Neovim terminal command “:RustRun” to run the current file.
- leader + ca to display the code-action using the Rust LSP.
- leader + K to give the LSP hover capabilities.
- leader + e to explain errors more verbosely.
There are other capabilities available to customize on the usage and features section of the rustaceanvim wiki.
For debugging, the above example uses the gnu project debugger (gpd) in conjunction with the nvim-dap plugin.
Python
If you’re writing python for data science, AI and machine learning, game development, or general programming, Neovim is a great choice.
Installation
To install Python3 on Fedora, you can either install via dnf or build from source (not shown here).
### install the latest version of Python3.12 and pip (python package manager) with dnf
sudo dnf install python3.12 python3-pip
Optional Installation
Common python libraries that can be installed via
- python3-devel – for development headers and libraries.
- python3-virtualenv – for building virtual environments.
- python3-pandas -for working with structured data in dataframes.
- python3-numpy – for working with numerical data in arrays.
### Optional installation
sudo dnf install python3-devel python3-virtualenv python3-pandas python3-numpy
LSP Support
pyright is great for language server support, static type checking, and code completion. It can be installed using :MasonInstall pyright from the command line in Neovim.
Note: pyright requires npm to be installed prior to running. See the Typescript section for instructions on installing npm on Fedora.
Example of data-science specific configuration:
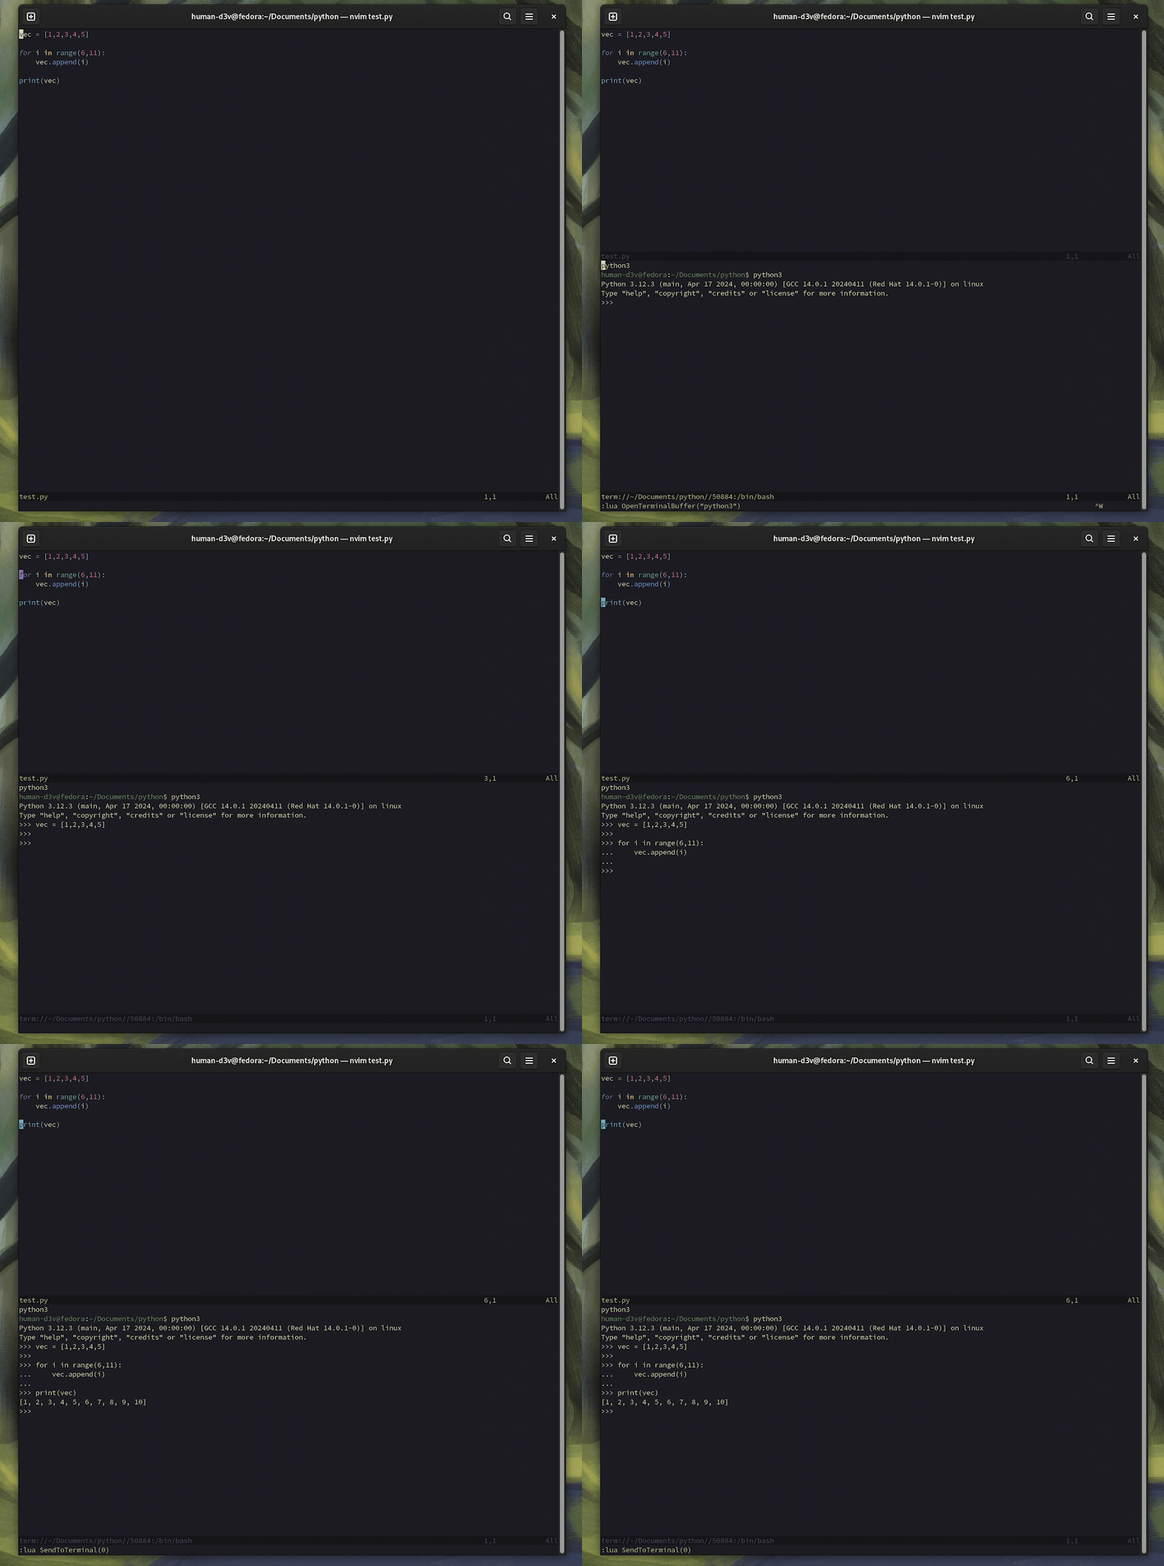
In the R-Programming Language you send commands to a terminal to work with data stored in memory. In order to work in a similar manner, the following functions are used to create a python REPL and send selections of code to be evaluated in the REPL. You can add these functions to a python.lua file in the ~/.config/nvim/after/plugin/ directory.
-- ~/.config/nvim/after/plugin/python.lua

function OpenTerminalBuffer(termType)
    -- open a terminal buffer
    vim.api.nvim_exec2('belowright split | term', {output = true})
    -- save terminal buffer
    local term_buf = vim.api.nvim_get_current_buf()
    vim.api.nvim_chan_send(vim.api.nvim_get_option_value('channel', {buf = term_buf}), termType .. "\r")
end

local function nextLine()
    local current_line = vim.api.nvim_win_get_cursor(0)[1]
	local total_lines = vim.api.nvim_buf_line_count(0)

	for i = current_line+1, total_lines do
		local line_content = vim.api.nvim_buf_get_lines(0, i-1, i, false)[1]
		if line_content:match('^%S') then
			vim.api.nvim_win_set_cursor(0, {i, 0})
			break
		end
	end
end

function SendToTerminal(opt)
   -- 0: send current line to buffer
   -- 1: send visual selection to buffer
   -- 2: send entire file up to and including current line to buffer

   -- extract text from current buffer
   local txt = ''
    if opt == 1 then
        vim.cmd('normal! gv"xy') -- move visual selection to x register
        txt = vim.fn.getreg('x')
        vim.api.nvim_exec2(":'>",{}) -- move cursor to last highlighted line
    elseif opt == 2 then
        local ln, _ = unpack(vim.api.nvim_win_get_cursor(0))
        local line_txts = vim.api.nvim_buf_get_lines(vim.api.nvim_get_current_buf(), 0, ln, false)
        txt = table.concat(line_txts, '\n')
    else
        txt = vim.api.nvim_get_current_line()
   end

    -- move cursor to next non-whitespace line
    nextLine()

    -- locate terminal buffer
   local term_buf = nil
   for _, bufnr in ipairs(vim.api.nvim_list_bufs()) do
        if vim.bo[bufnr].buftype == 'terminal' then
            term_buf = bufnr
            break
        end
    end
    if term_buf == nil then
        print('No terminal buffer found')
        return
    end

    vim.api.nvim_chan_send(vim.api.nvim_get_option_value('channel', {buf = term_buf}), txt .. "\r")
end

vim.api.nvim_create_autocmd('FileType', {
    pattern = {'python'},
    callback = function()
        vim.schedule(function()
            vim.keymap.set('n', '<leader><leader>py', [[:lua OpenTerminalBuffer("python3")<CR>]])
            vim.keymap.set({'v','x'}, '<BSlash>d', [[:lua SendToTerminal(1)<CR>]])
            vim.keymap.set('n', '<BSlash>d', [[:lua SendToTerminal(0)<CR>]])
            vim.keymap.set('n', '<BSlash>aa', [[:lua SendToTerminal(2)<CR>]])
        end)
    end,
})
This creates two global functions OpenTerminalBuffer() and SendToTerminal(),
then remaps keybindings to the following:
- leader + leader +py – Open a python REPL in a terminal buffer.
- \d – Send a visual selection or visual block to the REPL.
- \d – Send the current line to the REPL.
- \aa – Send the entire file up to and including the current line to the
REPL.
TypeScript
Installation
To install TypeScript support on Fedora, you will need Node.js and npm (node package manager). (Or comparable runtime like Bun)
### if you want to install nodejs and npm directly from the fedora repos
sudo dnf install nodejs npm
Next, install TypeScript either to your project or globally:
## locally
npm install typescript --save-dev

## globally
npm install -g typescript
LSP Support
The following LSP’s are helpful in writing TypeScript. They are installed with
mason:
- :MasonInstall tsserver – TypeScript Language Server for LSP support.
- :MasonInstall eslint_d – eslint for linting.
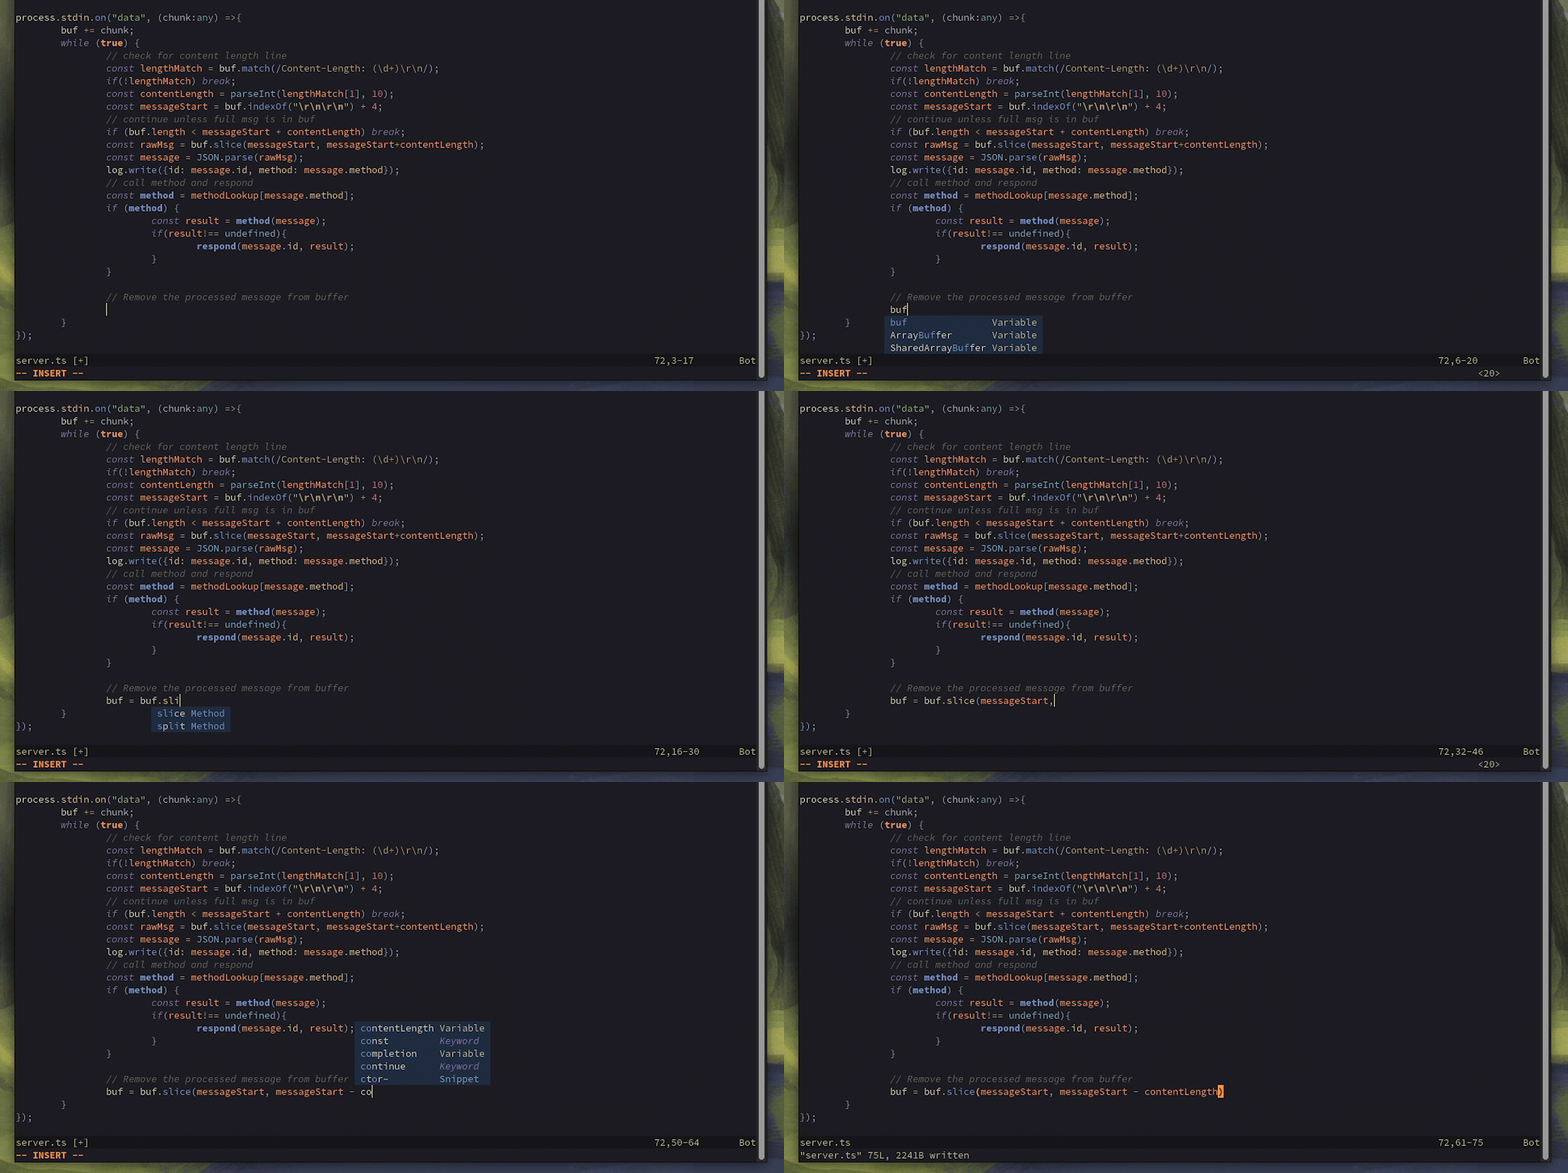
While there are plugins available specifically for typescript like typescript-tools.nvim, LSP support is enough for a basic implementation to work in TypeScript.
Go
Installation
Install Go on Fedora using dnf:
sudo dnf install go
After installation, build the ~/go directory and add Go to your PATH:
# make go directory
mkdir -p ~/go
# add go to path and source .bashrc
echo 'export GOPATH=$HOME/go' >> ~/.bashrc &&
source ~/.bashrc
For more specific information on installation, see the Fedora Developer Portal entry on Go.
LSP support
Install lsp support, formatting, and linting using mason.
- :MasonInstall gopls – the official Go LSP (gopls).
- :MasonInstall gofumpt – a strict formatter (gofumpt).
- :MasonInstall goimports – formatter that removes unused imports and adds referenced imports (goimports).
- :MasonInstall gomodifytags – a go tool used to modify field tags and structs (gomodifytags).
- :MasonInstall golangci-lint – linter (golangci-lint).
- :MasonInstall gotests – a go tool for generating table-driven tests (gotests).
Load plugins
The only plugin to load is go.nvim.
{
  "ray-x/go.nvim",
  dependencies = {"ray-x/guihua.lua"},
  config = function()
    require("go").setup()
  end,
  event = {"CmdlineEnter"},
  ft = {"go", 'gomod'},
  lazy = false,
}
Add this to your ~/.config/nvim/lua/config/lazy.lua plugin table:
--- partial file
-- ~/.config/nvim/lua/config/lazy.lua

local plugins = {
    "nvim-lua/plenary.nvim",
	{"nvim-treesitter/nvim-treesitter", build = ":TSUpdate"},
	{"nvim-telescope/telescope.nvim", tag = "0.1.1",
		requires = { {"nvim-lua/plenary.nvim"}}},
	{"ThePrimeagen/harpoon",branch = "harpoon2",
		dependencies = {"nvim-lua/plenary.nvim"}},
	{"mbbill/undotree"},
	{"tpope/vim-fugitive"},
	--lsp configuration
		{"neovim/nvim-lspconfig"},
		{"hrsh7th/cmp-nvim-lsp"}, --autocompletion
		{"hrsh7th/nvim-cmp"}, --additional autocompletion
		{"L3MON4D3/LuaSnip", version = "v2.*", build = "make install_jsregexp",
			dependencies = {'saadparwaiz1/cmp_luasnip',
				'rafamadriz/friendly-snippets'}}, --snippet engine
		{"williamboman/mason.nvim"}, --lsp manager
		{"williamboman/mason-lspconfig.nvim"}, --lsp configs manager
	--colorscheme
    {'rebelot/kanagawa.nvim'},
    -- for Go programming
    {
       "ray-x/go.nvim",
       dependencies = {"ray-x/guihua.lua"},
       config = function()
         require("go").setup()
       end,
       event = {"CmdlineEnter"},
       ft = {"go", 'gomod'},
       lazy = false,
    }
}
Plugin usage
Since setup() is run when the plugin in loaded, go.nvim doesn’t require a configuration file in the ~/.config/nvim/after/plugin/ directory unless you want to implement custom changes to the configuration. It implements a huge list of commands available from the Neovim command line, simply type :Go and press <tab> to display the possibilites.

General settings
Some general settings to implement include setting relative line numbers, a color column, filetype triggering, and terminal-buffer escaping. These are only a few of the options available to customize. Do this by adding to a settings.lua file in the ~/.config/nvim/lua/config/ directory:
-- ~/.config/nvim/lua/config/settings.lua

-- line numbering
vim.opt.nu = true
vim.opt.relativenumber = true

-- set tab spaces to 4
vim.opt.tabstop = 4
vim.opt.softtabstop = 4
vim.opt.shiftwidth = 4
vim.expandtab = true

-- hand off undoing to undotree plugin and don't keep a swapfile
vim.opt.swapfile = false
vim.opt.backup = false
vim.undodir = os.getenv("HOME") .. "/.vim.undodir"
vim.opt.undofile = true

-- set incremental search. This helps immensly with tricky searches
vim.opt.hlsearch = false
vim.opt.incsearch = true

-- fast update time
vim.opt.updatetime = 50

-- color column to 80 characters
vim.opt.colorcolumn = "80"

-- filetype trigger
vim.opt.filetype='on'

-- set escape to enter normal mode in terminal buffer
vim.keymap.set("t", "<esc>", [[<C-\><C-n>]], {silent = true, noremap = true})
vim.api.nvim_set_keymap("n", "<leader><leader>term", ':belowright split | terminal<CR>',
    {noremap = true, silent=true})
After creating the settings.lua file, add it to the ~/.config/nvim/init.lua file to source it:
-- ~/.config/nvim/lua/config/settings.lua
require('config.lazy')
require('config.settings')
Final directory structure:
If you followed this tutorial to this point, your final directory structure looks like this:
~/.config/nvim/
            ╰- init.lua
            ╰- after/plugin/
                           ╰- cmp.lua
                           ╰- colors.lua
                           ╰- harpoon.lua
                           ╰- lsp.lua
                           ╰- python.lua
                           ╰- rust.lua
                           ╰- telescope.lua
                           ╰- treesitter.lua
                           ╰- undotree.lua
            ╰- lua/config/
                         ╰-lazy.lua
                         ╰-settings.lua
And ~/.config/nvim/lua/config/lazy.lua looks like this:
-- ~/.config/lua/config/lazy.lua

local lazypath = vim.fn.stdpath("data") .. "/lazy/lazy.nvim"
if not (vim.uv or vim.loop).fs_stat(lazypath) then
  vim.fn.system({
    "git",
    "clone",
    "--filter=blob:none",
    "https://github.com/folke/lazy.nvim.git",
    "--branch=stable", -- latest stable release
    lazypath,
  })
end
vim.opt.rtp:prepend(lazypath)

vim.g.mapleader = " " -- the leader key is used in many keymaps

local plugins = {
    "nvim-lua/plenary.nvim",
    {"nvim-treesitter/nvim-treesitter", build = ":TSUpdate"},
    {"nvim-telescope/telescope.nvim", tag = '0.1.6',
        requires = { {"nvim-lua/plenary.nvim"}}},
    {"ThePrimeagen/harpoon", branch = "harpoon2",
        dependencies = {"nvim-lua/plenary.nvim"}},
    {"mbbill/undotree"},
    {"tpope/vim-fugitive"},
    --lsp configuration
        {"neovim/nvim-lspconfig"}, --lsp configs
        {"hrsh7th/cmp-nvim-lsp"}, -- autocompletion
        {"hrsh7th/nvim-cmp"}, --additional autocompletion
        {"L3MON4D3/LuaSnip", version = "v2.*", build = "make install_jsregexp", dependencies = {'saadparwaiz1/cmp_luasnip','rafamadriz/friendly-snippets'}}, --snippet engine
        {"williamboman/mason.nvim"}, --lsp package manager
        {"williamboman/mason-lspconfig.nvim"}, --lsp package manager configs
    --color scheme
    {'rebelot/kanagawa.nvim'},
    -- Rust programming
        {'mrcjkb/rustaceanvim', version = '^4', lazy = true, ft = {rust}},
        {'mfussenegger/nvim-dap'},
    -- Go programming
       {"ray-x/go.nvim", dependencies = {"ray-x/guihua.lua"},
           config = function()
             require("go").setup()
           end,
           event = {"CmdlineEnter"}, ft = {"go", 'gomod'},
           lazy = false},
}

require("lazy").setup(plugins, {})
Out-of-the-box alternative using LazyVim
“All of this configuration is too much work!” – you, probably.
We get it. You want to start writing code now without learning what a Lua table is or how to configure treesitter parsers. You still want a lightweight, fully-integrated development enviroment on Fedora Workstation and you love Vim motions. LazyVim is a great alternative.
LazyVim requires the installation of Neovim using the instructions above.
Stash your current configuration (optional)
If you have already configured Neovim but want to use LazyVim, stash your current confiration with the following commands:
mv ~/.config/nvim{,.bak}
mv ~/.local/state/nvim{,.bak}
mv ~/.local/share/nvim{,.bak}
mv ~/.cache/nvim{,.bak}
Load the starter
### clone starter repository locally to the ~/.config/nvim directory
git clone https://github.com/LazyVim/starter ~/.config/nvim
Open Neovim using the nvim command to see the new interface:
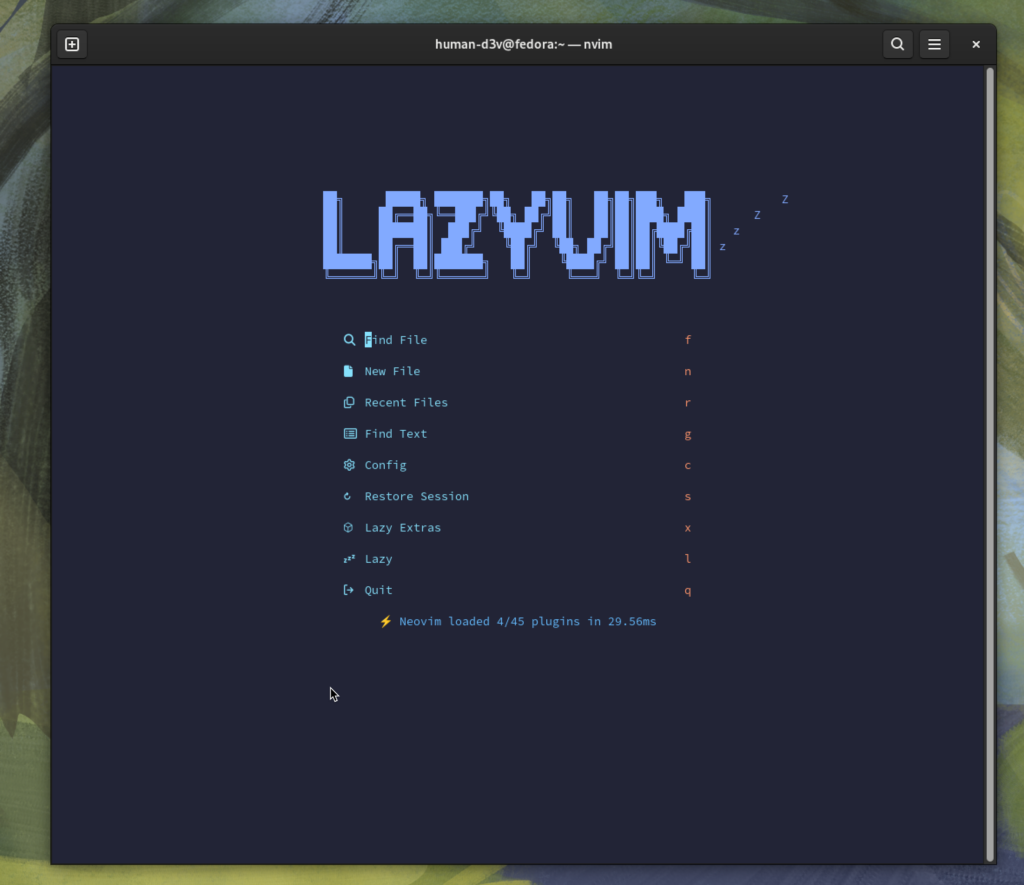
The icons above will only be available if you install a nerd font like JetBrains-Mono.
### install jetbrainsmono and fontawesome
sudo dnf install jetbrains-mono-fonts fontawesome-fonts
Language-specific setup
LazyVim makes it extremely easy to optimize for specific language development. Simply type :LazyExtras to bring up the Extras configuration options.
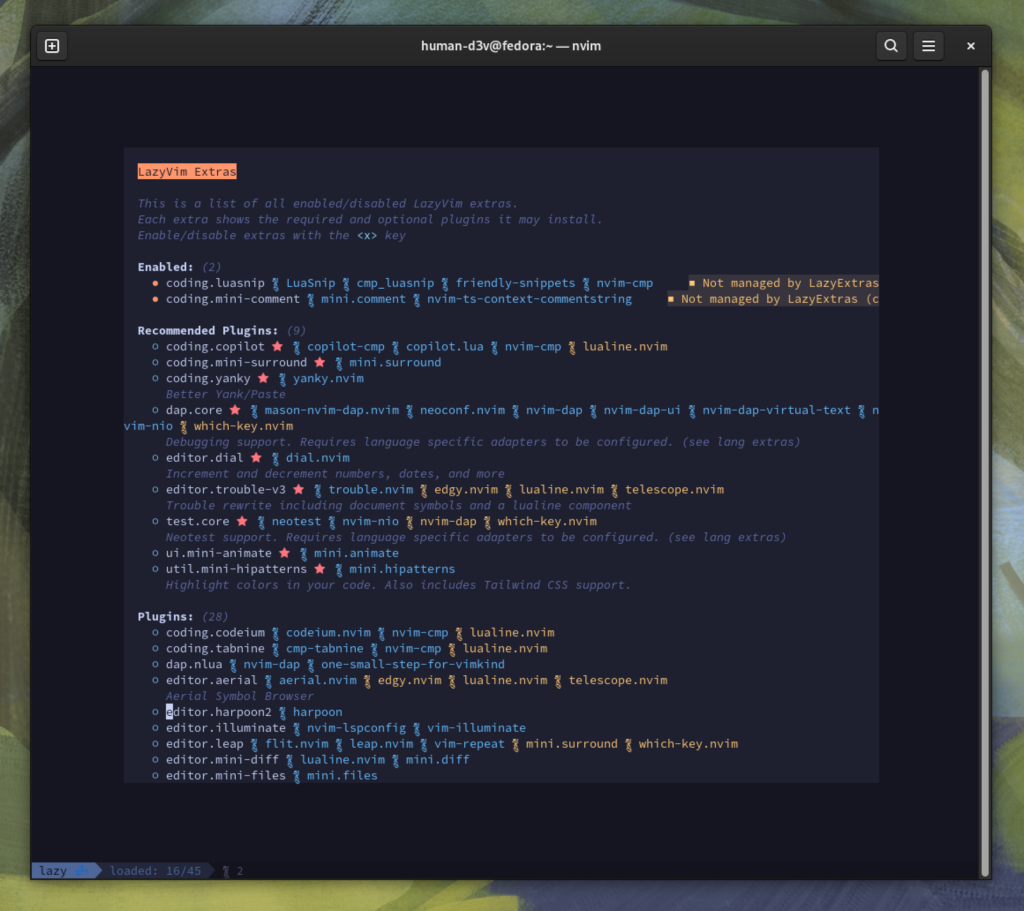
Scroll down the list or search the list with the / (forward-slash) key to find your preferred language. (e.g. lang.go, lang.rust, lang.python, lang.typescript, lang.haskell, etc.) and with the cursor over the line, press the x key to enable that configuration.
Conclusion
Whether you build a bespoke configuration to match your workflow or grab LazyVim for easy development, Fedora offers a reliable, leading-edge platform for software development, data analysis, research, and learning. Happy coding!
:q!



David
Gigachad who wrote this post
hammerhead corvette
I see Telescope and Harpoon. . . You know they’ve watched TJ & The Primeagen !
Darvond
This is neat and all, but I can’t help but notice this deftly avoids mentioning the eccentricities of NeoVim’s keyboard (presumed, mind) layout compared to less sane editors such as Nano, Micro or Ed.
Also, it feels like there’s certain irony in using powerful scripts in this powerful editor while using the straitjacket of desktops, GNOME.
hammerhead corvette
I’ll be honest. I have a handful of plugins, and have barely used them because Vim/Neovim can do so much OOTB. For development, all you really need is an LSP and the native functions. There’s just so mych to do/learn !
It’s a great editor.
Let’s continue the conversation on the forums !
Ketan Baitule
The path should be ~/.config/nvim/lua/config/lazy.lua
Richard England
Corrected. Thank you.
Detlef Leps
This point was still where I was hanging for a moment. One could mention that the directory structure isn’t created automatically. I overread the section before the Lazy Plugin Manager why I thought its more theoretically. At least I’ve reached the target now and I’m very happy with my new IDE. Thank you!
Joka63
I have installed neovim in a toolbox on Fedora Silverblue 40 and tried to install LazyVim. But then I had problems with the nerd fonts: since the terminal runs on the host and not in the toolbox, installing netbrains-mono-fonts and fontawesome-fonts had no effect.
Then I tried to install these font packages with “rpm-ostree install”, but was only partially successful. Netbrains-mono-fonts seems to support only some icons, but many are not rendered properly. Fortunately I found an article how to install nerd fonts on Rocky-Linux: https://docs.rockylinux.org/de/books/nvchad/nerd_fonts/ This guide explains how to install the “IBM Plex Mono” font in the home directory. This font apparently provides all the icons LayzVim requires.
Renich Bon Ćirić
Thank you. I was struggling with the icons. Indeed, installing jetbrains-mono-fonts and fontawesome-fonts didn’t work.
I had to install IBM Plex Mono JetBrains Mono using the install script from NerdFonts.
Thanks agian.
Henrique Picanço
Oh, good to know! I’m getting ready to install Silverblue on my computer, but something like NerdFonts has yet to see how it would work on an atomic system. Is there anything else in the Neovim configuration that changes because of Silverblue?
Jose Nunez
Great article, I always found explanations about NeoVim very convoluted but this piece made it easier to undersand. As a VIM user I would give it a try.
Please keep writing.
Thanks.
Pavel
“The icons above will only be available if you install a nerd font like JetBrains-Mono”
That’s misleading. Nerd Fonts are fonts patched with extra symbols. They cannot be installed with dnf, as they are not in the Fedora repository.
It’s unfortunate that Lazy is using Nerd Fonts by default. One of the main selling points of Neovim is that is can be used over ssh. Non-standard fonts would need to be set up on every terminal program on every system used to connect to the system that runs Neovim. There are so many good choices in standard Unicode.
Pamir
Wow!
Fantastic article.
I’ve recently gotten on with rust and go and use kwrite primarily on kinoite 40 and I know vim too…..will definitely be coming back to this article time and again.
Jarkko Sakkinen
Apologies for a nitpick but given ISO/IEC 80000-13 disruptive changes to unit names and their meanings, I’d recommend even perhaps to make it a guideline in Fedora Magazine articles to unconditionally use kibibytes (KiB), mibibytes (MiB) and gibibytes (GiB).
The reason for this should be dead obvious: ambiguity. I’m referring to “– 100 KB” 😉
Gregory Bartholomew
I understand (and I’ve made the correction in this article). However, I cannot promise that all the volunteer editors will be diligent about making sure the correct units are used in the articles. (You are welcome to point out such errors with comments though. 🙂)
Christian Ramos
The script for the ‘~/.config/nvim/lua/config/lazy.lua’ doesn’t work for me:
/home/junior/.config/nvim/init.lua: E5113: Error while calling lua chunk: vim/_init_packages.lua:0: /home/junior/.config/nvim/lua/config/lazy.lua:9: ” expected near ‘end’