


A few short how-to’s with screenshots, showing easy ways to boot up off a USB live ISO and return back to previous points in time with BTRFS.
Many Linux distributions now default to BTRFS as the standard installation filesystem. Fedora Linux is no exception to that.
2022/23 saw a lot of articles extolling its virtues of easy rollback, stability and so forth. All complete with paragraphs of command line instructions.
Times have changed, the BTRFS infrastructure has matured, and there are now easy to use GUI tools at our fingertips.
No special tools or skills
You may use any standard Fedora Linux ISO image and USB stick.
This article is for people new to Fedora Linux and for those who are familiar with ext4 and Timeshift.
Easy to follow instructions
My experience with Linux goes back quite a long way.
There used to be a time when the Fedora Linux help links often routed to Red Hat Enterprise. This generally targeted the needs of network managers and other system professionals.
Thankfully, for ordinary users the situation has now improved. The Fedora Magazine is one of those reasons.
In the last few years I have been using Fedora Linux as test-bed virtual machines and I have been using Fedora Kinoite on a secondary laptop.
As a daily driver, the thing that most recently stopped me switching to Fedora Linux was not being able to find easy to follow instructions on snapshot recovery during system boot failure.
This article lists the solutions that I finally pieced together.
How to start
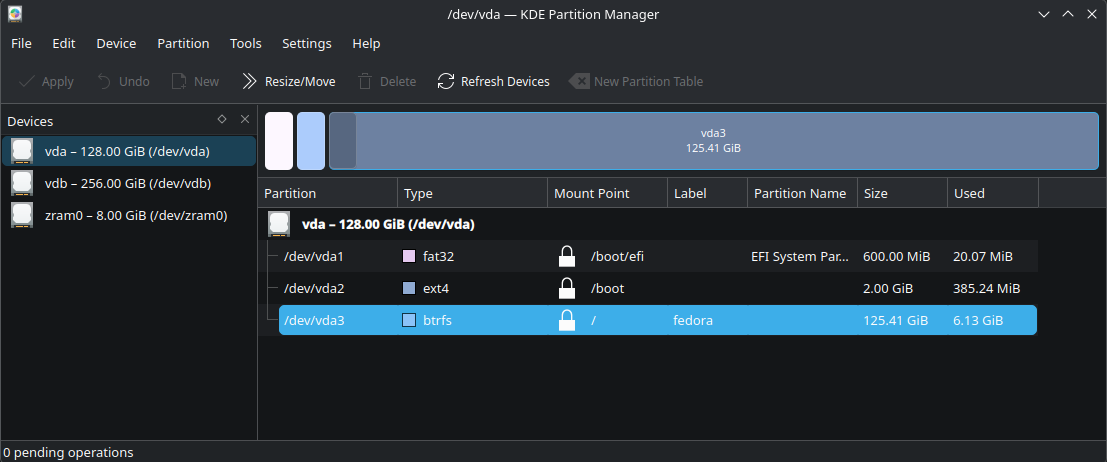
First, make sure that you do actually have your OS running with BTRFS.
This is now normally the case but if you have had your installation for a few years, or someone else installed it for you, it is wise to check.
On Fedora Workstation, with Gnome, try disks or gparted. These two will also install readily on KDE and many users actually prefer them to the KDE partion manager.
Many people welcomed the 2025 decision by the Fedora steering committee to promote KDE to parity status with (Gnome) Workstation. This guide covers both official versions.
If you don’t have Fedora Linux yet, there are also a few notes on general setup as well.
Getting help from the assistant
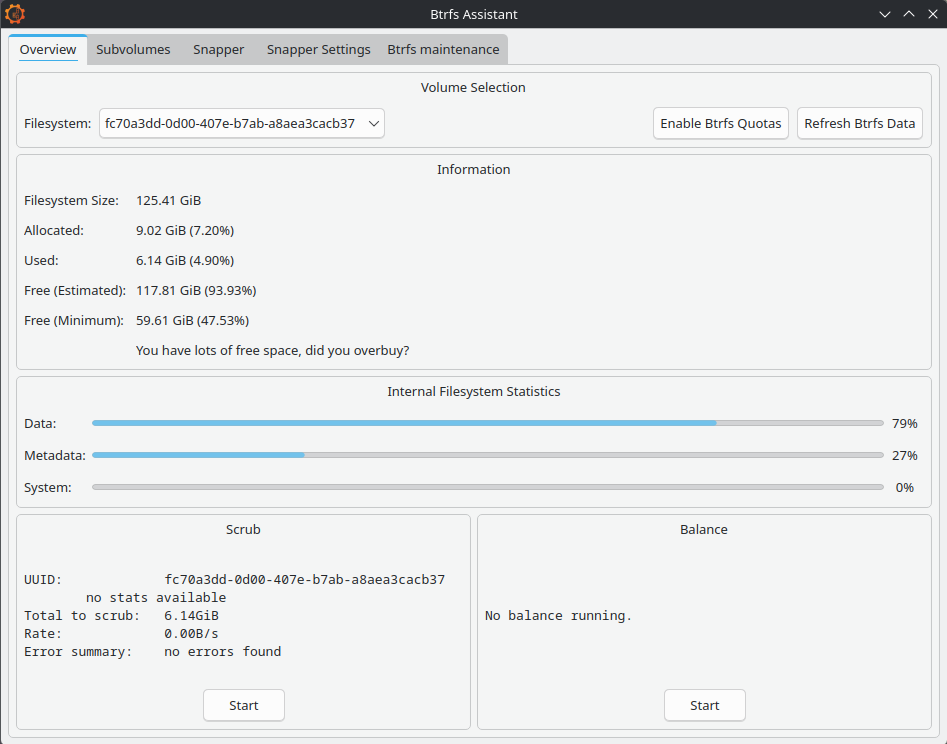
You may have seen btrfs-assistant mentioned in forum discussions. If you don’t already have this program installed, then now is the time to look at doing it.
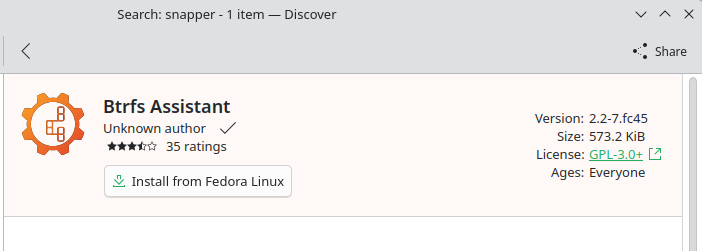
The package only takes a tiny amount of space and also installs snapper. About 4MB in total. Either Gnome Software or KDE Discover are fine. Or you can use dnf on the the command line.
Up and running:
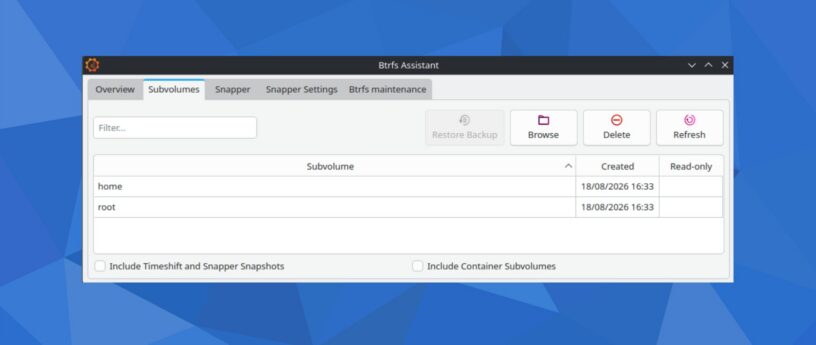
Sub-Volumes
Registration of existing sub-volumes is automatic:
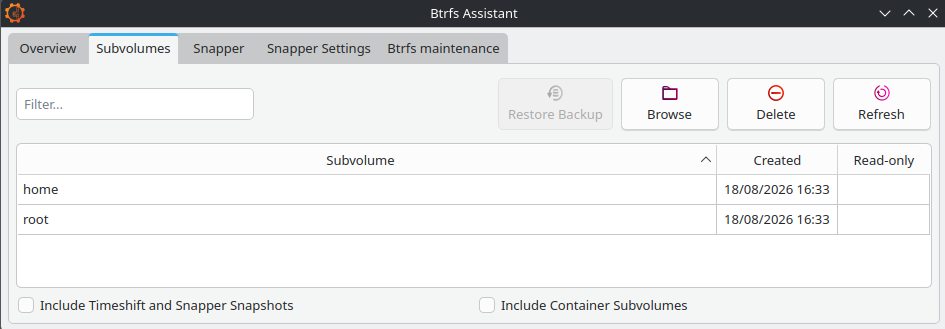
By default, Fedora creates two sub-volume sections on standard installation. We can only see them in the file manager when we boot via a USB live ISO, otherwise we see the volume contents only.
Partition managers such as gparted may show the partition as complete but the file system won’t work unless we have set up the logical sub-volume overlay inside of it.
If you are using Gnome Workstation you may probably see an additional sub-volume ‘/root/var/lib/machines‘ which, unless you are working with container built machines, will be empty. It’s just there to exclude temporary files from any snapshot processes and can be ignored too.
Alternative layouts
Anaconda is the in-house installer and I have been quite impressed with its recent incarnations.
The default installation route is decidedly the easier option at present.
However, for users wanting to add extra sub-volumes, the best method may be right at the start when you are offered the Storage Editor option. If using pre Fedora Linux 45, you can also find it at the top right corner of the interface.
Fedora Linux will happily install alongside your current setup if you want to try things out.
I have found that the best method is to use gparted to prepare a section of non-allocated disk space to offer the installer to work with, rather than offering it a ready made partition.
Post-install adjustments
Creating new sub-volumes requires the command line. This is for advanced users only.
In theory, Blivet-gui claims to be able to do this task but I am yet to be convinced. Btrfs-assistant leaves this bit well alone, which is what we are going to do.
Backups
There isn’t much that we can do with the actual sub-volumes, as they stand. The Copy On Write (CoW) mechanism is there and working. That’s about it.
But backups are always good to have, so make sure that you have got one before you start setting things up for real. We’ll have a look at this in detail later on.
There are btrfs command line methods for sub-volumes using send and receive but the concepts can get quite complex.
Making standard partition backups are much easier using dd or Gnome Disks, just as if we were using ext4, and they are equally effective for basic needs.
Snapshots
These are what really sets BTRFS rollback into a totally different league compared to using Timeshift.
To get this working we are going to use Snapper:
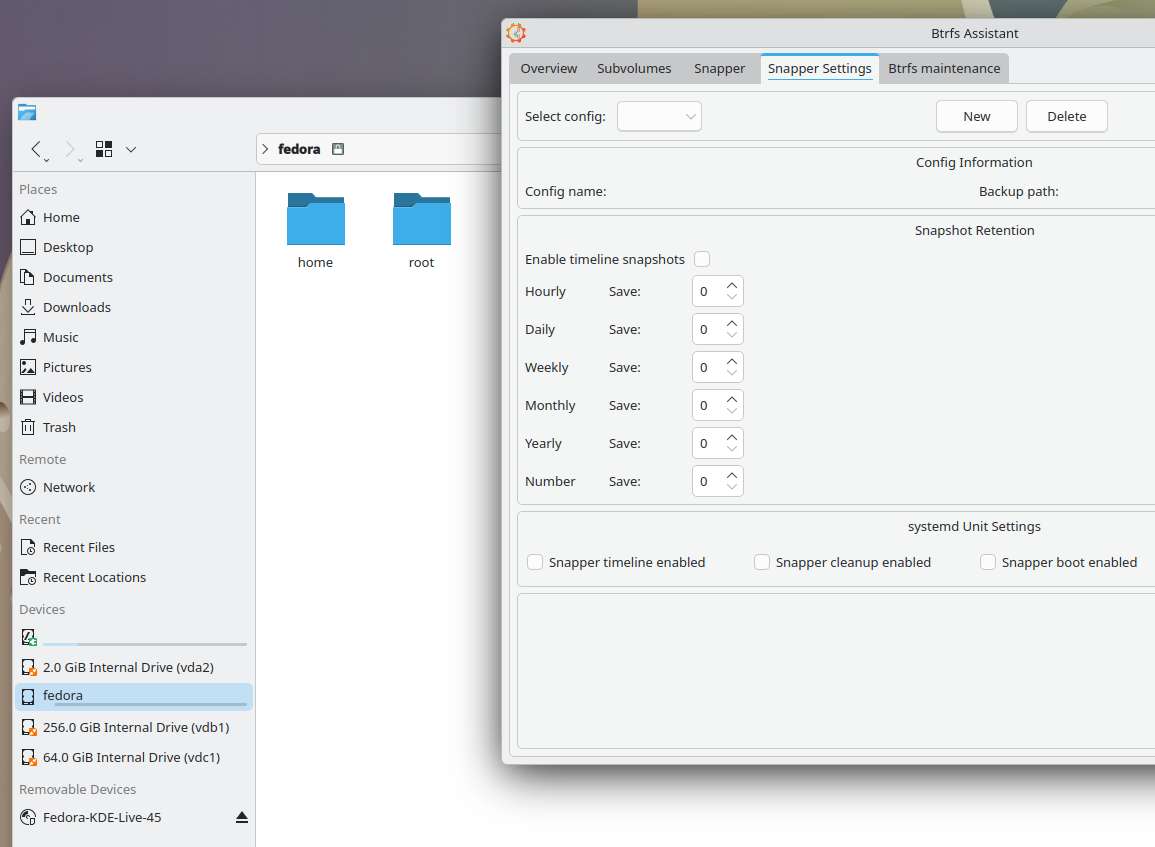
You may find mention on forums about using Timeshift on Fedora Linux BTRFS with Ubuntu style @ sub-volumes. This now no longer works unless you are using something like Linux Mint. It was never probably a good idea to start with but it does illustrate the extents to which people have gone to, and just to get some kind of easy GUI recovery setup going.
We need to set up Snapper before things go wrong.
If you have arrived at this article through a web search and are in difficulties, unless you have previously setup snapshots, you are going to be restricted to using the command line.
Command line btrfs is actually the foundation program used to create and manage the overlay sections. Snapper helps us work with the btrfs snapshots.
Several command line articles are available: https://fedoramagazine.org/?s=btrfs
Snapper configs
The place to start is at the Snapper Settings tab. Click ‘new’ and fill in the details, one for ‘root’ and one for ‘home’:
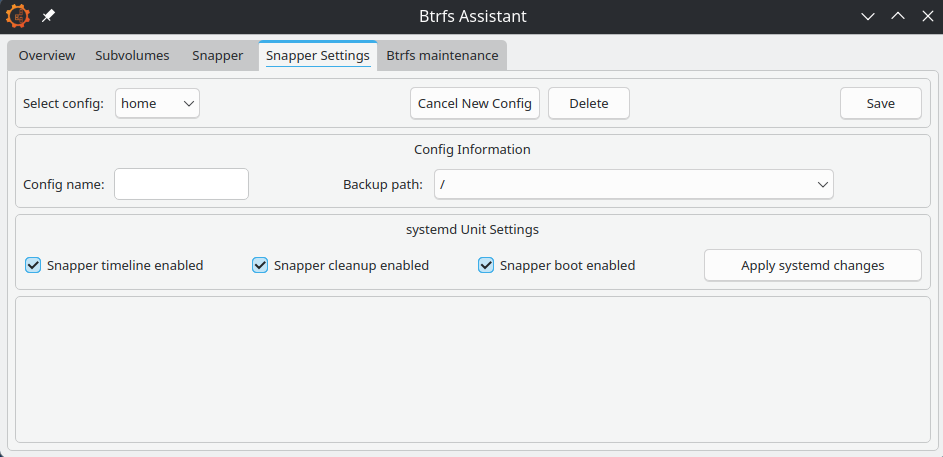
The backup and target paths must both be on the same partition. Otherwise, the docs say that you can place sub-volumes anywhere. BTRFS uses hidden sub-volumes, so placing ‘root’ at ‘/’ and ‘home’ at ‘/home’ is as good a place as any, probably.
In our setup, root means everything except the home folder. And the home folder will neatly hold the home snapshots.
Snapper will place its config files at ‘/etc/snapper’ if you need to find them.
Enable timeline, cleanup and boot. Click the save button.
Numbers
The first config save will set up the config file. We now have to set the numbers.
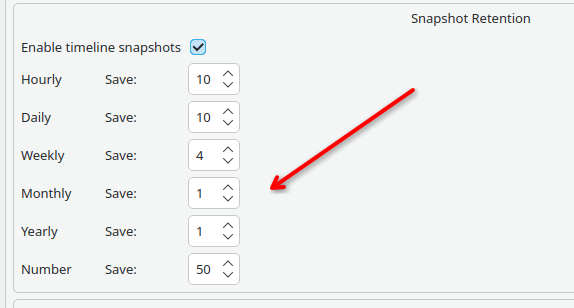
I don’t know if is intentional for Snapper to default to saving 10 whole years of snaps and nothing weekly. Perhaps it’s something to do with openSUSE and and their long term server support program?
For everyday use, these figures need changing. And the root volume needs to be treated differently from the home one.
I am currently evaluating the above set for root, with 15, 10, 5, 3, 1, 50 for home. Although, I am wondering if these these figures could be a bit too high …
The number defines how many snapshots the timeline cleanup algorithm should keep, counting from the youngest.
When done, save again, then apply systemd changes.
Hoarding Junk
Make sure that you don’t get carried away. Snapshots are very easy to take. We’ve all probably seen stories of people filling their houses with 20 years of old newspapers.
One or two snapshots of old kernels and firmware updates might get us out of problems but we don’t really need to keep Gigabytes of these for months on end. Conversely, it could be invaluable to find some small but important documents that got accidentally deleted a few months back without us realizing.
The dangers of system bloat could well be one of the reasons that Fedora Linux doesn’t have snapper already installed.
Creating the snapshots
This is normally fully automated and happens in micro-seconds. A very different scale to ext4 and Timeshift where we are frequently talking of minutes.
Manual snaps are great as well. Maybe just before doing something that could go wrong is a good idea.
If you set up the Snapper boot config option, an instant snapshot will be taken at every boot time, so any errant updates can be very easy to reverse too.
Different copy on write file systems can have both subtle or major differences but the basic b-tree principles tend to remain. If you want a deep dive into the theory, there’s lots out there.
The BTRFS system is continually working on records of what is happening, so data processing requirements are very small. In simple terms we can look at this as making tag at a point in time on a type of continuous and interconnected meta-data event log. When we roll back, we return to the tag and restart the recording on a new branch.
Browsing
Select the Snapper tab and then the sub-tab for Browse/Restore:
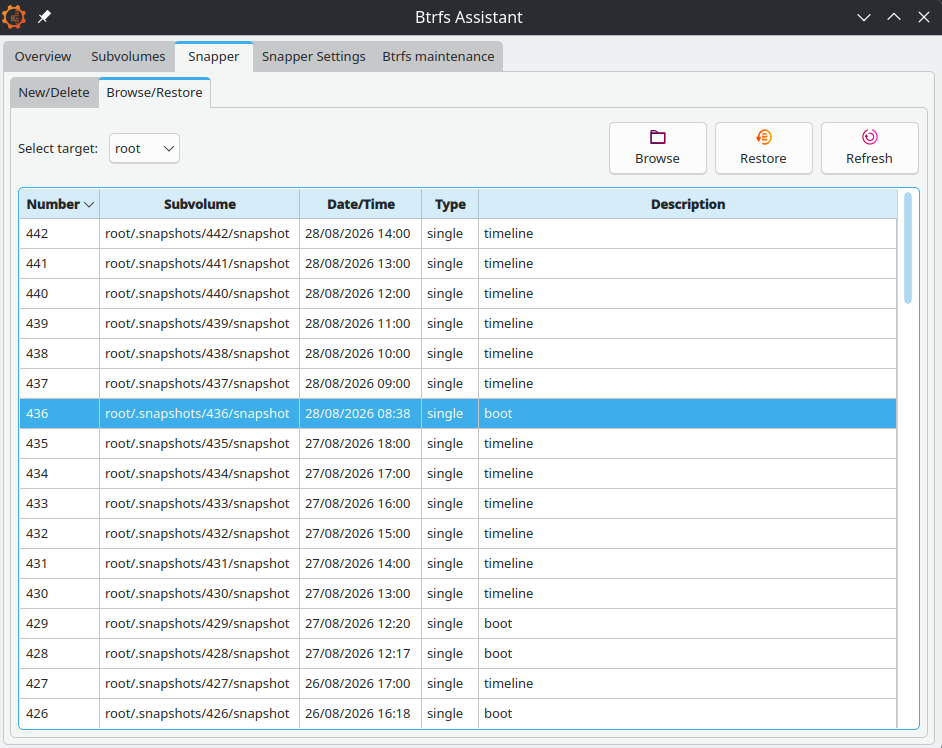
Find the snapshot that you think you need and click on Browse to see what’s in there. The Browse function also lets you restore individual files rather than whole snaps. Keep an eye on the target drop down which will change when you switch tabs.
Deleting
BTRFS is night and day faster than the qcow2 systems used on virtual machines. The same for Timeshift. Only a couple of seconds are needed, even for very old snapshots.
Maintenance
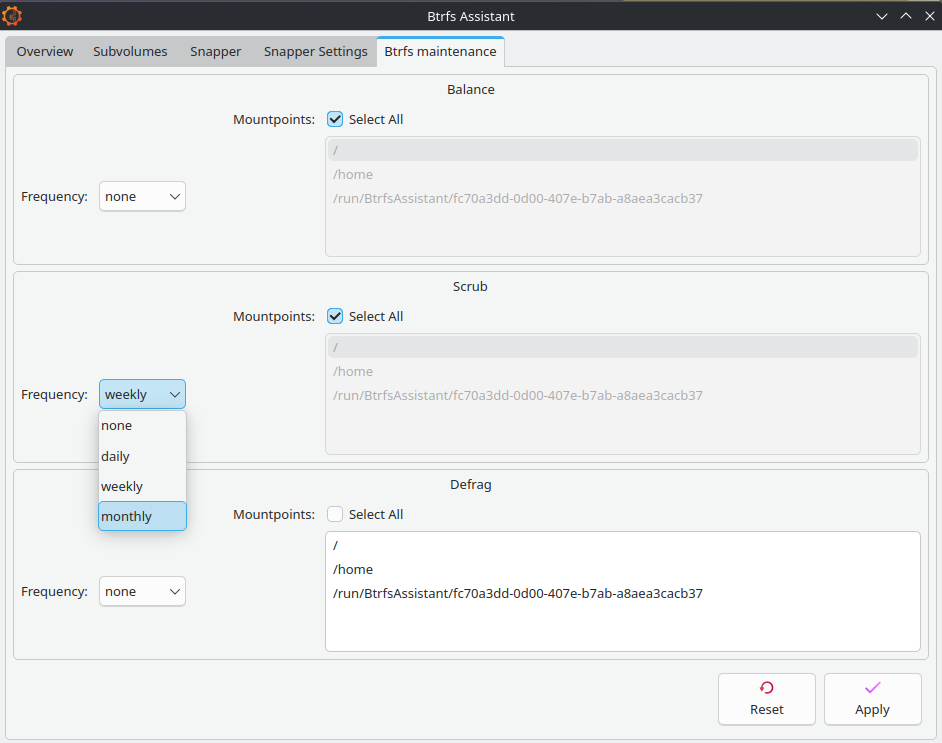
On this tab, scrub is probably the only important one. The docs say this should run at least monthly. If you have done a lot of snapshot rewinding then a manual scrub is a good idea.
Balance is for balancing RAID devices and you only really need defrag if you are running on a mechanical hard drive. An SSD will have its own optimising system built in but you could run defrag manually every year or two if you want.
[Editor Note] Also see the addendum in the comments section.
Live booting
There are some operations that we simply can’t do on an operating system when it’s in use. Instead, we need to use Fedora Media Writer or Gnome Disks to put a downloaded Live ISO onto a USB stick and run things from there. For Disks, right click on the ISO and select open-with Disk Image Writer.
Many of you will be very familiar with this process. But not everybody is aware that many live ISO’s will also allow you to install small amounts of software onto them. This little trick will in fact go on to form a keystone to how we do our system failure recovery.
Downloaded ISO images from https://fedoraproject.org
If preferred, try the Manjaro KDE ISO from https://manjaro.org/products/download/x86 which will also have most of the needed software already there.
Restarts
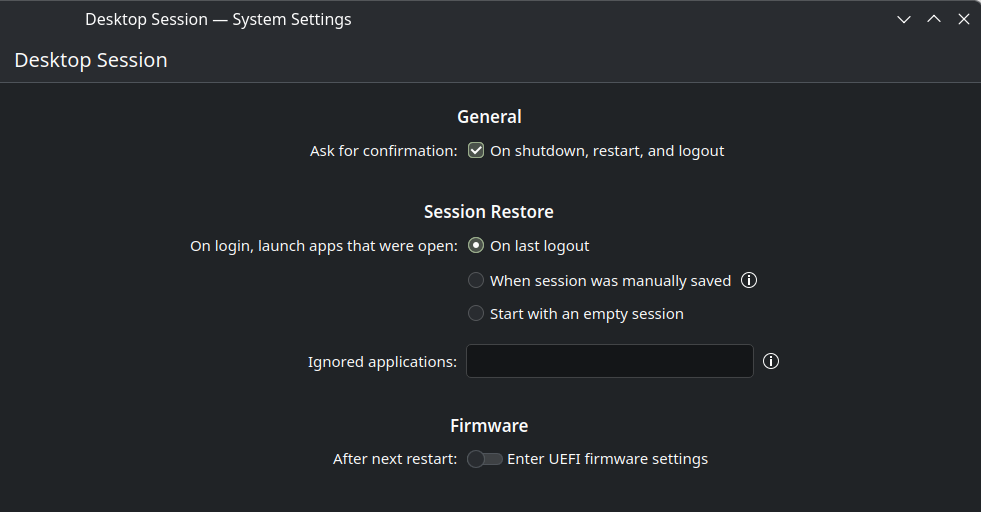
The next stage is to get your computer to boot with the USB; you will need to have either already set your UEFI/BIOS to allow a trigger key during initial starting, usually delete, or you will need to go to the OS settings and request a UEFI restart there:
Staying safe
It’s basic standard good practice to have a recent full backup when doing anything to your system.
Once you have booted the live ISO, if you don’t have a backup, then make sure that you do.
Using Disk‘s GUI interface allows the making of partition images to be fairly straight forward. Gnome Workstation ISO’s will already have Disks ready for you to use. If you are using KDE, set it up using KDE Discover. Otherwise use dnf. The installation is just a few MB.
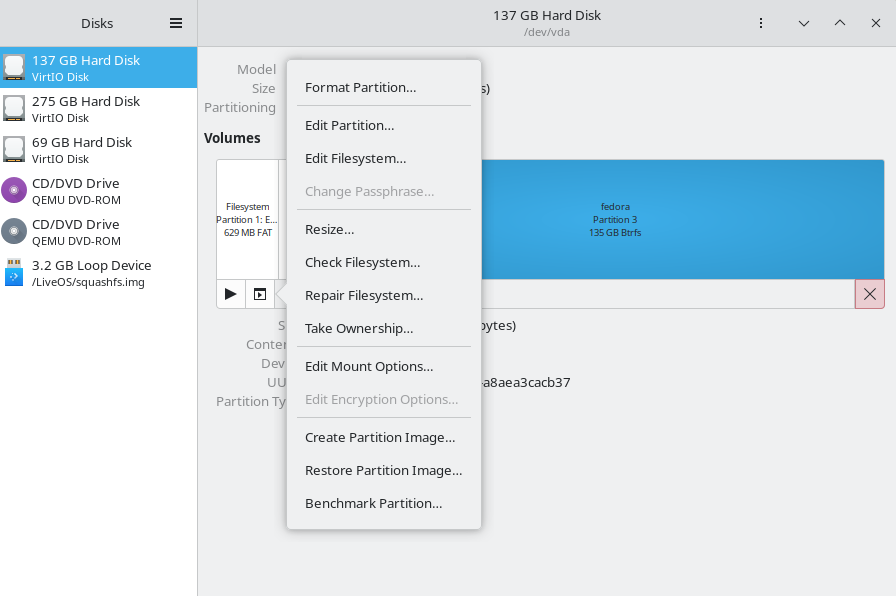
Select the partition, standard click the options button and choose ‘create partition image’.
Backup the boot partitions too. BTRFS makes no copies of these.
The usual cautions if you are thinking of using dd and have never used it before. You need to always pay attention to your input ‘if=’ and your output ‘of=’ or it changes from being a useful disk duplicator into it’s other guise of disk destroyer ….
Also, place your backups on to something reliable. A good quality USB hard-drive is generally viewed as a good choice. They are more resistant to time fading than SSD’s even if they are slower. If you have not heard of ‘bit rot’ there are lots of articles on the web. SSD’s will lose data if they are not regularly powered up.
Partition sizes
You may want to consider partition size adjustment at this point. But do the initial backup first, if you can.
Keeping the size of the OS partition reduced down will make backing up much easier. And you are still going to need further full backups, even with Copy On Write running things.
For more experienced users, there are methods to compress partition backups using dd. Also creating a ‘/dev/zero‘ temp file will help compress even more. You can save lots of space but the .img files have to be fully decompressed in order to mount them, which is a slight down side.
Virtual machines
Problems with computer speed and with excess data can occur when having a two concurrent CoW systems running together. A kind of snowball effect from the host system continually backing up copies of the other backups.
According to the Qemu docs, when keeping virtual machines on a BTRFS partition it is recommend to use the ‘nocow‘ option to avoid performance issues.
For those of you using Gnome Boxes, which comes pre-installed on Workstation, any adjustment of the config files and VM locations is not needed.
Boxes likes to keep its virtual machines out of view in a hidden home folder called ‘.local/share/gnome-boxes/images’ and it tends to work best when left that way. All the image files will already have had CoW disabled.
I can’t say that I have noticed any significant problems when I have carried out short tests. However, the issue is there nevertheless and a general look on the web will yield some quite lively discussion on the matter.
Advanced users may wish to consider running their VMs on a separate ext4 partition as another option.
The nocow +C flag can be easily checked by using lsattr against the image file, if required.
Swap files
Fedora Linux now uses the faster and more modern zram system which compresses the RAM data instead of swapping it to storage.
BTRFS snapshotting will not work if traditional swap files are present in the sub-volume.
If you are running short of RAM, your first option should be adjusting the zram allocation ratios. If you still find that you need a swap file, you will need to create a separate sub-volume to contain it.
Recovery
Having arrived at this point, you should now find this section to be fairly intuitive.
However, do remember to pay attention to root/home continuity. Remember that home will still contain hidden system and config files that are used by programs installed in the root section.
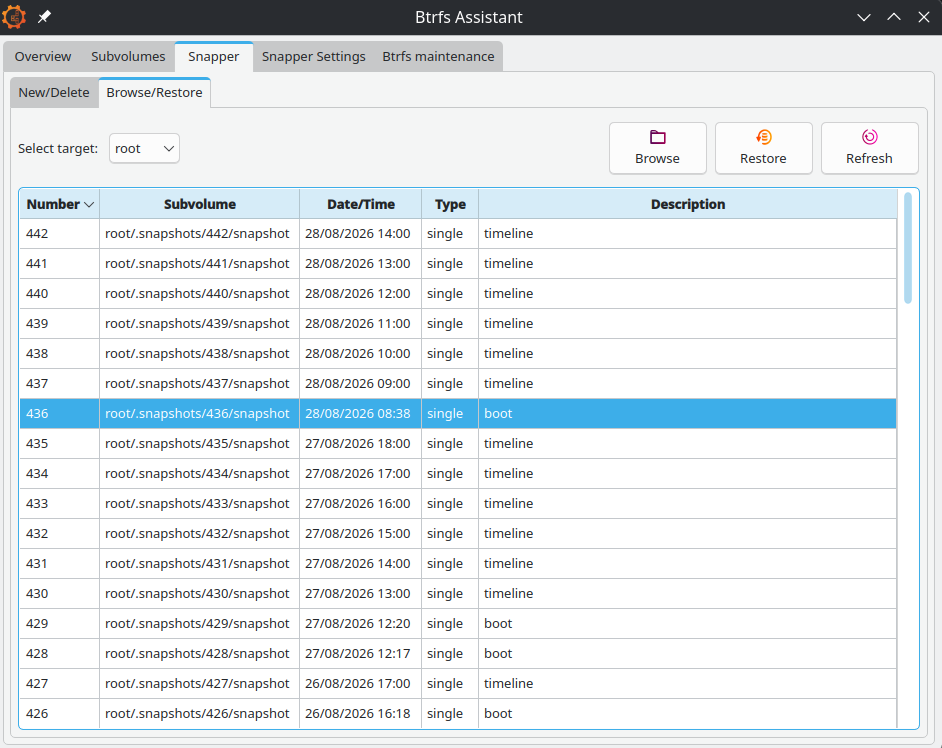
For small problems, where the system still boots, load btrfs-assistant on standard load and roll back to a previous good point.
Importantly, for USB running, start the file manager and mount the partition that you need to fix before installing or running btrfs-assistant or it will fail to work.
In both cases you will be advised to reboot for the request to take effect. The whole process is fairly quick and compared to Timeshift, pretty much instant.
Choosing the right tools
System failure happens to the best of us, given enough time to press enough buttons or to adjust one configuration file too many. But sometimes the failures are caused from upstream, from an unnoticed upstream bug perhaps.
If you are still able to boot into your system, Fedora Linux already features a very quick package reversal system as built-in standard. Sometimes we don’t need to use snapshots at all.
There is a GUI program to run this called dnfdragora:
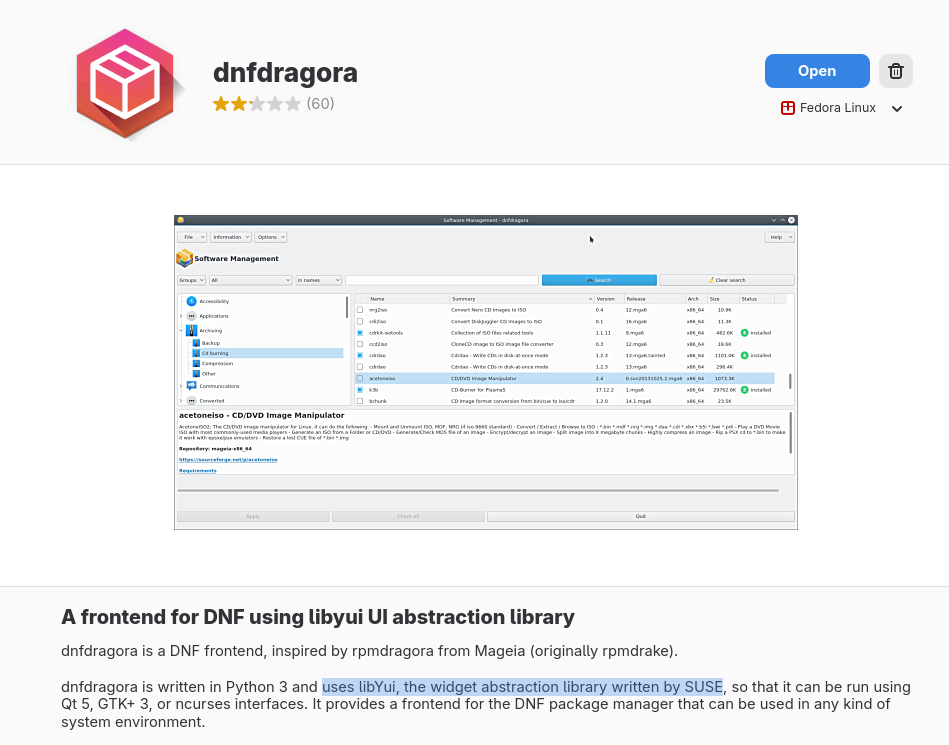
For the sake of completeness, this does need mentioning. However, I would probably argue that in this case the command line is quicker and more intuitive:
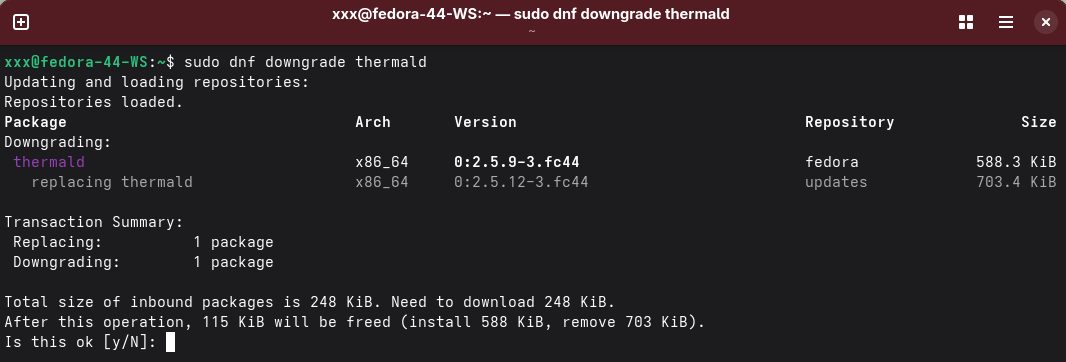
Downgrades work on a simple temporary basis only, so there is no need to re-instate anything at a later stage. When the next batch of updates are available, hopefully with a fix, the package and its associated files become automatically re-upgraded.
Conclusion
This article hopefully updates us to the start of H2 2026.
Should Red Hat support Fedora Linux putting their support behind btrfs-assistant and should we have snapper and snapshots already setup on new installations?
I think the answer to that is yes, and that this is probably going to be happening. But for exactly how and when, we will have to wait to see.
Further improvements will always be in the pipeline.

Would you mind clarifying what you mean by “was never probably a good idea to start with”? Is there something inherently flawed with Ubuntu style @ sub-volumes and/or Timeshift?
I use both Fedora with snapper/BTRFS Assistant and Debian with Timeshift and neither have failed me.
I used BTRFS on my work computer (fedora linux) some years ago and was generally happy. This is a great article describing some nice new tools but the issue I had back then was cleaning up a full file system. On a non BTRFS system this is simple - delete no longer needed files and get some space for new ones. But on BTRFS with snapshots you get no space back because the blocks are still held by snapshots so you would need to find and delete those same files in sometimes multiple snapshots before space is recovered. Hopefully by now there is a better way.
Timeshift on ext4 shouldn’t ‘fail’ you, whether that’s on Fedora Linux or with any other standard system that supports it. It’s only when you start trying to apply Timeshift to BTRFS that the snags and issues start to happen.
I don’t think that there is anything inherently wrong or ‘flawed’ with prefixing BTRFS sub-volumes with an ‘@’ in itself. It certainly does indicate to the user that there’s something non-standard about a folder or section of their file system. But on the other hand, it can make things look all a bit extrapolated and disconnected to standard notation, so I personally prefer the Fedora Linux approach.
The systems are the systems that we have though, whatever the decisions of senior managers or steering committees.
The main point of what I was trying to say, is that it is not generally a good idea to try forcing two basically different systems into configurations that neither set of system developers are expecting to see. If one team is going in direction X and the other team in direction Y, then eventually, at some point, one of the sides will release code that breaks what you are trying to do …
We need to remember that Timeshift is maintained by Linux Mint. Their repo on Github explains the system’s limitations.
An interesting avenue might be spinning up a Mint Debian Edition as a BTRFS virtual machine and seeing how the Mint setup might apply to a standard Debian one, perhaps ?
But having several years of core ‘long term support’ on a desktop that will usually have extra non-updated software added to it over time is something that should also be taken into account …
It can be quite tricky to actually see how much space is really being taken up on a CoW system in general. Sometimes it’s best not to pay too much attention to the figures.
You can get a lot of double counting and false reporting that can make the system seem to be taking up more space than it is.
It’s interesting to see all the general file system add-ons that are getting added to the Linux kernel every month. There have been a lot of recent improvements.
Note: A periodic balance on non-raid devices is useful to prevent premature ENOSPC situations which happen when the filesystem cannot allocate new data or metadata chunks, even if raw disk space appears available.
Yes and No. But also trying to keep things simple and within the scope of easy GUI methods.
Balance is a bit of questionable item when running on single disk. Everyone runs out of disk space at some point > Error No Space (enospc)
Yes, possibly in hind-sight, the article should have expanded a little more on this. Possibly.
The Btrfs docs state on line one that the “primary purpose of the balance feature is to spread block groups across all devices”
They also go on to say that the process can be very intensive and, somewhat ironically, won’t run if there isn’t enough space there to start with.
What they don’t say, at least directly, is that running a balance occasionally may help with adjusting the way that space reported. That’s discussed on a separate a troubleshooting page.
Heavy deletions of files and snapshots can cause the Data reporting to go slightly out of sync with the Meta-Data logs.
The BTRFS-ASSISTANT wiki gives no discussion on the matter, in the same way that it also omits suggestions on snapper numbers.
However, following on from your comment, I did do some looking at the btrfsmaintenance code that installs along with the assistant. These are quite surprisingly old SUSE scripts that have been packaged together. The btfrs balance commands are up-to-date but I am not sure that all the script calls are linking up properly on their journey from the assistant.
If you run the btrfs-assistant balance command from the front menu panel it seems to by-pass the SUSE config script that adds filters to reduce the running intensities.
What I would currently recommend is to run the balance command at the terminal. Adding =50 filters will speed things up considerably.
Try
sudo btrfs balance start -dusage=50 -musage=50 -v /with
sudo btrfs fi usage -b /before and after to see the difference.
There’s also a nifty utility called btrfs-balance-least-used in the python3-btrfs rpm package, that makes balances way faster and smarter by moving less data, in stages.
It is most impressive when used on big, active volumes that where never balanced before, where an unfiltered full balance would take days. In this scenario btrfs-balance-least-used, easily does an unfiltered full balance in just minutes.
Additional notes
The mechanism of system recovery was the main focus of the original article, and I wanted to write things down while my experiences and learning were still fresh and new in my mind.
With my need to get the article finished, I was constrained to place a certain amount of reliance on the official documents.
From extensive further research, there are now some additional observations and clarifications to make on maintenance and configuration.
Then there are the things that we just do automatically. It can be all too easy to forget to mention these important snippets. Power-save disabling is precisely one of those things.
Backup and partition adjustment
Idle time detectors won’t register what is happening. Discard any .img files that have had power supply or idle time interruptions. Even if they appear okay, they will usually contain hidden errors. Repeat any partition restores that have been interrupted too.
On the positive side, something to add is that Gparted is BTRFS aware. Remembering of course that any partition work is never 100% guaranteed, this does mean that Gparted should handle all the sub-volume adjustments. Tests that I have carried out on resizing show this to be the case. This works in both directions.
Snapper
I have now revised my auto-snapshot settings and discovered that man snapper-configs as well as excessive with its defaults, is not as clear as it could be either.
Working out that numbers only refers to the number of boot snapshots and reducing this figure from 50 to 5 saved an estimated 7 GiB of data space and reduced metadata usage by nearly 50%
Note also that boot snaps are only on the root sub-volume and that records of /home are only timeline or manual
Btrfs balance
Looking at, and on reflecting on, the btrfs docs my feeling is that the term balance must have been coined at a time when RAID HDD’s needed to be striped to get faster parallel output of the same file from two drives.
We now want SSD’s in duplicate to cover against drive failure. RAID 1 is now the default.
Although I intially referenced the official documents, my feeling is now that the balance notes are out-of-date and have become somewhat misleading.
The term balance has to now be seen in the framework of general system equilbrium rather than as a method of getting an equal and balanced amount of data onto a parallel pair of drives. Either that or the term should be deprecated and a new one given, like repack, consolidate or reallocate.
I now RECOMMEND putting the btrfs assistant balance setting at weekly
On an SSD with a 150 GiB main partition, the automated
-dusage=10routine takes just over 1 whole second …For a manual space-defragmentation use
sudo btrfs -v balance start -dusage=40 -musage=5 /No more than
-dusage=50 -musage=10In simple terms, try to imagine that the file system divides up and pre-allocates data blocks on the drive. The data gets written to a convenient block and its position and percentage occupancy of the block is recorded by the metadata. A bit like stacking things in boxes and then labeling them.
The metadata blocks need plenty of free space in them to be unimpeded when recording data changes. Compacting these beyond =10 will have negative effects when the disk is getting full. The number of metadata blocks will auto-adjust, depending on drive size and usage, and on the number of snapshots.
Some blocks are full, others only partly. When we balance the drive’s equilibrium, we look for blocks that are somewhat empty and try to fill them up with bits and bobs from somewhere else. This makes the free space less fragmented, easier to write to and easier to measure.
We don’t need to set the data usage filter to any greater than =50 as we can’t fit two blocks with greater than 50% usage in together with each other.
On tests carried out on repeated-roll-back identical state virtual machines,
btrfs balance start -dusage=42 -musage=8 /andbtrfs-balance-least-used -u 42 /were almost identical.Running as high as
btrfs-balance-least-used -u 80 /achieved no more space compaction.On the Snapper 50 to 5 number reduction:
Note the Free (estimated): 73.06GiB and Used: 64.50GiB remain identical. The defragmented space gives a higher MIN free space estimate but the actual free space remains the same.
Resize
Something to note here on the last before/after is the Device slack: 1.00GiB
All SSD’s should be setup with spare unallocated space around the partions. This allows the firmware to trim bad sectors and keep the drive healthy.
I decided to use the command
sudo btrfs filesystem resize -1G /to add a bit of breathing room on the actual partition itself. I am not sure if BTRFS will use this automatically. The docs say that it will use unallocated space in a tight squeeze but whether that means device or volume unallocated is not clear. Irrespectively, I thought at least it could help with an enospc situation.HDD’s
Users that are still running on rotational devices may need to consider using manual only settings for SCRUB
RAID
The Fedora installer will automatically use mkfs.btrfs defaults when two drives are given as targets and will create RAID 1 which creates duplicate (mirrored) disks.
When everyone’s done fighting with Snapper and ready to give up on periodic snapshots, try
btrbkfor a breath of fresh air.Also, I recommend not setting
nodatacowon anything that matters. This sacrifices btrfs data resiliency features; the most prominent being checksums (nodatacowimpliesnodatasum). Might as well run FAT32 at that point (like FAT32, btrfs does not journal).A “daily-driver” VM used for mainstream business applications is likely to perform well even with the underlying virtual disk file highly fragmented – between the VM’s OS disk caching and the host’s OS disk caching the user experience is likely to be just fine.
My personal experience is with Windows guests on btrfs-hosted virtual disks approaching a half million fragments. After one puts away benchmarking toys and starts using the VM for actual work they’re likely to find nothing amiss. Something something perfect enemy of the good and all…
Never saw that before, thanks for pointing that out. I don’t find snapper difficult to use though, especially with BTRFS Assistant.
I’ll try it on a VM, I’m interested to see if I can hook it to grub-btrfs and the automatic snapshotting with dnf operations.