


You love astrophotography. You love Fedora Linux. What if you could do the former using the latter? Capturing stunning and awe-inspiring astrophotographs, processing them, and editing them for printing or sharing online using Fedora is absolutely possible! This tutorial guides you through the process of setting up a computer-guided telescope mount, guide cameras, imaging cameras, and other pieces of equipment. A future article will cover capturing and processing data into pleasing images. Please note that while this article is written with certain aspects of the astrophotography process included or omitted based off my own equipment, you can custom-tailor it to fit your own equipment and experience. Let’s capture some photons!
Installing Fedora Astronomy Lab
This tutorial focuses on Fedora Astronomy Lab, so it only makes sense that the first thing we should do is get it installed. But first, a quick introduction: based on the KDE Plasma desktop, Fedora Astronomy Lab includes many pieces of open source software to aid astronomers in planning observations, capturing data, processing images, and controlling astronomical equipment.
Download Fedora Astronomy Lab from the Fedora Labs website. You will need a USB flash-drive with at least eight GB of storage. Once you have downloaded the ISO image, use Fedora Media Writer to write the image to your USB flash-drive. After this is done, boot from the USB drive you just flashed and install Fedora Astronomy Lab to your hard drive. While you can use Fedora Astronomy Lab in a live-environment right from the flash drive, you should install to the hard drive to prevent bottlenecks when processing large amounts of astronomical data.
Configuring your installation
Before you can go capturing the heavens, you need to do some minor setup in Fedora Astronomy Lab.
First of all, you need to add your user to the dialout group so that you can access certain pieces of astronomical equipment from within the guiding software. Do that by opening the terminal (Konsole) and running this command (replacing user with your username):
My personal setup includes a guide camera (QHY5 series, also known as Orion Starshoot) that does not have a driver in the mainline Fedora repositories. To enable it, ypu need to install the qhyccd SDK. (Note that this package is not officially supported by Fedora. Use it at your own risk.) At the time of writing, I chose to use the latest stable release, 20.08.26. Once you download the Linux 64-bit version of the SDK, to extract it:
tar zxvf sdk_linux64_20.08.26.tgz
Now change into the directory you just extracted, change the permissions of the install.sh file to give you execute privileges, and run the install.sh:
cd sdk_linux64_20.08.26
chmod +x install.sh
sudo ./install.sh
Now it’s time to install the qhyccd INDI driver. INDI is an open source software library used to control astronomical equipment. Unfortunately, the driver is unavailable in the mainline Fedora repositories, but it is in a Copr repository. (Note: Copr is not officially supported by Fedora infrastructure. Use packages at your own risk.) If you prefer to have the newest (and perhaps unstable!) pieces of astronomy software, you can also enable the “bleeding” repositories at this time by following this guide. For this tutorial, you are only going to enable one repo:
sudo dnf copr enable xsnrg/indi-3rdparty-bleeding
Install the driver by running the following command:
sudo dnf install indi-qhy
Finally, update all of your system packages:
To recap what you accomplished in this sectio: you added your user to the dialout group, downloaded and installed the qhyccd driver, enabled the indi-3rdparty-bleeding copr, installed the qhyccd-INDI driver with dnf, and updated your system.
Connecting your equipment
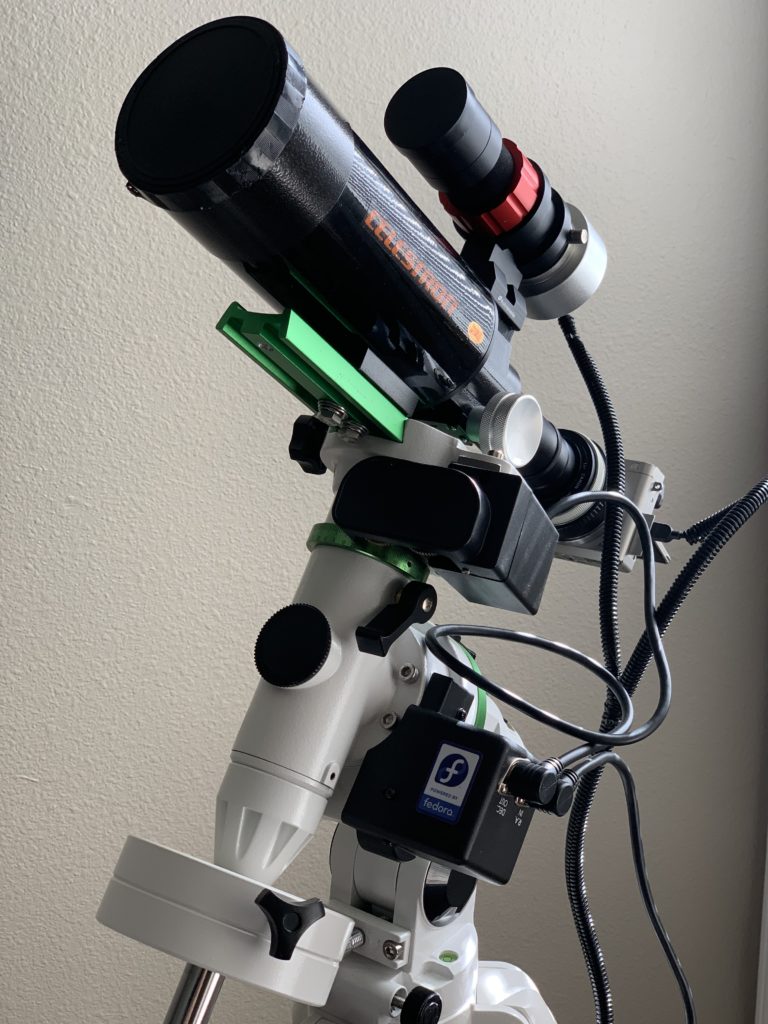
This is the time to connect all your equipment to your computer. Most astronomical equipment will connect via USB, and it’s really as easy as plugging each device into your computer’s USB ports. If you have a lot of equipment (mount, imaging camera, guide camera, focuser, filter wheel, etc), you should use an external powered-USB hub to make sure that all connected devices have adequate power. Once you have everything plugged in, run the following command to ensure that the system recognizes your equipment:
lsusb
You should see output similar to (but not the same as) the output here:
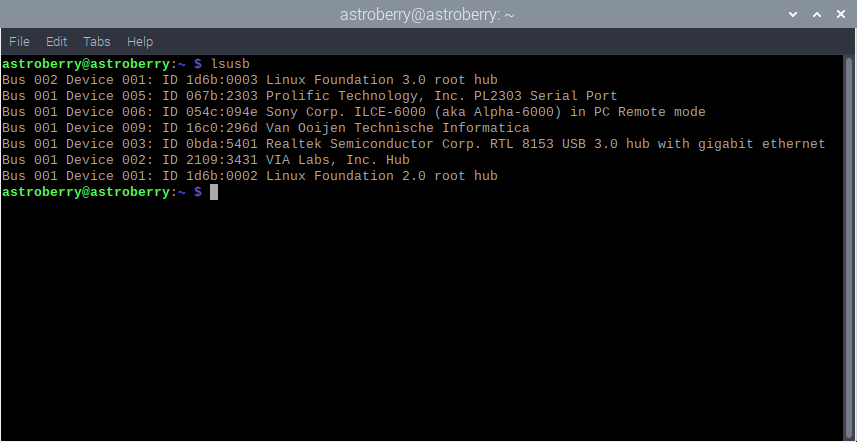
You see in the output that the system recognizes the telescope mount (a SkyWatcher EQM-35 Pro) as Prolific Technology, Inc. PL2303 Serial Port, the imaging camera (a Sony a6000) as Sony Corp. ILCE-6000, and the guide camera (an Orion Starshoot, aka QHY5) as Van Ouijen Technische Informatica. Now that you have made sure your system recognizes your equipment, it’s time to open your desktop planetarium and telescope controller, KStars!
Setting up KStars
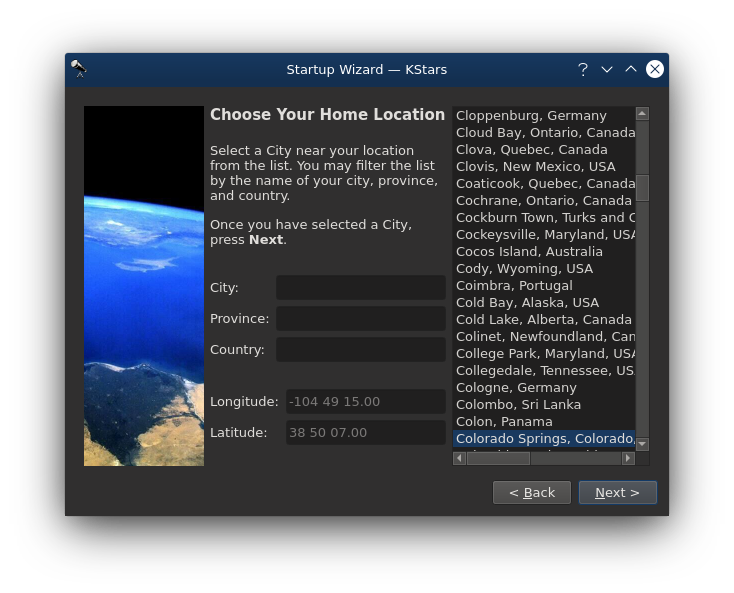
It’s time to open KStars, which is a desktop planetarium and also includes the Ekos telescope control software. The first time you open KStars, you will see the KStars Startup Wizard.
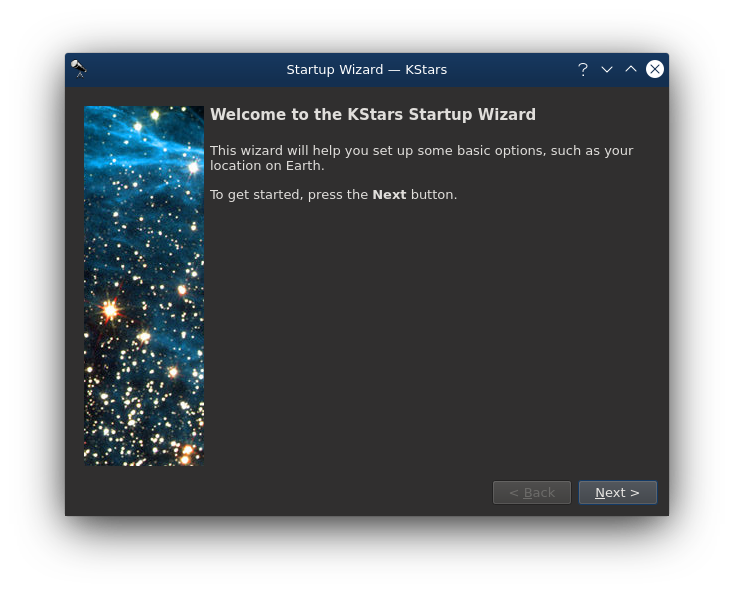
Follow the prompts to choose your home location (where you will be imaging from) and Download Extra Data…
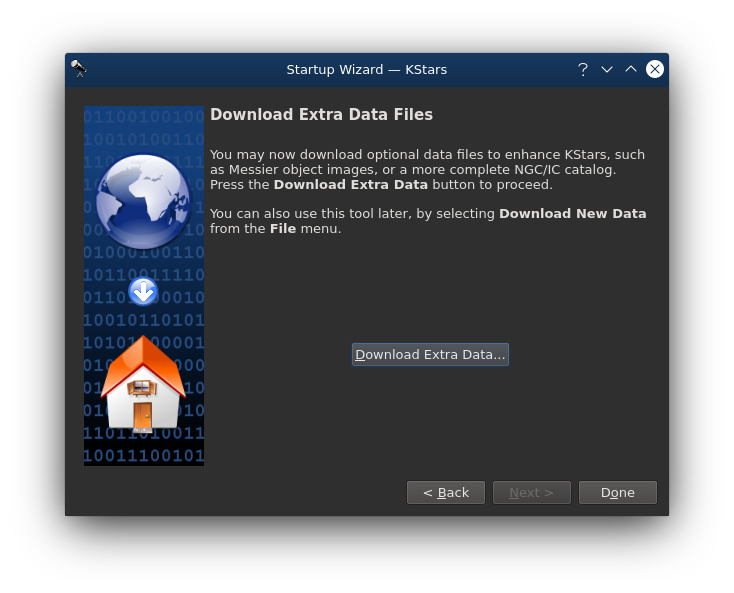

This will allow you to install additional star, nebula, and galaxy catalogs. You don’t need them, but they don’t take up too much space and add to the experience of using KStars. Once you’ve completed this, hit Done in the bottom right corner to continue.
Getting familiar with KStars
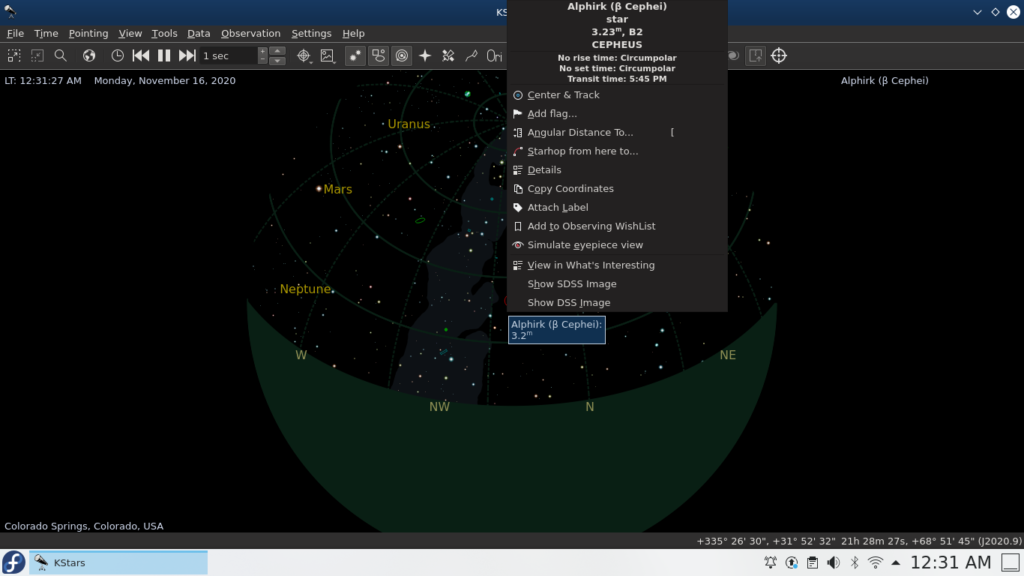
Now is a good time to play around with the KStars interface. You are greeted with a spherical image with a coordinate plane and stars in the sky.

This is the desktop planetarium which allows you to view the placement of objects in the night sky. Double-clicking an object selects it, and right clicking on an object gives you options like Center & Track which will follow the object in the planetarium, compensating for sidereal time. Show DSS Image shows a real digitized sky survey image of the selected object.
Another essential feature is the Set Time option in the toolbar. Clicking this will allow you to input a future (or past) time and then simulate the night sky as if that were the current date.
Configuring capture equipment with Ekos
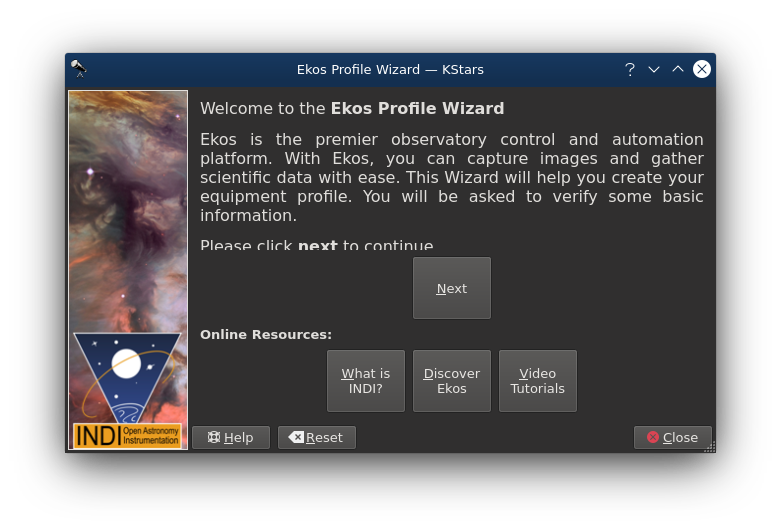
You’re familiar with the KStars layout and some basic functions, so it’s time to move on configuring your equipment using the Ekos observatory controller and automation tool. To open Ekos, click the observatory button in the toolbar or go to Tools > Ekos.
You will see another setup wizard: the Ekos Profile Wizard. Click Next to start the wizard.
In this tutorial, you have all of our equipment connected directly to your computer. A future article we will cover using an INDI server installed on a remote computer to control our equipment, allowing you to connect over a network and not have to be in the same physical space as your gear. For now though, select Equipment is attached to this device.

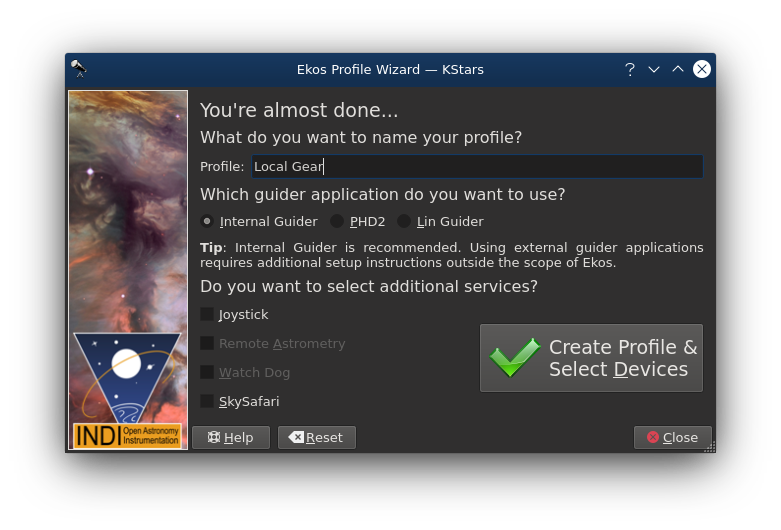
You are now asked to name your equipment profile. I usually name mine something like “Local Gear” to differentiate between profiles that are for remote gear, but name your profile what you wish. We will leave the button marked Internal Guide checked and won’t select any additional services. Now click the Create Profile & Select Devices button.
This next screen is where we can select your particular driver to use for each individual piece of equipment. This part will be specific to your setup depending on what gear you use. For this tutorial, I will select the drivers for my setup.
My mount, a SkyWatcher EQM-35 Pro, uses the EQMod Mount under SkyWatcher in the menu (this driver is also compatible with all SkyWatcher equatorial mounts, including the EQ6-R Pro and the EQ8-R Pro). For my Sony a6000 imaging camera, I choose the Sony DSLR under DSLRs under the CCD category. Under Guider, I choose the QHY CCD under QHY for my Orion Starshoot (and any QHY5 series camera). That last driver we want to select will be under the Aux 1 category. We want to select Astrometry from the drop-down window. This will enable the Astrometry plate-solver from within Ekos that will allow our telescope to automatically figure out where in the night sky it is pointed, saving us the time and hassle of doing a one, two, or three star calibration after setting up our mount.
You selected your drivers. Now it’s time to configure your telescope. Add new telescope profiles by clicking on the + button in the lower right. This is essential for computing field-of-view measurements so you can tell what your images will look like when you open the shutter. Once you click the + button, you will be presented with a form where you can enter the specifications of your telescope and guide scope. For my imaging telescope, I will enter Celestron into the Vendor field, SS-80 into the Model field, I will leave the Driver field as None, Type field as Refractor, Aperture as 80mm, and Focal Length as 400mm.
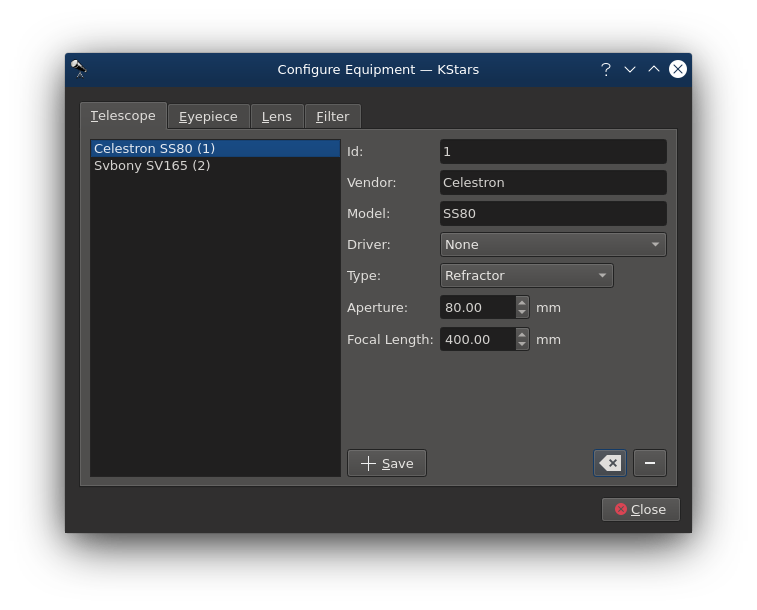
After you enter the data, hit the Save button. You will see the data you just entered appear in the left window with an index number of 1 next to it. Now you can go about entering the specs for your guide scope following the steps above. Once you hit save here, the guide scope will also appear in the left window with an index number of 2. Once all of your scopes are entered, close this window. Now select your Primary and Guide telescopes from the drop-down window.
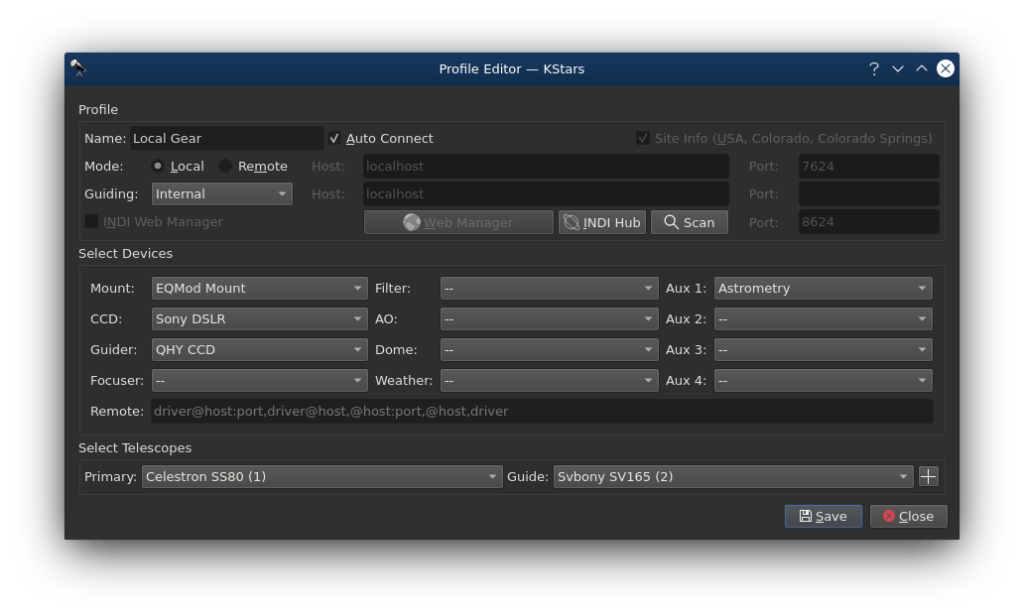
After all that work, everything should be correctly configured! Click the Close button and complete the final bit of setup.
Starting your capture equipment
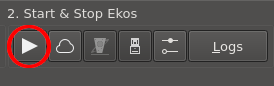
This last step before you can start taking images should be easy enough. Click the Play button under Start & Stop Ekos to connect to your equipment.
You will be greeted with a screen that looks similar to this:
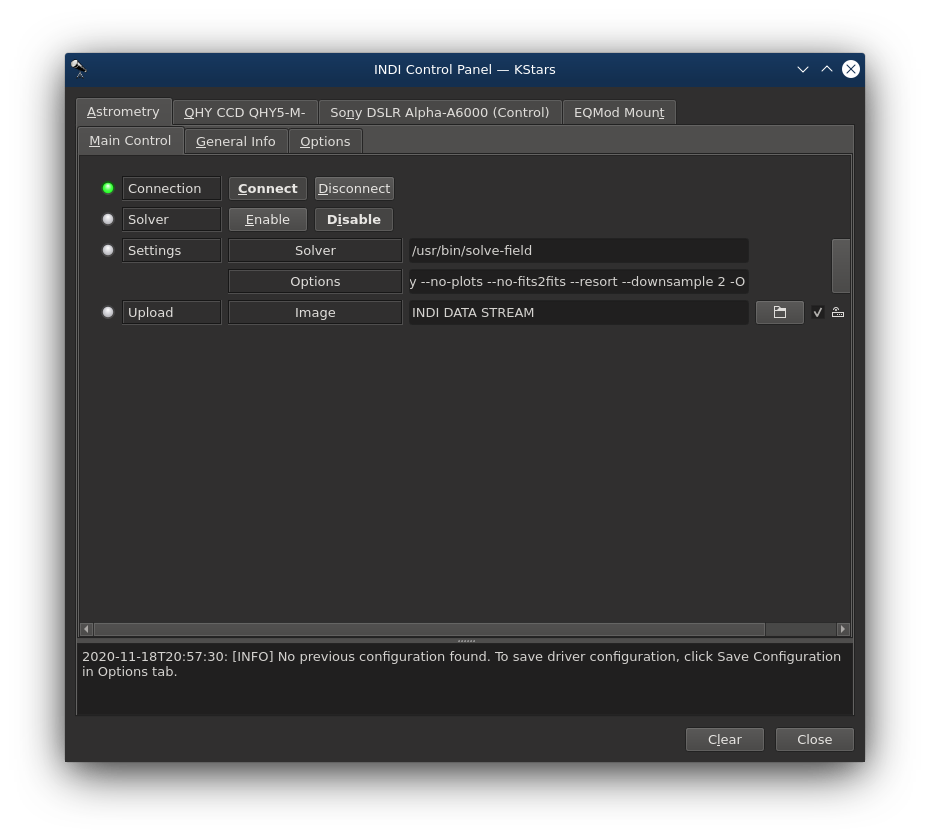
When you click on the tabs at the top of the screen, they should all show a green dot next to Connection, indicating that they are connected to your system. On my setup, the baud rate for my mount (the EQMod Mount tab) is set incorrectly, and so the mount is not connected.
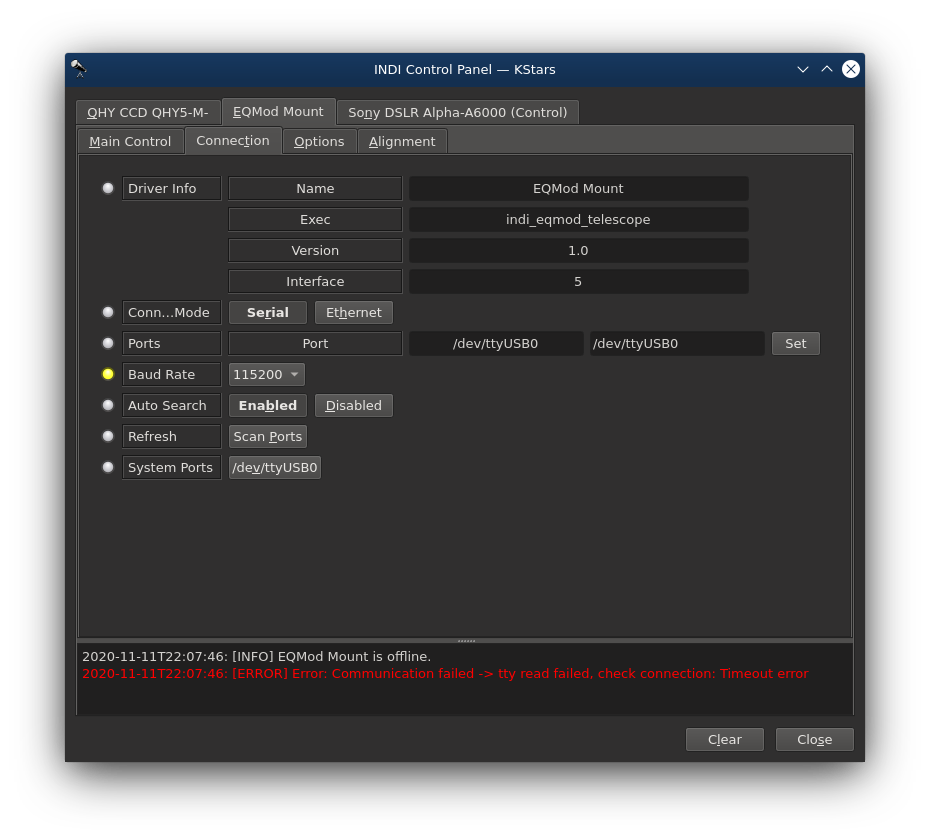
This is an easy fix; click on the EQMod Mount tab, then the Connection sub-tab, and then change the baud rate from 9600 to 115200. Now is a good time to ensure the serial port under Ports is the correct serial port for your mount. You can check which port the system has mounted your device on by running the command:
| grep USBls /dev
You should see ttyUSB0. If there is more than one USB-serial device plugged in at a time, you will see more than one ttyUSB port, with an incrementing following number. To figure out which port is correct. unplug your mount and run the command again.
Now click on the Main Control sub-tab, click Connect again, and wait for the mount to connect. It might take a few seconds, be patient and it should connect.
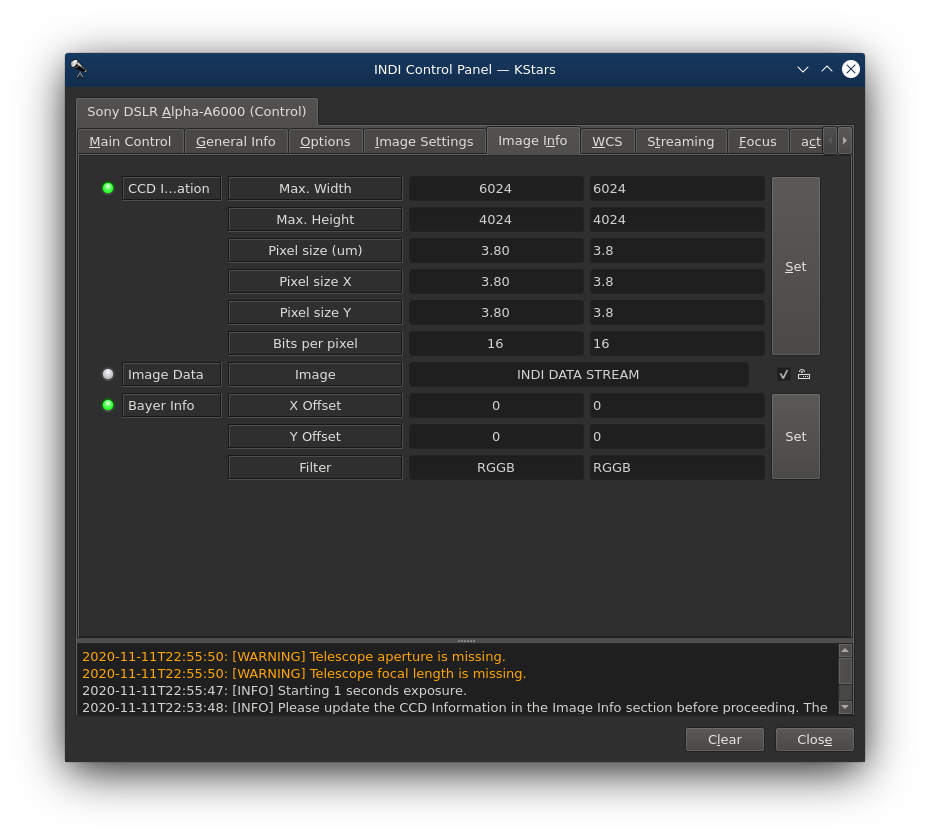
The last thing to do is set the sensor and pixel size parameters for my camera. Under the Sony DSLR Alpha-A6000 (Control) tab, select the Image Info sub-tab. This is where you can enter your sensor specifications; if you don’t know them, a quick search on the internet will bring you your sensor’s maximum resolution as well as pixel pitch. Enter this data into the right-side boxes, then press the Set button to load them into the left boxes and save them into memory. Hit the Close button when you are done.
Conclusion
Your equipment is ready to use. In the next article, you will learn how to capture and process the images.

William
Thanks, very well explained and nice use of opensource software for skywatchers! Can’t wait for episode 2!
Markus
Can you explain also how to attach a RaspberryPi High Quality Camera to a telescope for astrophotography?
Katsuharu Tanaka
It’s far from the essence of Fedora, but the situation depends on what you’re targeting in astrophotography. This is because the larger the aperture of the telescope, the smaller the sensor can take astrophotography.
Paul
I don’t understand this comment.
As I see it, the image scale is dependent on the focal length, not the aperture.
Whether it is useful for astrophotography depends on the angular size of the intended target and whether you are prepared to stitch together a mosaic of images.
Some targets are very small — distant planets, planetary nebulae and most globular clusters for instance — and should not be adversely affected by a large image scale.
Katsuharu Tanaka
Paul
Maybe I didn’t write enough. What I wanted to say was that the target of astrophotography affects the performance of the telescope.
For example, if you want to shoot the moon, you can shoot with Galileo Galilei’s telescope or Rasberry Pi’s camera without doing anything.
However, it is faint .. Yes, I wanted to point out that it is difficult to shoot celestial bodies such as the M1 (Crab Nebula) due to the sensitivity of the sensor without using a large telescope.
That’s why I made a disclaimer because it’s different from the essence of Fedora. It should be noted that some observatory telescopes also incorporate control using Linux.
jo
so great
that is so great. thanks for sharing!
Paul
Anyone know if there is a INDI driver for the Velleman K80955N yet? It is used as my dome controller and the EKOS I now have doesn’t drive it. An ASCOM driver exists within Lesvedome but that is Windows-only
David Jackson
Would it be possible for Fedora to package Davinci?
It’s a program developed by Arizona State University in their Mars program used to manipulate large datasets. Its really useful for post processing DSO images.
There’s a script that requires Davinci written by Roger Clark called rnc-color-stretch that’s very effective at stretching astro images that gives excellent results.
https://davinci.mars.asu.edu/index.php?title=Main_Page
https://clarkvision.com/articles/astrophotography-rnc-color-stretch-m8+m20/
Rob
I see the WiKI hasn’t been updated since 2016 and several of the links to “features” are broken, or don’t point to where they should. What’s with that? Is this an active project?