


The Rosetta@home project is a not-for-profit distributed computing project created by the Baker laboratory at the University of Washington. The project uses idle compute capacity from volunteer computers to study protein structure, which is used in research into diseases such as HIV, Malaria, Cancer, and Alzheimer’s.
In common with many other scientific organizations, Rosetta@home is currently expending significant resources on the search for vaccines and treatments for COVID-19.
Rosetta@home uses the open source BOINC platform to manage donated compute resources. BOINC was originally developed to support the SETI@home project searching for Extraterrestrial Intelligence. These days, it is used by a number of projects in many different scientific fields. A single BOINC client can contribute compute resources to many such projects, though not all projects support all architectures.
For the example shown in this article a Raspberry Pi 3 Model B was used, which is one of the tested reference devices for Fedora IoT. This device, with only 1GB of RAM, is only just powerful enough to be able to make a meaningful contribution to Rosetta@home, and there’s certainly no way the Raspberry Pi can be used for anything else – such as running a desktop environment – at the same time.
It’s also worth mentioning at this point that the first rule of Raspberry Pi computing is to get the recommended power supply. It is important to get as close to the specified 2.5A as you can, and use a good quality micro-usb cable.
Getting Fedora IoT
To install Fedora IoT on a Raspberry Pi, the first step is to download the aarch64 Raw Image from the iot.fedoraproject.org download page.
Then use the arm-image-installer utility (sudo dnf install fedora-arm-installer) to write the image to the SD card. As always, be very sure which device name corresponds to your SD Card before continuing. Check the device with the lsblk command like this:
$ lsblk
NAME      MAJ:MIN RM SIZE RO TYPE MOUNTPOINT
sdb         8:16 1 59.5G  0 disk
└─sdb1      8:17 1 59.5G  0 part /run/media/gavin/154F-1CEC
nvme0n1     259:0 0 477G  0 disk
├─nvme0n1p1 259:1 0 600M  0 part
...
If you’re still not sure, try running lsblk with the SD card removed, then again with the SD card inserted and comparing the outputs. In this case it lists the SD card as /dev/sdb. If you’re really unsure, there are some more tips described in the Getting Started guide.
We need to tell arm-image-installer which image file to use, what type of device we’re going to be using, and the device name – determined above – to use for writing the image. The arm-image-installer utility is also able to expand the filesystem to use the entire SD card at the point of writing the image.
Since we’re not going to use the zezere provisioning server to deploy SSH keys to the Raspberry Pi, we need to specify the option to remove the root password so that we can log in and set it at first boot.
In my case, the full command was:
sudo arm-image-installer --image ~/Downloads/Fedora-IoT-32-20200603.0.aarch64.raw.xz --target=rpi3 --media=/dev/sdb --resizefs --norootpass
After a final confirmation prompt:
= Selected Image:
= /var/home/gavin/Downloads/Fedora-IoT-32-20200603.0.aarc...
= Selected Media : /dev/sdb
= U-Boot Target : rpi3
= Root Password will be removed.
= Root partition will be resized
=====================================================

*****************************************************
*****************************************************
******** WARNING! ALL DATA WILL BE DESTROYED ********
*****************************************************
*****************************************************

 Type 'YES' to proceed, anything else to exit now
the image is written to the SD Card.
...
= Installation Complete! Insert into the rpi3 and boot.
Booting the Raspberry Pi
For the initial setup, you’ll need to attach a keyboard and mouse to the Raspberry Pi. Alternatively, you can follow the instructions for connecting with a USB-to-Serial cable.
When the Raspberry Pi boots up, just type root at the login prompt and press enter.
localhost login: root
[root@localhost~]#
The first task is to set a password for the root user.
[root@localhost~]# passwd
Changing password for user root.
New password:
Retype new password:
passwd: all authentication tokens updated successfully
[root@localhost~]#
Verifying Network Connectivity
To verify the network connectivity, the checklist in the Fedora IoT Getting Started guide was followed. This system is using a wired ethernet connection, which shows as eth0. If you need to set up a wireless connection this can be done with nmcli.
ip addr will allow you to check that you have a valid IP address.
[root@localhost ~]# ip addr
1: lo: <LOOPBACK,UP,LOWER_UP> mtu 65536 qdisc noqueue state UNKNOWN group default qlen 1000
link/loopback 00:00:00:00:00:00 brd 00:00:00:00:00:00
inet 127.0.0.1/8 scope host lo
valid_lft forever preferred_lft forever
inet6 ::1/128 scope host
valid_lft forever preferred_lft forever
2: eth0: <BROADCAST,MULTICAST,UP,LOWER_UP> mtu 1500 qdisc fq_codel state UP group default qlen 1000
link/ether b8:27:eb:9d:6e:13 brd ff:ff:ff:ff:ff:ff
inet 192.168.178.60/24 brd 192.168.178.255 scope global dynamic noprefixroute eth0
valid_lft 863928sec preferred_lft 863928sec
inet6 fe80::ba27:ebff:fe9d:6e13/64 scope link
valid_lft forever preferred_lft forever
3: wlan0: <NO-CARRIER,BROADCAST,MULTICAST,UP> mtu 1500 qdisc fq_codel state DOWN group default qlen 1000
link/ether fe:d3:c9:dc:54:25 brd ff:ff:ff:ff:ff:ff
ip route will check that the network has a default gateway configured.
[root@localhost ~]# ip route
default via 192.168.178.1 dev eth0 proto dhcp metric 100
192.168.178.0/24 dev eth0 proto kernel scope link src 192.168.178.60 metric 100
To verify internet access and name resolution, use ping
[root@localhost ~]# ping -c3 iot.fedoraproject.org
PING wildcard.fedoraproject.org (8.43.85.67) 56(84) bytes of data.
64 bytes from proxy14.fedoraproject.org (8.43.85.67): icmp_seq=1 ttl=46 time=93.4 ms
64 bytes from proxy14.fedoraproject.org (8.43.85.67): icmp_seq=2 ttl=46 time=90.0 ms
64 bytes from proxy14.fedoraproject.org (8.43.85.67): icmp_seq=3 ttl=46 time=91.3 ms

--- wildcard.fedoraproject.org ping statistics ---
3 packets transmitted, 3 received, 0% packet loss, time 2003ms
rtt min/avg/max/mdev = 90.043/91.573/93.377/1.374 ms
Optional: Configuring sshd so we can disconnect the keyboard and monitor
Before disconnecting the keyboard and monitor, we need to ensure that we can connect to the Raspberry Pi over the network.
First we verify that sshd is running
[root@localhost~]# systemctl is-active sshd
active
and that there is a firewall rule present to allow ssh.
[root@localhost ~]# firewall-cmd --list-all
public (active)
  target: default
  icmp-block-inversion: no
  interfaces: eth0
  sources:
  services: dhcpv6-client mdns ssh
  ports:
  protocols:
  masquerade: no
  forward-ports:
  source-ports:
  icmp-blocks:
  rich rules:
In the file /etc/ssh/sshd_config, find the section named
# Authentication
and add the line
PermitRootLogin yes
There will already be a line
#PermitRootLogin prohibit-password
which you can edit by removing the # comment character and changing the value to yes.
Restart the sshd service to pick up the change
[root@localhost ~]# systemctl restart sshd
If all this is in place, we should be able to ssh to the Raspberry Pi.
[gavin@desktop ~]$ ssh root@192.168.178.60
The authenticity of host '192.168.178.60 (192.168.178.60)' can't be established.
ECDSA key fingerprint is SHA256:DLdFaYbvKhB6DG2lKmJxqY2mbrbX5HDRptzWMiAUgBM.
Are you sure you want to continue connecting (yes/no/[fingerprint])? yes
Warning: Permanently added '192.168.178.60' (ECDSA) to the list of known hosts.
root@192.168.178.60's password:
Boot Status is GREEN - Health Check SUCCESS
Last login: Wed Apr  1 17:24:50 2020
[root@localhost ~]#
It’s now safe to log out from the console (exit) and disconnect the keyboard and monitor.
Disabling unneeded services
Since we’re right on the lower limit of viable hardware for Rosetta@home, it’s worth disabling any unneeded services. Fedora IoT is much more lightweight than desktop distributions, but there are still a few optimizations we can do.
Like disabling bluetooth, Modem Manager (used for cellular data connections), WPA supplicant (used for Wi-Fi) and the zezere services, which are used to centrally manage a fleet of Fedora IoT devices.
[root@localhost /]# for serviceName in bluetooth ModemManager wpa_supplicant zezere_ignition zezere_ignition.timer zezere_ignition_banner; do
   sudo systemctl stop $serviceName;
   sudo systemctl disable $serviceName;
   sudo systemctl mask $serviceName;
   done
Getting the BOINC client
Instead of installing the BOINC client directly onto the operating system with rpm-ostree, we’re going to use podman to run the containerized version of the client.
This image uses a volume mount to store its data, so we create the directories it needs in advance.
[root@localhost ~]# mkdir -p /opt/appdata/boinc/slots /opt/appdata/boinc/locale
We also need to add a firewall rule to allow the container to resolve external DNS names.
[root@localhost ~]# firewall-cmd --permanent --zone=trusted --add-interface=cni-podman0 success [root@localhost ~]# systemctl restart firewalld
Finally we are ready to pull and run the BOINC client container.
[root@localhost ~]# podman run --name boinc -dt -p 31416:31416 -v /opt/appdata/boinc:/var/lib/boinc:Z -e BOINC_GUI_RPC_PASSWORD="blah"  -e BOINC_CMD_LINE_OPTIONS="--allow_remote_gui_rpc"  boinc/client:arm64v8
Trying to pull...
...
...

787a26c34206e75449a7767c4ad0dd452ec25a501f719c2e63485479f...
We can inspect the container logs to make sure everything is working as expected:
[root@localhost ~]# podman logs boinc
20-Jun-2020 09:02:44 [---] cc_config.xml not found - using defaults
20-Jun-2020 09:02:44 [---] Starting BOINC client version 7.14.12 for aarch64-unknown-linux-gnu
...
...
...
20-Jun-2020 09:02:44 [---] Checking presence of 0 project files
20-Jun-2020 09:02:44 [---] This computer is not attached to any projects
20-Jun-2020 09:02:44 Initialization completed
Configuring the BOINC container to run at startup
We can automatically generate a systemd unit file for the container with podman generate systemd.
[root@localhost ~]# podman generate systemd --files --name boinc
/root/container-boinc.service
This creates a systemd unit file in root’s home directory.
[root@localhost ~]# cat container-boinc.service
# container-boinc.service
# autogenerated by Podman 1.9.3
# Sat Jun 20 09:13:58 UTC 2020

[Unit]
Description=Podman container-boinc.service
Documentation=man:podman-generate-systemd(1)
Wants=network.target
After=network-online.target

[Service]
Environment=PODMAN_SYSTEMD_UNIT=%n
Restart=on-failure
ExecStart=/usr/bin/podman start boinc
ExecStop=/usr/bin/podman stop -t 10 boinc
PIDFile=/var/run/containers/storage/overlay-containers/787a26c34206e75449a7767c4ad0dd452ec25a501f719c2e63485479fbe21631/userdata/conmon.pid
KillMode=none
Type=forking

[Install]
WantedBy=multi-user.target default.target
We install the file by moving it to the appropriate directory.
[root@localhost ~]# mv -Z container-boinc.service  /etc/systemd/system
[root@localhost ~]# systemctl enable /etc/systemd/system/container-boinc.service
Created symlink /etc/systemd/system/multi-user.target.wants/container-boinc.service → /etc/systemd/system/container-boinc.service.
Created symlink /etc/systemd/system/default.target.wants/container-boinc.service → /etc/systemd/system/container-boinc.service.
Connecting to the Rosetta Stone project
You need to create an account at the Rosetta@home signup page, and retrieve your account key from your account home page. The key to copy is the “Weak Account Key”.
Finally, we execute the boinccmd configuration utility inside the container using podman exec, passing the Rosetta@home url and our account key.
[root@localhost ~]# podman exec boinc boinccmd --project_attach https://boinc.bakerlab.org/rosetta/ 2160739_cadd20314e4ef804f1d95ce2862c8f73
Running podman logs –follow boinc will allow us to see the container connecting to the project. You will probably see errors of the form
20-Jun-2020 10:18:40 [Rosetta@home] Rosetta needs 1716.61 MB RAM but only 845.11 MB is available for use.
This is because most, but not all, of the work units in Rosetta@Home require more memory than we have to offer. However, if you leave the device running for a while, it should eventually get some jobs to process. The polling interval seems to be approximately 10 minutes. We can also tweak the memory settings using BOINC manager to allow BOINC to use slightly more memory. This will increase the probability that Rosetta@home will be able to find tasks for us.
Installing BOINC Manager for remote access
You can use dnf to install the BOINC manager component to remotely manage the BOINC client on the Raspberry Pi.
[gavin@desktop ~]$ sudo dnf install boinc-manager
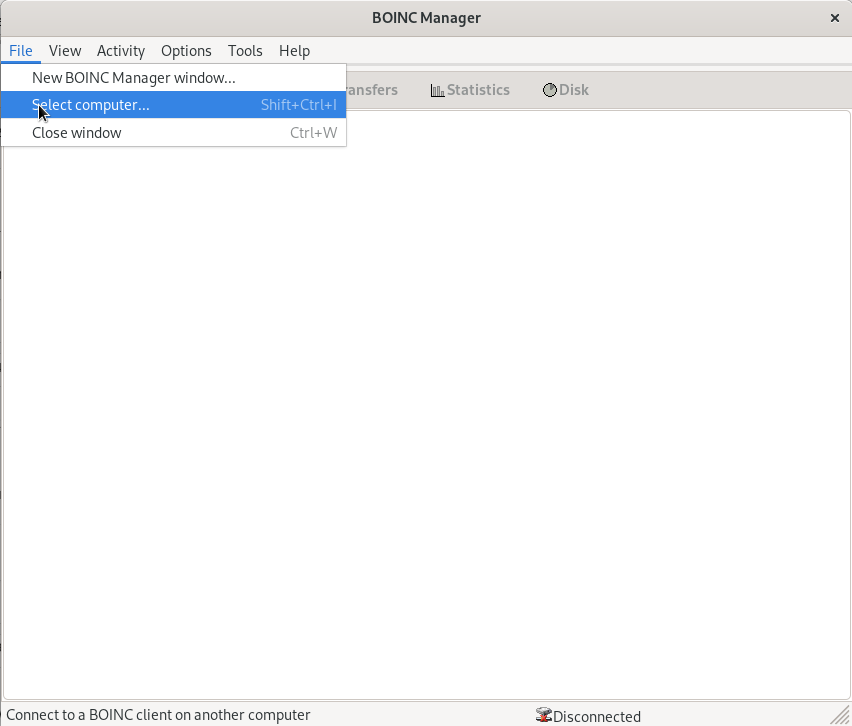
If you switch to “Advanced View” , you will be able to select “File -> Select Computer” and connect to your Raspberry Pi, using the IP address of the Pi and the value supplied for BOINC_GUI_RPC_PASSWORD in the podman run command, in my case “blah“.
Under “Options -> Computing Preferences”, increase the value for “When Computer is not in use, use at most _ %”. I’ve been using 93%; this seems to allow Rosetta@home to schedule work on the pi, whilst still leaving it just about usable. It is possible that further fine tuning of the operating system might allow this percentage to be increased.
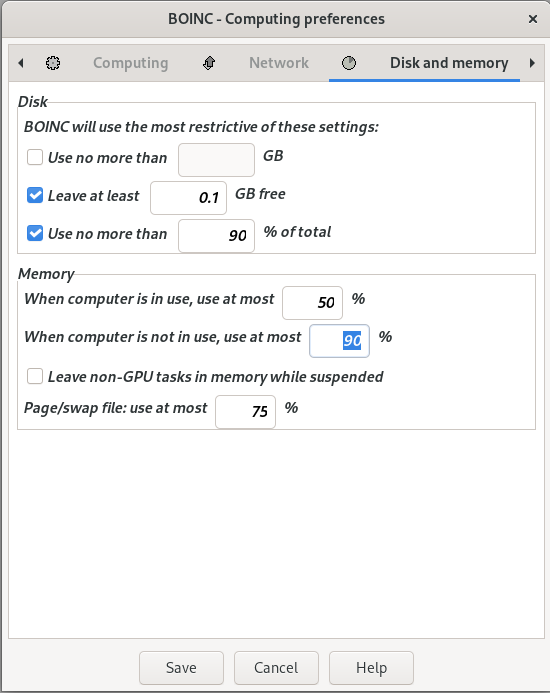
These settings can also be changed through the Rosetta@home website settings page, but bear in mind that changes made through the BOINC Manager client override preferences set in the web interface.
Wait
It may take a while, possibly several hours, for Rosetta@home to send work to our newly installed client, particularly as most work units are too big to run on a Raspberry Pi. COVID-19 has resulted in a large number of new computers being joined to the Rosetta@home project, which means that there are times when there isn’t enough work to do.
When we are assigned some work units, BOINC will download several hundred megabytes of data. This will be stored on the SD Card and can be viewed using BOINC manager.

We can also see the tasks running in the Tasks pane:
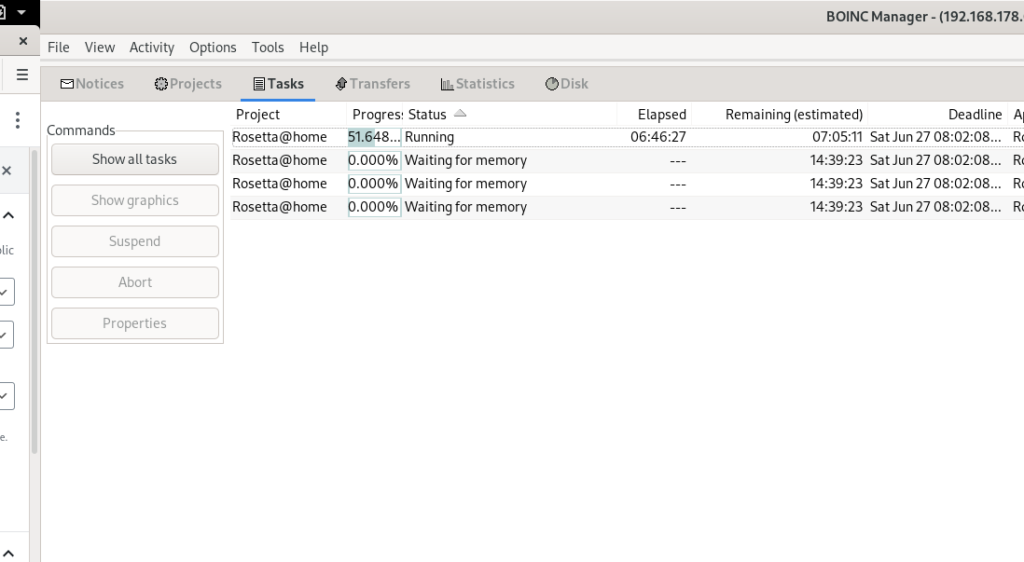
The client has downloaded four tasks, but only one of them is currently running due to memory constraints. At times, two tasks can run simultaneously, but I haven’t seen more than that. This is OK as long as the tasks are completed by the deadline shown on the right. I’m fairly confident these will be completed as long as the Raspberry Pi is left running. I have found that the additional memory overhead created by the BOINC Manager connection and sshd services can reduce parallelism, so I try to disconnect these when I’m not using them.
Conclusion
Rosetta@home, in common with many other distributed computing projects, is currently experiencing a large spike in participation due to COVID-19. That aside, the project has been doing valuable work for many years to combat a number of other diseases.
Whilst a Raspberry Pi is never going to appear at the top of the contribution chart, I think this is a worthwhile project to undertake with a spare Raspberry Pi. The existence of work units aimed at low-spec ARM devices indicates that the project organizers agree with this sentiment. I’ll certainly be leaving mine running for the foreseeable future.

Thommy M. Malmström
Well, it seems as there still is a root password set as it asks for one. What can that be?
And yes, I did add –norootpass …
sudo arm-image-installer –image ~/Downloads/Fedora-IoT-32-20200603.0.aarch64.raw.xz –target=rpi3 –media=/dev/sdf –resizefs –norootpass
Ondrej
I would mount the content of the root partition and replace the /etc/shadow password hash with a well known hash.
Thommy M. Malmström
I tried that but to no avail. But I just installed the Fedora minimal and podman and then followed the rest of the instructions above. Now waiting for tasks small enough … 😉
Gavin Campbell
That’s odd. the first time I did this I forgot the –norootpass option and ended up starting again. I did find this bugzilla which suggests that behaviour of certain options can depend on the selinux status of the host where you are creating the SD Card. https://bugzilla.redhat.com/show_bug.cgi?id=1655329
Most workarounds will involve mounting the root filesystem and editing the password files offline, I think that removing the “x” – and only the “x”, not the colons – from the line
root:x:0:0:root:/root:/bin/bash
should blank out the password.
Thommy M. Malmström
I saw the same Bugzilla and I have selinux disabled on my Fedora 32.
If I look at the /etc/passwd and /etc/shadow they look like this for the root account
root:x:0:0:root:/root:/bin/bash
root:!locked::0:99999:7:::
I the tried to remove the x in passwd, but no help. Also replaced !locked with * in shadow but no luck.
As I said, I installed a minimal Fedora and the run all the other stuff and that works like a charm (except that a haven’t got any small jobs yet).
Hampton Finger
I ran Rosetta on another machine, and it thrashed the heck out of the NFS volume it was using for files. Rosetta at home is a memory card killer so beware. It does a lot of read-write every second.
asimon
Too bad there is no Fedora for RPi4, I wonder if there ever will be. However, one can go through this tutorial using another distribution, that runs on RPi4.