


With people doing video conferencing all day, good audio has recently become much more important. The best option is obviously a proper audio studio. Unfortunately, this is not something you will always have and you might need to make do with a much simpler setup.
In such situations, a noise reduction filter that keeps your voice but filters out ambient noises (street noise, keyboard, …) can be very helpful. In this article, we will take a look at how to integrate such a filter into PulseAudio so that it can easily be used in all applications with no additional requirements on their part.
The Idea
We set up PulseAudio for live noise-reduction using an LADSPA filter.
This creates a new PulseAudio source which can be used as a virtual microphone. Other applications will not even realize that they are not dealing with physical devices and you can select it as if you had an additional microphone connected.
Terminology
Before we start, it is good to know the following two PulseAudio terms to better understand what we are doing:
- source – represents a source from which audio can be obtained. Like a microphone
- sink – represents a consumer of audio like a speaker
Each PulseAudio sink also has a source called monitor which can be used to get the audio put into that sink. For example, you could have audio put out by your headphones while using the monitor of your headphone device to record the output.
Installation
While PulseAudio is usually pre-installed, we need to get the LADSPA filter for noise reduction. You can build and install the filter manually, but it is much easier to install the filter via Fedora Copr:
sudo dnf copr enable -y lkiesow/noise-suppression-for-voice
sudo dnf install -y ladspa-realtime-noise-suppression-plugin
Note that the Copr projects are not maintained and quality-controlled by Fedora directly.
Enable Noise Reduction Filter
First, you need to identify the name of the device you want to apply the noise reduction to. In this example, we’ll use the RODE NT-USB microphone as input.
$ pactl list sources short
0 alsa_input.usb-RODE_Microphones_RODE_NT-USB-00.iec958-stereo …
1 alsa_output.usb-0c76_USB_Headphone_Set-00.analog-stereo.monitor …
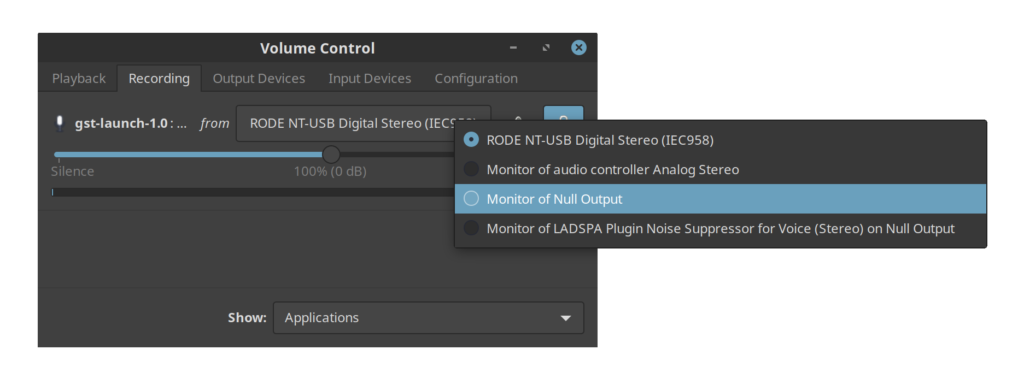
Next, we create a new PulseAudio sink, the filter and a loopback between microphone and filter. That way, the output from the microphone is used as input for the noise reduction filter. The output from this filter will then be available via the null sink monitor.
To visualize this, here is the path the audio will travel from the microphone to, for example, a browser:
mic → loopback → ladspa filter → null sink [monitor] → browser
While this sounds complicated, it is set up with just a few simple commands:
pacmd load-module module-null-sink \
    sink_name=mic_denoised_out
pacmd load-module module-ladspa-sink \
    sink_name=mic_raw_in \
    sink_master=mic_denoised_out \
    label=noise_suppressor_stereo \
    plugin=librnnoise_ladspa \
    control=50
pacmd load-module module-loopback \
    source=alsa_input.usb-RODE_Microphones_RODE_NT-USB-00.iec958-stereo \
    sink=mic_raw_in \
    channels=2
That’s it. You should now be able to select the new device.
Chromium
Unfortunately, browsers based on Chromium will hide monitor devices by default. This means, that we cannot select the newly created noise-reduction device in the browser. One workaround is to select another device first, then use pavucontrol to assign the noise-reduction device afterward.
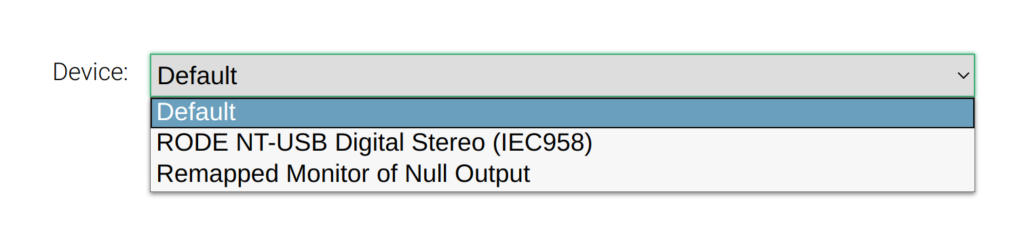
But if you do this on a regular basis, you can work around the issue by using the remap-source module to convert the null sink monitor to a regular PulseAudio source. The module is actually meant for remapping audio channels – e.g. swapping left and right channel on stereo audio – but we can just ignore these additional capabilities and create a new source similar to the monitor:
pacmd load-module module-remap-source \
    source_name=denoised \
    master=mic_denoised_out.monitor \
    channels=2
The remapped device delivers audio identical to the original one so that assigning this with PulseAudio will yield no difference. But this device does now show up in Chromium:
Improvements
While the guide above should help you with all the basics and will get you a working setup, there are a few things you can improve.
But while the commands above should generally work, you might need to experiment with the following suggestions.
Latency
By default, the loopback module will introduce a slight audio latency. You can hear this by running an echo test:
gst-launch-1.0 pulsesrc ! pulsesink
You might be able to reduce this latency by using the latency_msec option when loading the loopback module:
pacmd load-module module-loopback \
    latency_msec=1 \
    source=alsa_input.usb-RODE_Microphones_RODE_NT- USB-00.iec958-stereo \
    sink=mic_raw_in \
    channels=2
Voice Threshold
The noise reduction library provides controls for a voice threshold. The filter will return silence if the probability for sound being voice is lower than this threshold. In other words, the higher you set this value, the more aggressive the filter becomes.
You can pass different thresholds to the filter by supplying them as control argument when the ladspa-sink module is being loaded.
pacmd load-module module-ladspa-sink \
    sink_name=mic_raw_in \
    sink_master=mic_denoised_out \
    label=noise_suppressor_stereo \
    plugin=librnnoise_ladspa \
    control=95
Mono vs Stereo
The example above will work with stereo audio. When working with a simple microphone, you may want to use a mono signal instead.
For switching to mono, use the following values instead when loading the different modules:
- label=noise_suppressor_mono – when loading the ladspa-sink module
- channels=1 – when loading the loopback and remap-source modules
Persistence
Using the pacmd command for the setup, settings are not persistent and will disappear if PulseAudio is restarted. You can add these commands to your PulseAudio configuration file if you want them to be persistent. For that, edit ~/.config/pulse/default.pa and add your commands like this:
.include /etc/pulse/default.pa

load-module module-null-sink sink_name=mic_denoised_out
load-module module-ladspa-sink …
…
Limitations
If you listen to the example above, you will notice that the filter reliably reduces background noise. But unfortunately, depending on the situation, it can also cause a loss in voice quality.
The following example shows the results with some street noise. Activating the filter reliably removes the noise, but in this example, the voice quality noticeably drops as well:
As a conclusion, we can say that this can help if you find yourself in less than ideal audio scenarios. It is also very effective if you are not the main speaker in a video conference and you do not want to constantly mute yourself.
Still, good audio equipment and a quiet environment will always be better.
Have fun.

SeeM
I use a mixer with compression for chatting and a decent mic, but this is really good. Thank You.
M D
Excellent article. PulseAudio is such an amazing technology, and so configurable.
I’ve been using NoiseTorch [1] which is also a pulseaudio virtual plugin based on RRNoise [2]. It is a huge help out cutting out my barking dog and various other city noises.
[1] https://github.com/lawl/NoiseTorch
[2] https://jmvalin.ca/demo/rnnoise/
Paolo
Great article! Well explained.
qoheniac
Thank you very much for this interesting read. I always wondered how Pulse Audio works, but never found the time to dive into the documentation. For example I always wondered how to combine multiple sources into one. For example music player plus microphone to listen to music together in voice or video conferences.
Mehdi
Thanks for the article. Very good explanation of concepts and usage.
Stefan Midjich
Hey first time commenting so I must say that I love Fedora Magazine and your articles.
I could not get this filter to work well for me, my voice is distorted with control=25, control=50 and control=75, makes no difference.
I also tried the other LV2 filter bin/rnnoise.lv2/librnnoise_lv2.so but only silence.
So I tried noisetorch recommended in the comments and it definitely works better. No distortion at all on my voice when its custom source is loaded for recording.
When activating noisetorch it requests sudo, I denied it by pressing cancel and it still was able to activate its source. I wish I knew why they need sudo, and I wish they just would provide a pulseaudio filter module like the other project.
lawl
Hey Stefan
NoiseTorch developer here. I have described the reason it prompts for root here: https://github.com/lawl/NoiseTorch/wiki/Why-does-NoiseTorch-prompt-for-root-privileges
Hope that helps.