


Fedora Server Edition works on Single Board Computers (SBC) like Raspberry Pi. This article is aimed at data backup and restoration of personal data for users who want to take advantage of solid server systems and built-in tools like Cockpit. It describes 3 levels of backup.
Pre-requisites
To use this guide, all you need is a working Fedora Linux workstation and the following items.
- You should read, understand, and practice the requirements as documented in the Fedora Docs for server installation and administration
- An SBC (Single Board Computer), tested for Fedora Linux. Check hardware status here.
- Fedora ARM server raw image & ARM image installer
- A choice of microSD Card (64 GB / Class 10) and SSD device
- Ethernet cable / DHCP reserved IP or static IP
- A Linux client workstation with ssh keys prepared
- Make a choice of cloud storage services
- Have an additional Linux workstation available
With this setup, I opted for Raspberry Pi 3B+/4B+ (one for hot-swap) because of the price and availability at the time of writing this article. While the Pi server is remotely connected using Cockpit, you can position the Pi near the router for a neat set-up.
Harden server security
After following through with server installation and administration on the SBC, it is a good practice to harden the server security with firewalld.
You must configure the firewall as soon as the server is online before connecting the storage device to the server. Firewalld is a zone-based firewall. It creates one pre-defined zone ‘FedoraServer’ after following through with the installation and administration guide in the Fedora Docs.
Rich rules in firewalld
Rich rules are used to block or allow a particular IP address or address range. The following rule accepts SSH connections only from the host with the registered IP (of client workstation) and drops other connections. Run the commands in Cockpit Terminal or terminal in client workstation connect to the server via ssh.
firewall-cmd --add-rich-rule='rule family=ipv4 source address=<registered_ip_address>/24 service name=ssh log prefix="SSH Logs" level="notice" accept'
Reject ping requests from all hosts
Use this command to set the icmp reject and disallow ping requests
firewall-cmd --add-rich-rule='rule protocol value=icmp reject'
To carry out additional firewall controls, such as managing ports and zones, please refer to the link below. Please be aware that misconfiguring the firewall may make it vulnerable to security breaches.
Managing firewall in Cockpit
firewalld rules
Configure storage for file server
The next step is to connect a storage device to the SBC and partition a newly attached storage device using Cockpit. With Cockpit’s graphical server management interface, managing a home lab (whether a single server or several servers) is much simpler than before. Fedora Linux server offers Cockpit as standard.
In this setup, an SSD device, powered by the USB port of the SBC, is placed in service without the need for an additional power supply.
- Connect the storage device to a USB port of the SBC
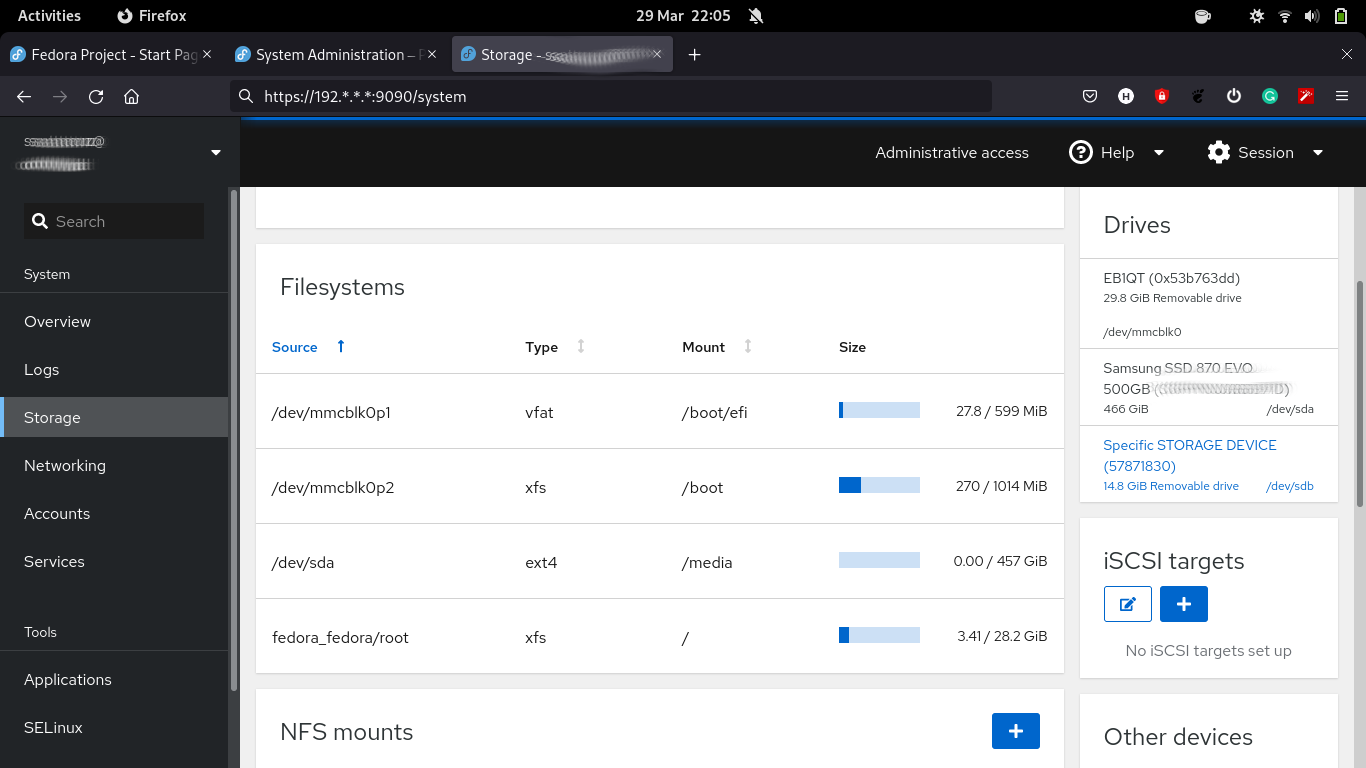
- After Cockpit is running (as set up in the pre-requisites), visit ip-address-of-machine:9090 in the web browser of your client workstation
- After logging into Cockpit, click ‘Turn on administrative access’ at the top of the Cockpit page
- Click the “Storage” on the left pane
- Select the device under “Drives” section to format and partition a blank storage device
- On the screen of the selected storage device create a new partition table or format and create new partitions. When prompted to initialize disk, in the “Partitioning” type, select GPT partition
- For a file system type from the drop-down list (XFS and ext4), choose ext4. This is suitable for an SBC with limited I/O capability (like USB 2.0 port) and limited bandwidth (less than 200MB/s)
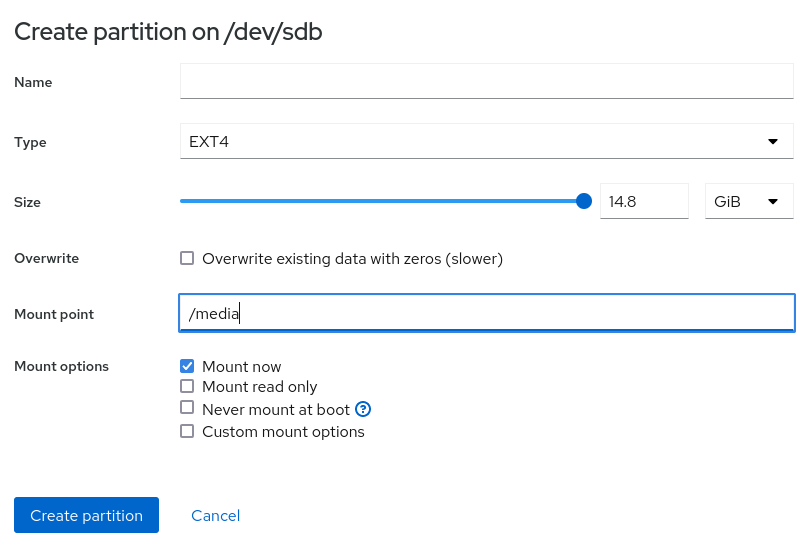
- To create a single partition taking up all the storage space on the device, specify its mount point, such as “/media” and click “Ok”
- Click “Create partition”, which creates a new partition mounted at “/media”.
Create backups and restore from backups
Backups are rarely one-size-fits-all. There are a few choices to make such as where the data is backed up, the steps you take to backup data, identify any automation, and determine how to restore backed-up data.
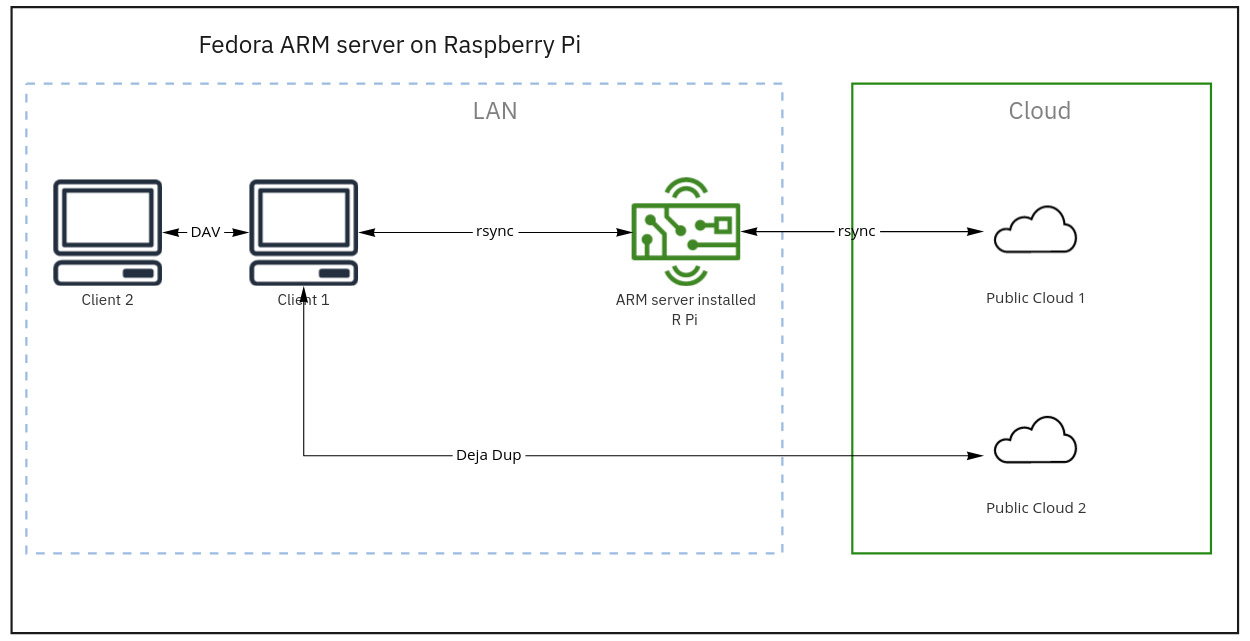
Backup 1. rsync from client to file server (Raspberry Pi)
The command used for this transfer was:
rsync -azP ~/source syncuser@host1:/destination
Options:
-a, --archive
-z, --compress
-P, --progress
To run rsync with additional options, set the following flags:
Update destination files in-place
--inplace
Append data onto shorter files
--append
Source-side deduplication combined with compression is the most effective way to reduce the size of data to be backed up before it goes to backup storage.
I run this manually at the end of the day. Automation scripts are advantageous once I settled in with the cloud backup workflow.
For details on rsync, please visit the Fedora magazine article here.
Backup 2. rsync from file server to primary cloud storage
Factors to consider when selecting cloud storage are;
- Cost: Upload, storage, and download fee
- rsync, sftp supported
- Data redundancy (RAID 10 or data center redundancy plan in place)
- Snapshots
One of the cloud storage fitting these criteria is Hetzner’s hosted Nextcloud – Storage Box. You are not tied to a supplier and are free to switch without an exit penalty.
Generate SSH keys and create authorized key files in the file server
Use ssh-keygen to generate a new pair of SSH keys for the file server and cloud storage.
ssh-keygen
Generating public/private rsa key pair.
Enter file in which to save the key . . .
Insert the required public SSH keys into a new local authorized_keys file.
cat .ssh/id_rsa.pub >> storagebox_authorized_keys
Transfer keys to cloud storage
The next step is to upload the generated authorized_keys file to the Storage Box. To do this, create the directory .ssh with permission 700 and create the file authorized_keys with the public SSH keys and permission 600. Run the following command.
echo -e "mkdir .ssh \n chmod 700 .ssh \n put storagebox_authorized_keys .ssh/authorized_keys \n chmod 600 .ssh/authorized_keys" | sftp <username>@<username>.your-storagebox.de
Use rsync over ssh
Use rsync to synchronize the current state of your file directories to Storage Box.
rsync --progress -e 'ssh -p23' --recursive <local_directory> <username>@<username>.your-storagebox.de:<target_directory>
This process is called a push operation because it “pushes” a directory from the local system to a remote system.
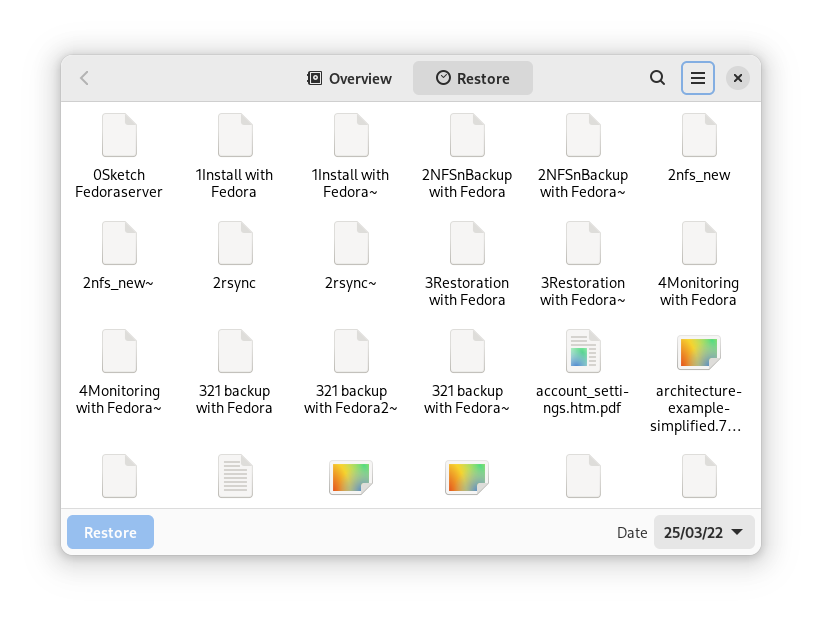
Restore a directory from cloud storage
To restore a directory from the Storage Box, swap the directories:
rsync --progress -e 'ssh -p23' --recursive <username>@<username>.your-storagebox.de:<remote_directory> <local_directory>
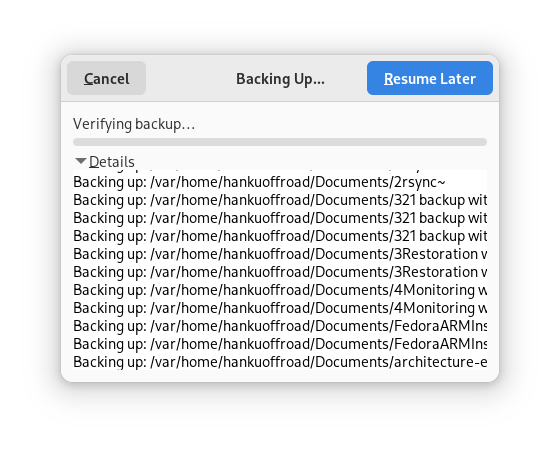
Backup 3. Client backup to secondary cloud storage
Deja Dup is in the Fedora software repo, making it a quick backup solution for Fedora Workstation. It handles the GPG encryption, scheduling, and file inclusion (which directories to back up).
Archive personal data
Not every data needs a 3-2-1 backup strategy. That is personal data share. I repurposed a hand-me-down laptop with a 1TB HDD as an archive of personal data (family photos).
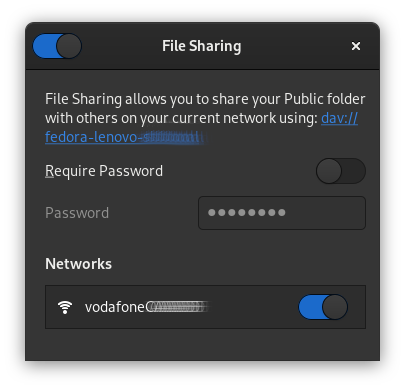
Go to “Sharing” in settings (in my case, the GNOME file manager) and toggle the slider to enable sharing.
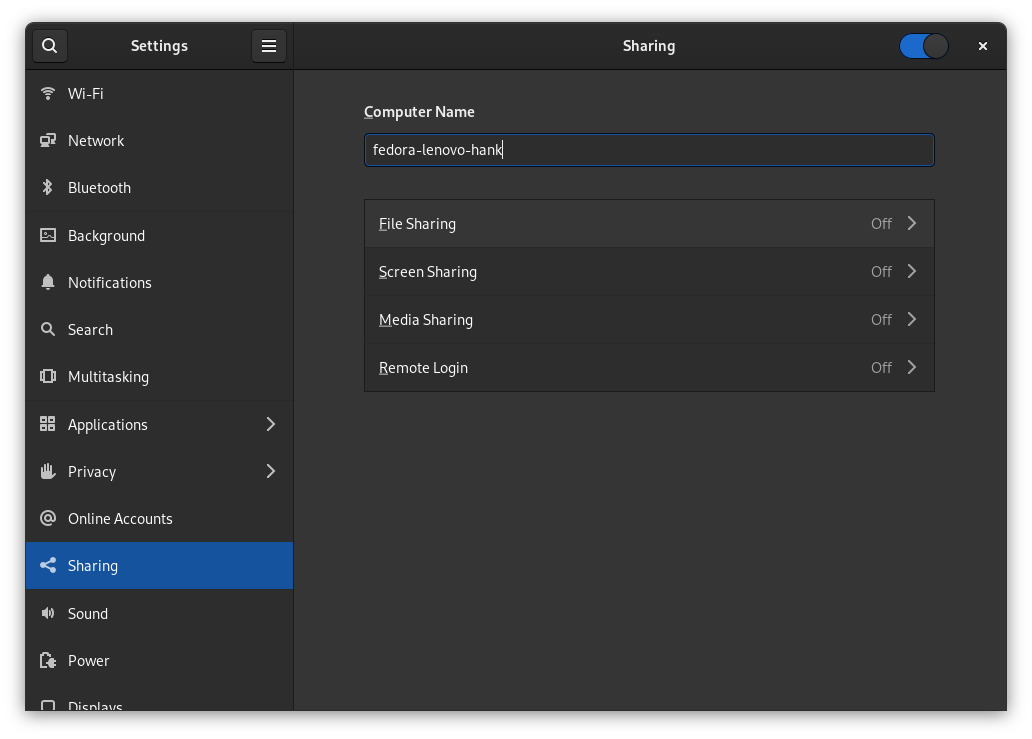
Turn on “file sharing”, “Networks” and “Required password”, which allows you to share your public folders with other workstations on your local network using WebDAV.
Prepare fallback options
Untested backups are no better than no backups at all. I take the ‘hot swap’ approach in a home lab environment where disruptions like frequent power outages or liquid damages do happen. However, my recommendations are far from disaster recovery plans or automatic failover in corporate IT.
- Dry run restoration of files on a regular basis
- Backup ssh/GPG keys onto an external storage device
- Copy a raw image of the Fedora ARM server onto an SD card
- Keep snapshots of full backups at primary cloud storage
- Automate backup process to minimize human error or oversight
Track activity and troubleshoot with Cockpit
As your project grows, so does the number of servers you manage. Activity and alert tracking in Cockpit ease your administrative burden. You can achieve this in three ways using Cockpit’s graphical interface.
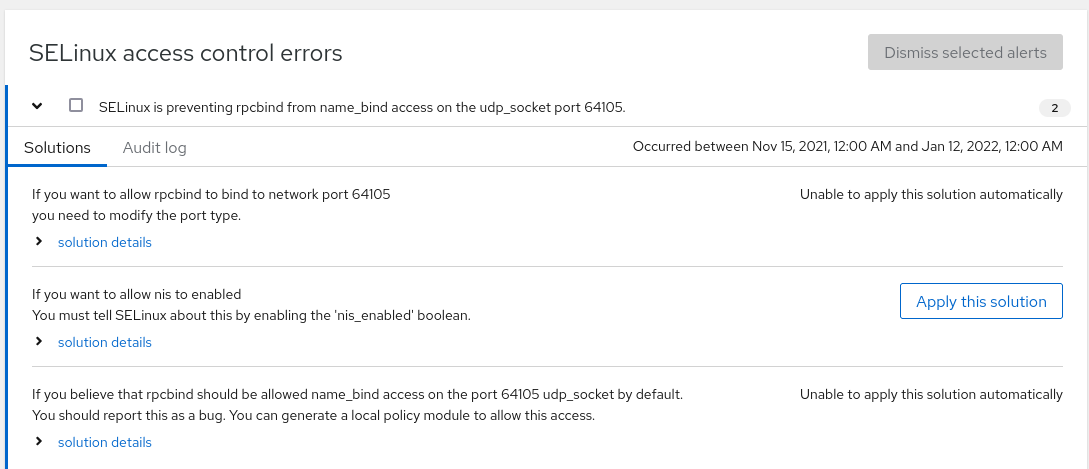
SELinux menu
How to diagnose network issues, find logs and troubleshoot in Cockpit
- Go to SELinux to check logs
- Check “solution details”
- Select “Apply this solution” when necessary
- View automation script and run it if necessary
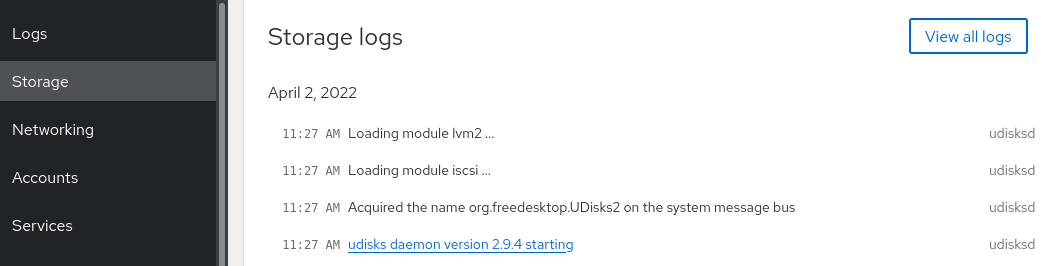
Network or storage logs
Server logs track detailed metrics that correlate CPU load, memory usage, network activity, and storage performance with the system’s journal. Logs are organized under the network or storage dashboard.
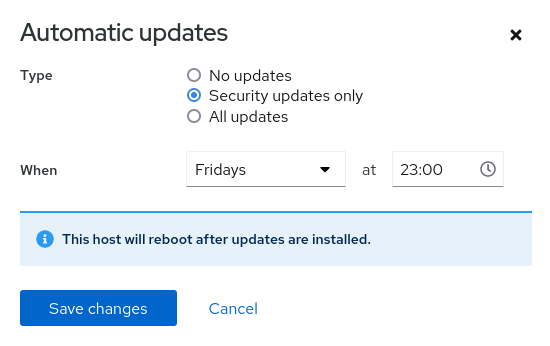
Software updates
Cockpit helps security updates on preset time and frequency. You can run all updates when you need them.
Congratulations on setting up a file/backup server with the Fedora ARM server edition.

JackJohnJames
I will continue to use rsync with this wrapper:
https://github.com/MatteoGuadrini/Butterfly-Backup
because it guarantees me safe backup points and above all restore, having a searchable and exhaustive catalog.
Hanku Lee
Butterfly backup looks like an excellent extension to rsync. As the project extends, I’ll try. Thanks.
tsyang
Nice article. Thank you, Hanku.
I used to run Rsync every hour to store a company’s file server data to an offsite computer. The most common request from the company’s workers was that they wanted a deleted file back. This request was fulfilled using Rsync’s incremental backup option:
–backup-dir=DIR
I used backup date and time as the directory name DIR.
Therefore, the recovered file only had an hour of loss maximum.
Hanku Lee
Cool. My workflow will evolve with more backup options, for sure.
mer
This is an amazing article, a very solid write-up that I very much enjoyed reading. I’ve got my own back-up plan but you can be sure I’ll recommend your article to others, Hanku. Thank you so much!
Hanku Lee
Sure, a backup plan will have many forms and preferences based on use cases. Thanks for your kind words.
ergertyg
2 different location and mobile usb disc in my pocket
raid 10 on serwer for integrating and safe data
and work on orange pi etc.
Hanku Lee
@ergertyg, could you elaborate on what you mean?
I appreciate backup plans will vary by needs and obvious constraints. For me, I decided to build one without RAID and plugging in a USB thumb drive.
Due to the remote working policy where I work, it was impractical to have offsite drives in two locations (like friends/relatives), so backup plans had to be fitted into constraints.
Instead, I’d mount the network drive when backing up and unmount it after that (either manually or by script).
KATSUHARU TANAKA
Thanks Hanku Lee.
In recent years, the number of ARM-based servers has been increasing, and We would like to thank you for showing us backup measures against them.
In the future, security measures will become important for backup, and measures for RISC-V must be taken.
We look forward to your continued success in the future.
Hanku Lee
@Katsuharu, thanks for sharing your insight.
Jeremy Linton
rsync is a fine tool for syncing machines, but isn’t particularly good by itself at actual backups. That is because it lacks a good retention policy, and you either end up in the situation where it deletes the file you suddenly want back, it fails to have an older version of a file (you overwrote it), or the target keeps growing until your out of space (failure to use –delete).
Most of these problems are solved by using rsnapshot or rdiff-backup, both of which are layers over rsync which add versioning and options to control retention periods. (both have their pluses and minuses, find a comparison article before picking one). Another similar alternative that ships with fedora, but doesn’t use rsync directly is restic.
Finally, there are other sync tools that ship with fedora, but shouldn’t really be used for backup either. Syncthing comes to mind, which despite having a version/log they explicitly state: “No. Syncthing is not a great backup application because all changes to your files (modifications, deletions, etc.) will be propagated to all your devices. You can enable versioning, but we encourage you to use other tools to keep your data safe from your (or our) mistakes.”
Hanku Lee
@Jeremy, I do feel well informed now. Thanks.
My original backup process was based on rdiff-backup from its inception. Two things that got in the way were;
1) the same version of rdiff-back should be maintained on both systems – tested and evidenced by me
2) Reported performance issue when used with NFS mounts
https://rdiff-backup.net/docs/FAQ.html
https://www.backupcentral.com/forum/17/171499/rdiff-backup_painfully_slow_using_nfs_mount
Building blocks of the backup process can be replaced by better alternatives and more options in rsync. As my backup workflow diagram is versioned 1.0, I’ll try those alternatives as the project evolves.
For now, I’ve stuck to the minimum number of additional installations and configurations.
Helix
I like Borg Backup and Vorta as GUI or Borgmatic as wrapper for servers more than Deja Dup. Apart from that, great article about the 3-2-1 backup rule with a good backup strategy for regular users.
Hanku Lee
@Helix, I reviewed BorgBackup in the article, but haven’t had a chance to get hands-on with it while I was happy with Deja-Dup for simple client backup, bypassing my Pi server.
https://fedoramagazine.org/backup-on-fedora-silverblue-with-borg/
As this solution is written for Fedora Silverblue (my daily driver), I’m tempted to try Vorta.
Thanks for introducing Borgmatic.
p.s.) I must confess Deja-Dup reminded me of Time Machine and I fell for it.
condor
I’ve used Deja-Dup and rsync both for backups and have recently expermented with btrfs RAID1 on my lab network. My first instinct was to install Fedora onto the RAID1 device then decided it best to isolate the RAID1 comprised of two small, identical hdds and consider it experimental. My previous USB backup device is on a second workstation in close proximity to my producition machine used for debugging and such.
I’ve use the RAID1 as /home on my production machine. I want to investigate traditional uses and configurations of RAID devices that are already tested and my original idea of installing Fedora on the RAID1 device.
Your article is proving helpful!
Hanku Lee
@condor, Thanks a lot for writing back.
I bought two HDDs to create RAID1 using Cockpit. When tinkering with cloud storage services, I turned to automated snapshots and data center redundancy (RAID10) offered by Hetzner as one of the recommended backups in my article.
https://docs.hetzner.com/robot/storage-box/snapshots/
Although the two (RAID and snapshots) are not entirely comparable, I fell for zero to low maintenance of cloud storage. I’m biased maybe, but I didn’t want to replace failed HDDs and monitor them.
People say RAID isn’t backups, so I decided to simplify my workflow.