


Wireshark is popular tool for network protocol analysis used by education institutions and in the industry. It offers both terminal and graphical user interfaces and both are available on Fedora. You can use it either for real-time network analysis or to inspect files with captured traffic such as pcap files.
For many years, the primary framework for the graphical user interface (GUI) used to be GTK, but since version 2.0, Qt became the framework of a choice. Nevertheless the old GUI is still available and you can choose which one you want to use.
How to install
In order to install the Wireshark GUI from repositories, simply type…
$ sudo dnf install wireshark-qt
…into a terminal. This will install both Qt and the CLI version of Wireshark. At this point, you can use Wireshark as root, but it is generally considered a bad practice. Therefore, we will set up permissions for regular users to capture on network interfaces (see below about security implications).
Setting permissions
During installation, a system group called wireshark was created. Users in this group can capture network traffic. All you need to do is to add your user account into the group like this, substituting your username for username:
$ sudo usermod -a -G wireshark username
Then log out and in again a you are ready to go!
How to capture packets with Wireshark
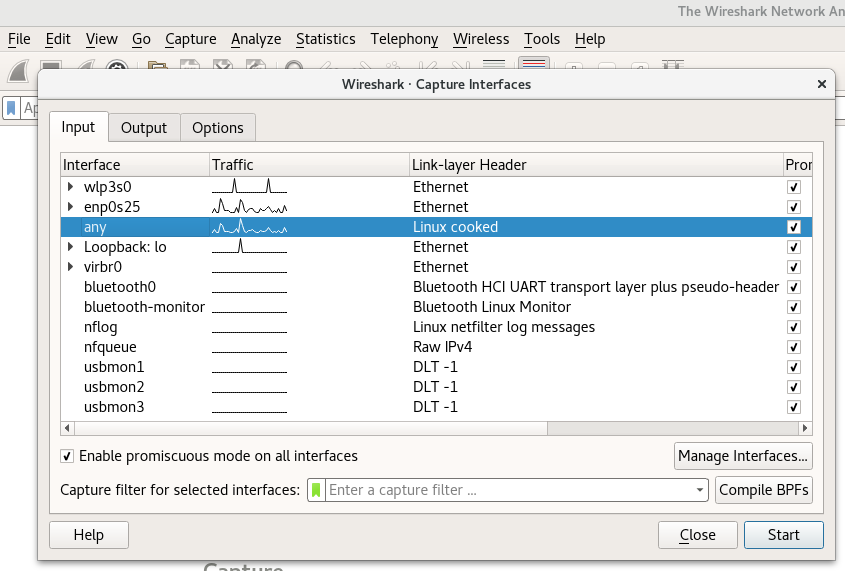
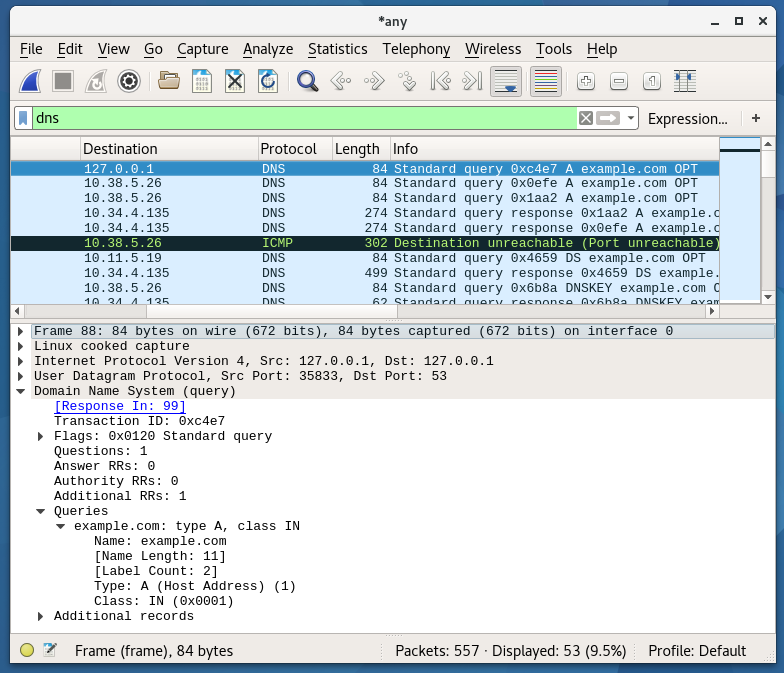
In order to start your first capture, select Capture in top menu, then pick one interface (e.g. loopback) or just tick the Enable promiscuous mode on all interfaces option and press the Start button. You should see network traffic now.
If you are curious how this privilege escalation works, take a look at dumpcap, which does the magic.
Discussion about security
Every privilege escalation mechanism comes with a certain amount of risk. As I said in the previous section, dumpcap does the magic of capturing network traffic. In order to do so, it needs to have certain privileges (specifically CAP_NET_RAW and CAP_NET_ADMIN, see man capabilities for more information). That being said, dumpcap could possibly harm your network configuration and cause serious troubles, so be cautious with whom you give these capabilities (whom you place into the wireshark group).
Another thing to keep in mind when using Wireshark is that protocol dissectors tend to be buggy due to enormous amount of protocols and code needed to dissect them all. Take for instance the number of lines of code in C files only for dissectors:
$ cat epan/dissectors/*.c | wc -l
3178870
If you want to capture live traffic, it is better to use a simple capture utility (tcpdump, dumpcap) and dissect the traffic afterwards in a safe, isolated environment.
See what else Fedora offers
dnf is not just about installation and updates! You can also use it to find out what else is provided in repositories. Use the search module to look for available packages and filter (with grep) those starting with wireshark, as these are sub-packages of the main Wireshark RPM package.
$ dnf search wireshark | grep '^wireshark'
wireshark.x86_64 : Network traffic analyzer
wireshark-qt.x86_64 : Wireshark's Qt-based GUI
wireshark-gtk.x86_64 : Wireshark's GTK+-based GUI
wireshark-debuginfo.x86_64 : Debug information for package wireshark
wireshark-devel.i686 : Development headers and libraries for wireshark
wireshark-devel.x86_64 : Development headers and libraries for wireshark
wireshark-cli.x86_64 : Network traffic analyzer
wireshark-cli.i686 : Network traffic analyzer
As you can see from the output, a GTK+-based GUI is also available.
Install multiple GUIs and switch between them
If you want to try the old GTK+ GUI, install it in a similar fashion as the previous one.
$ sudo dnf install wireshark-gtk
Now you need to use a tool called alternatives to switch among them:
$ sudo alternatives --config wireshark
There are 2 programs which provide 'wireshark'.

Selection Command
-----------------------------------------------
*+ 1 /usr/sbin/wireshark-qt
2 /usr/sbin/wireshark-gtk

Enter to keep the current selection[+], or type selection number: 2
Now if you run Wireshark, e.g. from GNOME Shell, it will automatically start the GTK+ version. Anyway you can always just call wireshark-gtk or wireshark-qt directly from a terminal.

Further reading
Wireshark offers wide range of tools, filters, dissectors etc. You can read more about its capabilities in the official documentation.
As mentioned earlier, there is also a CLI version called tshark. It is useful if you need to run network analysis remotely, for instance over SSH. There is also tcpdump which can be used in a similar fashion, but that’s for another article!
Image courtesy Juan Di Nella – originally posted to Unsplash as Untitled.

realgaodacheng
What a precise article to explain from installation to its simple usage, thanks for your post .
sqrwvzblw
Thanks for this sweet article and also great demonstration of some useful cl fu. Just a small side note that when adding the user to the wireshark group, the username should be added, so for user1 it should be
$ sudo usermod -a -G wireshark user1
Paul W. Frields
Fixed. Thanks for catching this.