


NetworkManager is the default network management service on Fedora and several other Linux distributions. Its main purpose is to take care of things like setting up interfaces, adding addresses and routes to them and configuring other network related aspects of the system, such as DNS.
There are other tools that offer similar functionality. However one of the advantages of NetworkManager is that it offers a powerful API. Using this API, other applications can inspect, monitor and change the networking state of the system.
This article first introduces the API of NetworkManager and presents how to use it from a Python program. In the second part it shows some practical examples: how to connect to a wireless network or to add an IP address to an interface programmatically via NetworkManager.
The API
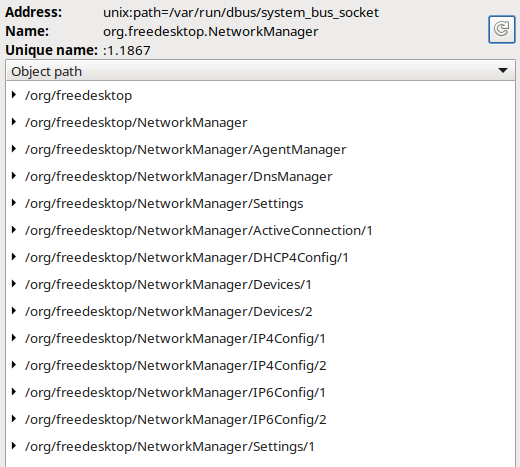
NetworkManager provides a D-Bus API. D-Bus is a message bus system that allows processes to talk to each other; using D-Bus, a process that wants to offer some services can register on the bus with a well-known name (for example, “org.freedesktop.NetworkManager”) and expose some objects, each identified by a path. Using d-feet, a graphical tool to inspect D-Bus objects, we can see the object tree exposed by the NetworkManager service:
Each object has properties, methods and signals, grouped into different interfaces. For example, the following is a simplified view of the interfaces for the second device object:
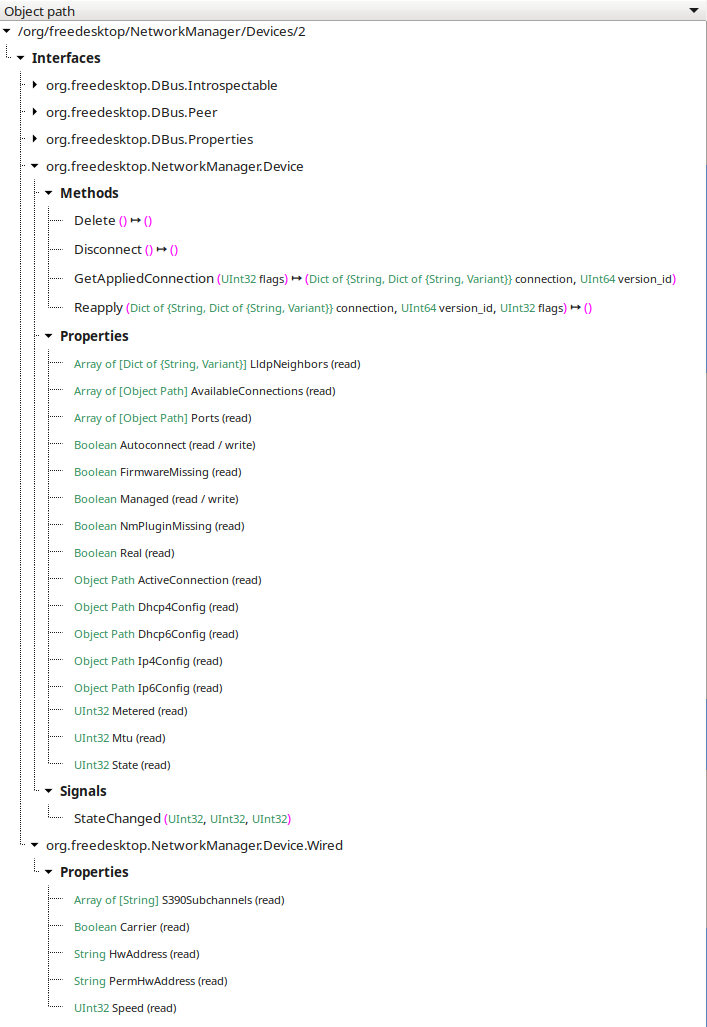
We see that there are different interfaces; the org.freedesktop.NetworkManager.Device interface contains some properties common to all devices, like the state, the MTU and IP configurations. Since this device is Ethernet, it also has a org.freedesktop.NetworkManager.Device.Wired D-Bus interface containing other properties such as the link speed.
The full documentation for the D-Bus API of NetworkManager is here.
A client can connect to the NetworkManager service using the well-known name and perform operations on the exposed objects. For example, it can invoke methods, access properties or receive notifications via signals. In this way, it can control almost every aspect of network configuration. In fact, all the tools that interact with NetworkManager – nmcli, nmtui, GNOME control center, the KDE applet, Cockpit – use this API.
libnm
When developing a program, it can be convenient to automatically instantiate objects from the objects available on D-Bus and keep their properties synchronized; or to be able to have method calls on those objects automatically dispatched to the corresponding D-Bus method. Such objects are usually called proxies and are used to hide the complexity of D-Bus communication from the developer.
For this purpose, the NetworkManager project provides a library called libnm, written in C and based on GNOME’s GLib and GObject. The library provides C language bindings for functionality provided by NetworkManager. Being a GLib library, it is usable from other languages as well via GObject introspection, as explained below.
The library maps fairly closely to the D-Bus API of NetworkManager. It wraps remote D-Bus objects as native GObjects, and D-Bus signals and properties to GObject signals and properties. Furthermore, it provides helpful accessors and utility functions.
Overview of libnm objects
The diagram below shows the most important objects in libnm and their relationship:
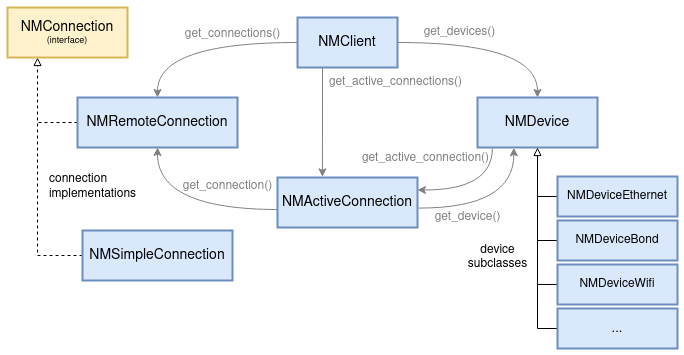
NMClient caches all the objects instantiated from D-Bus. The object is typically created at the beginning at the program and provides a way to access other objects.
A NMDevice represents a network interface, physical (as Ethernet, Infiniband, Wi-Fi, etc.) or virtual (as a bridge or a IP tunnel). Each device type supported by NetworkManager has a dedicated subclass that implements type-specific properties and methods. For example, a NMDeviceWifi has properties related to the wireless configuration and to access points found during the scan, while a NMDeviceVlan has properties describing its VLAN-id and the parent device.
NMClient also provides a list of NMRemoteConnection objects. NMRemoteConnection is one of the two implementations of the NMConnection interface. A connection (or connection profile) contains all the configuration needed to connect to a specific network.
The difference between a NMRemoteConnection and a NMSimpleConnection is that the former is a proxy for a connection existing on D-Bus while the latter is not. In particular, NMSimpleConnection can be instantiated when a new blank connection object is required. This is useful for, example, when adding a new connection to NetworkManager.
The last object in the diagram is NMActiveConnection. This represents an active connection to a specific network using settings from a NMRemoteConnection.
GObject introspection
GObject introspection is a layer that acts as a bridge between a C library using GObject and programming language runtimes such as JavaScript, Python, Perl, Java, Lua, .NET, Scheme, etc.
When the library is built, sources are scanned to generate introspection metadata describing, in a language-agnostic way, all the constants, types, functions, signals, etc. exported by the library. The resulting metadata is used to automatically generate bindings to call into the C library from other languages.
One form of metadata is a GObject Introspection Repository (GIR) XML file. GIRs are mostly used by languages that generate bindings at compile time. The GIR can be translated into a machine-readable format called Typelib that is optimized for fast access and lower memory footprint; for this reason it is mostly used by languages that generate bindings at runtime.
This page lists all the introspection bindings for other languages. For a Python example we will use PyGObject which is included in the python3-gobject RPM on Fedora.
A basic example
Let’s start with a simple Python program that prints information about the system:
import gi

gi.require_version("NM", "1.0")
from gi.repository import GLib, NM

client = NM.Client.new(None)
print("version:", client.get_version())
At the beginning we import the introspection module and then the Glib and NM modules. Since there could be multiple versions of the NM module in the system, we make certain to load the right one. Then we create a client object and print the version of NetworkManager.
Next, we want to get a list of devices and print some of their properties:
devices = client.get_devices()
print("devices:")
for device in devices:
    print("  - name:", device.get_iface());
    print("    type:", device.get_type_description())
    print("    state:", device.get_state().value_nick)
The device state is an enum of type NMDeviceState and we use value_nick to get its description. The output is something like:
version: 1.41.0
devices:
  - name: lo
    type: loopback
    state: unmanaged
  - name: enp1s0
    type: ethernet
    state: activated
  - name: wlp4s0
    type: wifi
    state: activated
In the libnm documentation we see that the NMDevice object has a get_ip4_config() method which returns a NMIPConfig object and provides access to addresses, routes and other parameters currently set on the device. We can print them with:
    ip4 = device.get_ip4_config()
    if ip4 is not None:
       print("    addresses:")
       for a in ip4.get_addresses():
           print("      - {}/{}".format(a.get_address(),
                                        a.get_prefix()))
       print("    routes:")
       for r in ip4.get_routes():
           print("      - {}/{} via {}".format(r.get_dest(),
                                               r.get_prefix(),
                                               r.get_next_hop()))
From this, the output for enp1s0 becomes:
 - name: enp1s0
   type: ethernet
   state: activated
   addresses:
     - 192.168.122.191/24
     - 172.26.1.1/16
   routes:
     - 172.26.0.0/16 via None
     - 192.168.122.0/24 via None
     - 0.0.0.0/0 via 192.168.122.1
Connecting to a Wi-Fi network
Now that we have mastered the basics, let’s try something more advanced. Suppose we are in the range of a wireless network and we want to connect to it.
As mentioned before, a connection profile describes all the settings required to connect to a specific network. Conceptually, we’ll need to perform two different operations: first insert a new connection profile into NetworkManager’s configuration and second activate it. Fortunately, the API provides method nm_client_add_and_activate_connection_async() that does everything in a single step. When calling the method we need to pass at least the following parameters:
- the NMConnection we want to add, containing all the needed properties;
- the device to activate the connection on;
- the callback function to invoke when the method completes asynchronously.
We can construct the connection with:
def create_connection():
    connection = NM.SimpleConnection.new()
    ssid = GLib.Bytes.new("Home".encode("utf-8"))

    s_con = NM.SettingConnection.new()
    s_con.set_property(NM.SETTING_CONNECTION_ID,
                       "my-wifi-connection")
    s_con.set_property(NM.SETTING_CONNECTION_TYPE,
                       "802-11-wireless")

    s_wifi = NM.SettingWireless.new()
    s_wifi.set_property(NM.SETTING_WIRELESS_SSID, ssid)
    s_wifi.set_property(NM.SETTING_WIRELESS_MODE,
                        "infrastructure")

    s_wsec = NM.SettingWirelessSecurity.new()
    s_wsec.set_property(NM.SETTING_WIRELESS_SECURITY_KEY_MGMT,
                        "wpa-psk")
    s_wsec.set_property(NM.SETTING_WIRELESS_SECURITY_PSK,
                        "z!q9at#0b1")

    s_ip4 = NM.SettingIP4Config.new()
    s_ip4.set_property(NM.SETTING_IP_CONFIG_METHOD, "auto")

    s_ip6 = NM.SettingIP6Config.new()
    s_ip6.set_property(NM.SETTING_IP_CONFIG_METHOD, "auto")

    connection.add_setting(s_con)
    connection.add_setting(s_wifi)
    connection.add_setting(s_wsec)
    connection.add_setting(s_ip4)
    connection.add_setting(s_ip6)

    return connection
The function creates a new NMSimpleConnection and sets all the needed properties. All the properties are grouped into settings. In particular, the NMSettingConnection setting contains general properties such as the profile name and its type. NMSettingWireless indicates the wireless network name (SSID) and that we want to operate in “infrastructure” mode, that is, as a wireless client. The wireless security setting specifies the authentication mechanism and a password. We set both IPv4 and IPv6 to “auto” so that the interface gets addresses via DHCP and IPv6 autoconfiguration.
All the properties supported by NetworkManager are described in the nm-settings man page and in the “Connection and Setting API Reference” section of the libnm documentation.
To find a suitable interface, we loop through all devices on the system and return the first Wi-Fi device.
def find_wifi_device(client):
   for device in client.get_devices():
       if device.get_device_type() == NM.DeviceType.WIFI:
           return device
   return None
What is missing now is a callback function, but it’s easier if we look at it later. We can proceed invoking the add_and_activate_connection_async() method:
import gi
gi.require_version("NM", "1.0")
from gi.repository import GLib, NM

# other functions here...

main_loop = GLib.MainLoop()
client = NM.Client.new(None)
connection = create_connection()
device = find_wifi_device(client)
client.add_and_activate_connection_async(
    connection, device, None, None, add_and_activate_cb, None
)
main_loop.run()
To support multiple asynchronous operations without blocking execution of the whole program, libnm uses an event loop mechanism. For an introduction to event loops in GLib see this tutorial. The call to main_loop.run() waits until there are events (such as the callback for our method invocation, or any update from D-Bus). Event processing continues until the main loop is explicitly terminated. This happens in the callback:
def add_and_activate_cb(client, result, data):
    try:
        ac = client.add_and_activate_connection_finish(result)
        print("ActiveConnection {}".format(ac.get_path()))
        print("State {}".format(ac.get_state().value_nick))
    except Exception as e:
        print("Error:", e)
    main_loop.quit()
Here, we use client.add_and_activate_connection_finish() to get the result for the asynchronous method. The result is a NMActiveConnection object and we print its D-Bus path and state.
Note that the callback is invoked as soon as the active connection is created. It may still be attempting to connect. In other words, when the callback runs we don’t have a guarantee that the activation completed successfully. If we want to ensure that, we would need to monitor the active connection state until it changes to activated (or to deactivated in case of failure). In this example, we just print that the activation started, or why it failed, and then we quit the main loop; after that, the main_loop.run() call will end and our program will terminate.
Adding an address to a device
Once there is a connection active on a device, we might decide that we want to configure an additional IP address on it.
There are different ways to do that. One way would be to modify the profile and activate it again similar to what we saw in the previous example. Another way is by changing the runtime configuration of the device without updating the profile on disk.
To do that, we use the reapply() method. It requires at least the following parameters:
- the NMDevice on which to apply the new configuration;
- the NMConnection containing the configuration.
Since we only want to change the IP address and leave everything else unchanged, we first need to retrieve the current configuration of the device (also called the “applied connection”). Then we update it with the static address and reapply it to the device.
The applied connection, not surprisingly, can be queried with method get_applied_connection() of the NMDevice. Note that the method also returns a version id that can be useful during the reapply to avoid race conditions with other clients. For simplicity we are not going to use it.
In this example we suppose that we already know the name of the device we want to update:
import gi
import socket

gi.require_version("NM", "1.0")
from gi.repository import GLib, NM

# other functions here...

main_loop = GLib.MainLoop()
client = NM.Client.new(None)
device = client.get_device_by_iface("enp1s0")
device.get_applied_connection_async(0, None, get_applied_cb, None)
main_loop.run()
The callback function retrieves the applied connection from the result, changes the IPv4 configuration and reapplies it:
def get_applied_cb(device, result, data):
    (connection, v) = device.get_applied_connection_finish(result)

    s_ip4 = connection.get_setting_ip4_config()
    s_ip4.add_address(NM.IPAddress.new(socket.AF_INET,
                                       "172.25.12.1",
                                       24))

    device.reapply_async(connection, 0, 0, None, reapply_cb, None)
Omitting exception handling for brevity, the reapply callback is as simple as:
def reapply_cb(device, result, data):
   device.reapply_finish(result)
   main_loop.quit()
When the program quits, we will see the new address configured on the interface.
Conclusion
This article introduced the D-Bus and libnm API of NetworkManager and presented some practical examples of its usage. Hopefully it will be useful when you need to develop your next project that involves networking!
Besides the examples presented here, the NetworkManager git tree includes many others for different programming languages. To stay up-to-date with the news from NetworkManager world, follow the blog.

Istanbul
Great article. Thank you so much.
Robert Rędziak
I wish this article had been published two years ago, when I was trying to talk to NM via D-Bus (of course, there is official documentation, but it is a bit terse).
You Really Don't Want to Know
A much simpler alternative is /etc/hosts.
antanof
😀
Mehdi Haghgoo
Nice article and good tutorial.
Thank you.
dilnix
Nice article, shows the most simple examples =)
Thanks!