


We will use Tuxguitar to render the audio of a Guitar Pro score [5]. Guitar Pro scores are files with a complete band score transcribed (guitars, bass, drums, synths and more).
Introduction
Tuxguitar is a quite powerful application written in a mixture of Java / C. It is able to render a score in real time either via Fluidsynth [6] or via pure MIDI. The development of Tuxguitar started in 2008 on Sourceforce and after a halt in 2022, the project restarted on Github and is still actively developed.
The goal of this article is to try to render a score via Tuxguitar, and various other applications connected to Tuxguitar, via Jack or Pipewire-Jack. The score used throughout this article will be The Pursuit Of Vikings by the band Amon Amarth [7]. It has 2 guitars, a bass and a drum track.
First step, configuration
For this audio rendering, we will use some tools from the Audinux Fedora COPR repository [11] [12]. The COPR repository can be enabled via :
$ dnf copr enable ycollet/audinux
You may activate the official real time kernel, via the GRUB menu by adding the following options to the kernel you want to boot (hit ‘e’ while on the kernel you want to boot on GRUB) :
preempt=full threadirqs nopti
Then hit F10 to start the kernel.
Using a real time kernel is not always a requirement for audio. It really depends on how you use audio. For standard audio rendering, a standard kernel is maybe enough. However, if you want real time processing of the audio of a guitar connected to a USB audio interface via Guitarix, for example, then a real time kernel will be required. This is especially true if you want to have a really low latency.
Last step: ensure that the /etc/security/limits.d/25-pw-rlimits.conf has the following settings:
@pipewire – rtprio 80
@pipewire – nice -15
@pipewire – memlock unlimited
Add your username to the pipewire group and disconnect / reconnect to your session.
This last setting is required to allow audio to use a high priority to avoid Xruns (cracks in the sound because of a buffer not filled fast enough).
On Pipewire, you can now adjust the global audio latency via the following command:
$ pw-metadata -n settings 0 clock.force-quantum 256
The global sample rate can be adjusted via the following command:
$ pw-metadata -n settings 0 clock.force-rate 44100
Using Tuxguitar
The first step is to activate the Fluidsynth plugin of Tuxguitar.
Fluidsynth [6] is a software MIDI synthesizer based on the SoundFont 2 specifications [28] and can read sound fonts (set of samples used to mimic some instruments) either in format SF2 (samples based on WAV files) or SF3 (samples based on OGG files – [29]). Fluidsynth comes as a library and executable tool, but is often integrated into applications like Tuxguitar or Qsynth (which is a GUI to control Fluidsynth).
To enable the Fluidsynth plugin in Tuxguitar : open Tools→ Plugins and check Fluidsynth output plugin. After that, select Fluidsynth output plugin on Configure. You will then have access to three tabs (Soundfonts, Audio, and Synthesizer) which allow you to select a better sound font and control the audio rendering of this sound font.

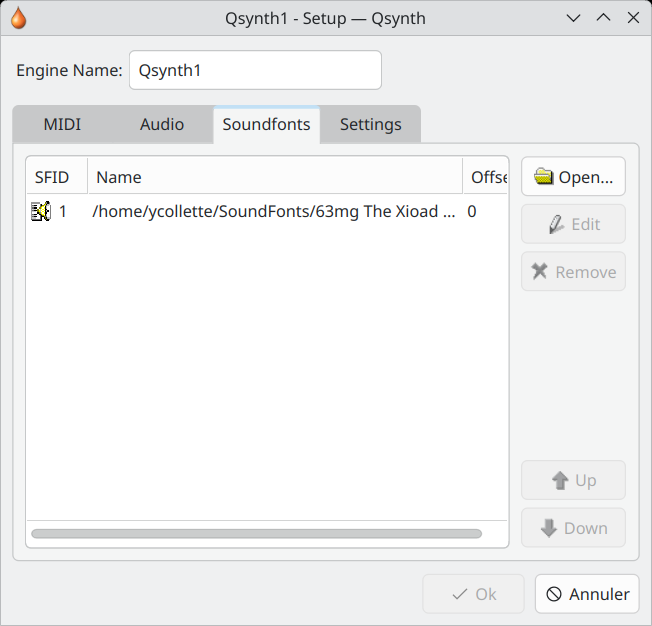
Soundfont selection

Audio configuration
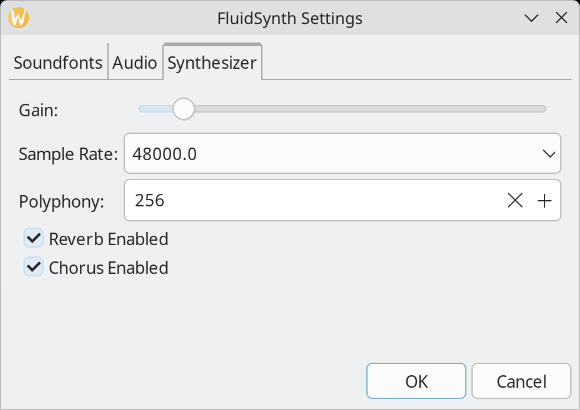
Synthesizer tuning
The Musical Artifacts website [1] hosts a lot of interesting artifacts for audio. You can find the Xioad Bank Sound font which has a lot of interesting sounds for Rock and Metal.
Once the sound font is set up in Tuxguitar, you need to select this sound font as audio driver via Tools → Settings → Sound.
First select a MIDI Sequencer (I use the Jack one) and the MIDI Port (TG Fluidsynth – The Xioad Bank).

Sound configuration dialog
After those selections, you can open the score [4], [7].
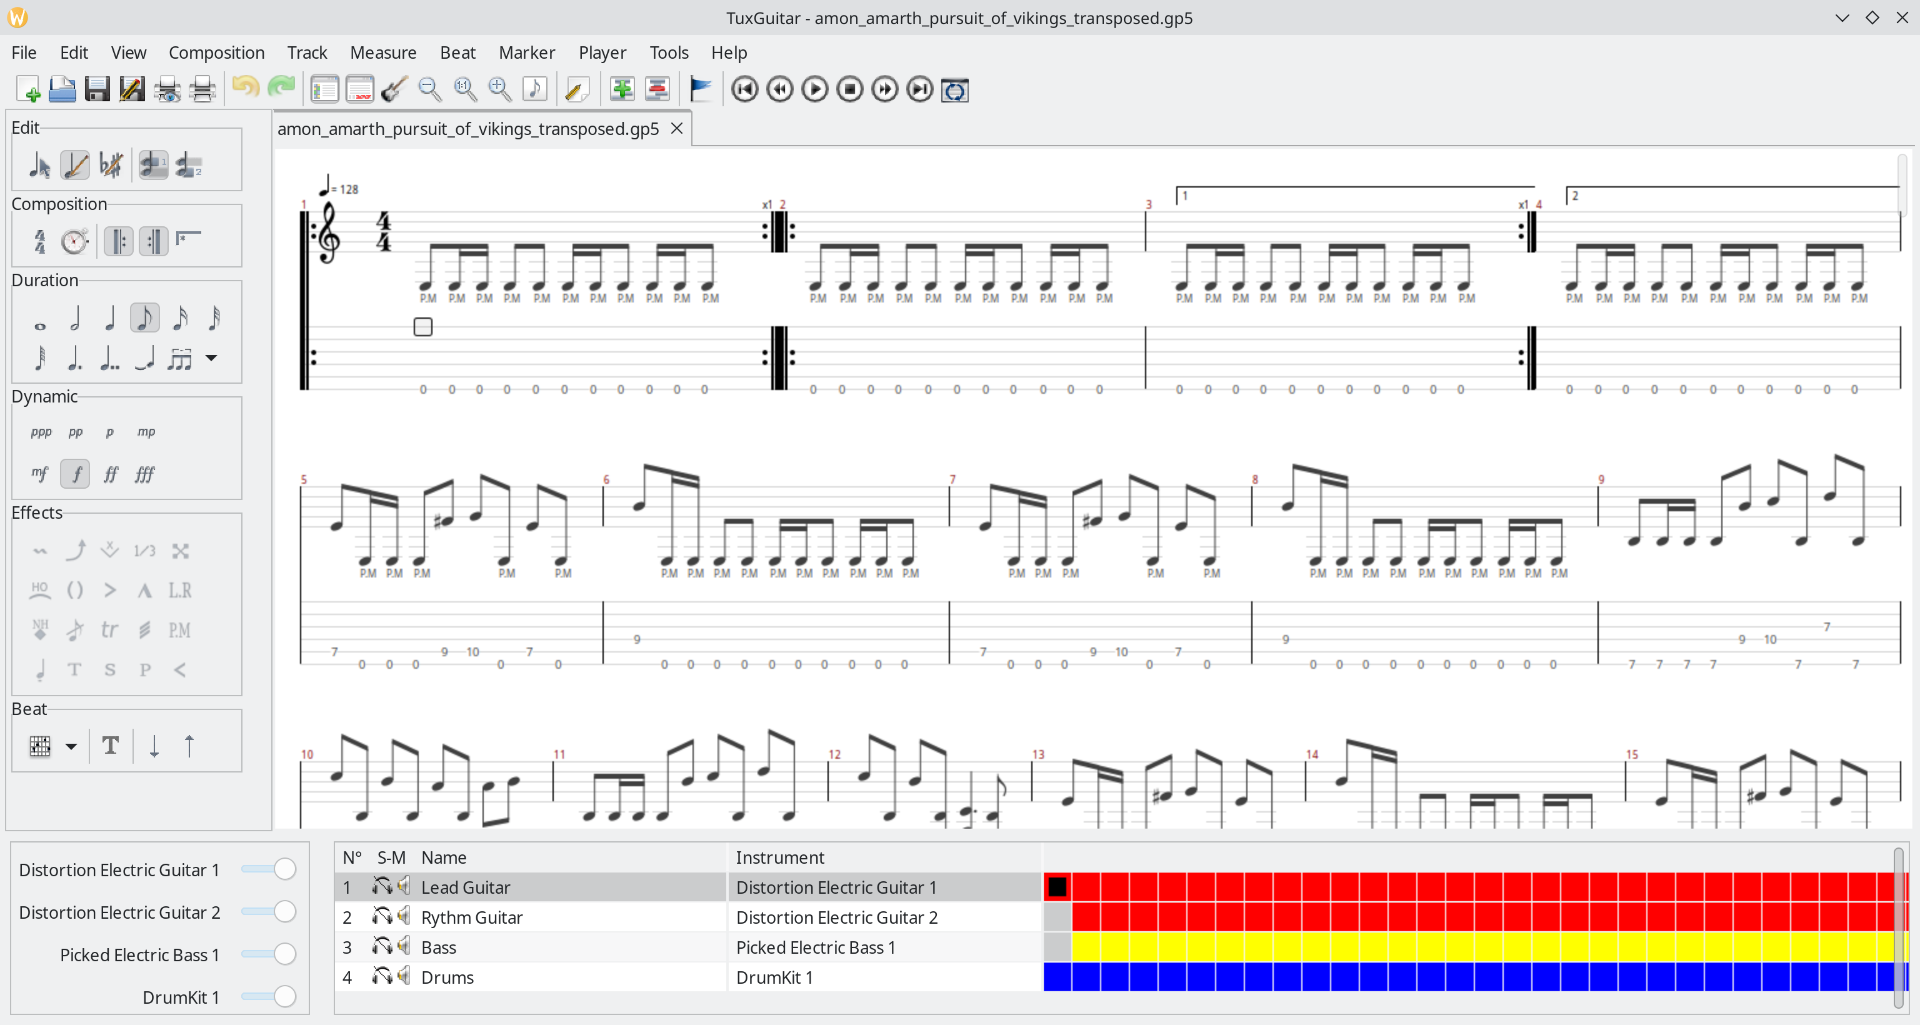
The main Tuxguitar window
Connecting Tuxguitar to Audio Output
Under Jack or Pipewire-Jack, we will need to connect Tuxguitar to the audio output of the computer. This can be done via Ray-Session [10] or qpwgraph [30].
Ray Session is an audio session manager. It can load a user defined set of applications and remember the audio connections made between application and rewire these connections automatically. With such a tool, you can restart and rewire a complex session in a second.

Ray Session connection window
qpwgraph is a Pipewire graph manager and can be used to perform connections between various applications.
In Ray Session you will need to draw wires between the fluidsynth block to the audio output (a block with blue connectors). When that is complete, select Play in Tuxguitar to render the score.
Fine tuning the drum sound
Some sound fonts provide various drum kits and, via Tuxguitar, it is relatively easy to select a new kit.
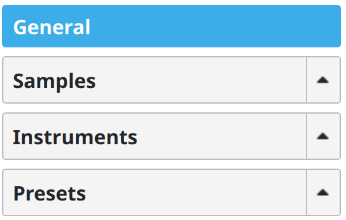
First, inspect the sound font using Polyphone [8], [9]. Polyphone is a sound font editor. You can easily create new sound fonts using this tool by assembling samples into instruments and presets.
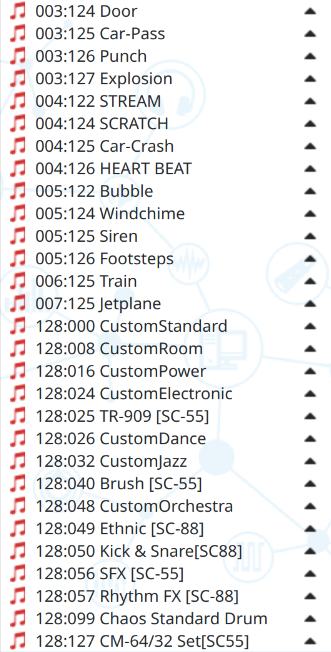
List of available ensembles for Xioad sound font
In the Presets subsection, you can see all the available instruments in the sound font. Each instrument is identified by an index. For example, in 006:125 the first number is the bank (006) and the second number is the instrument (125). Thus, 006:125 → bank 6 and instrument 125. In the general MIDI specification [21], bank 128 is dedicated to drums. As you can see, the Xioad sound font gives you access to 15 drum kits. We will now switch the default drum kit used by Tuxguitar from 128:001 – Custom Standard to 128:016 – Custom Power.
The instrument list of the current score
Switch the drum kit by selecting View → Show Instruments and then, in the DrumKit 1 area, select the drop down menu and select ‘Program #16‘ to select the 128:016 – Custom Power drum kit. There is a correspondence between the ‘Program #’ number and the bank ‘128:’ number.
You can now hit Play in Tuxguitar and hear the difference in sound between the default drum kit and the one just selected.
Using Tuxguitar and Hydrogen / QSynth
We will now set up Tuxguitar as a MIDI sequencer using :
- Qsynth for the audio rendering anything but the drum [15], [16]
- Hydrogen for the drum audio rendering [13], [14]
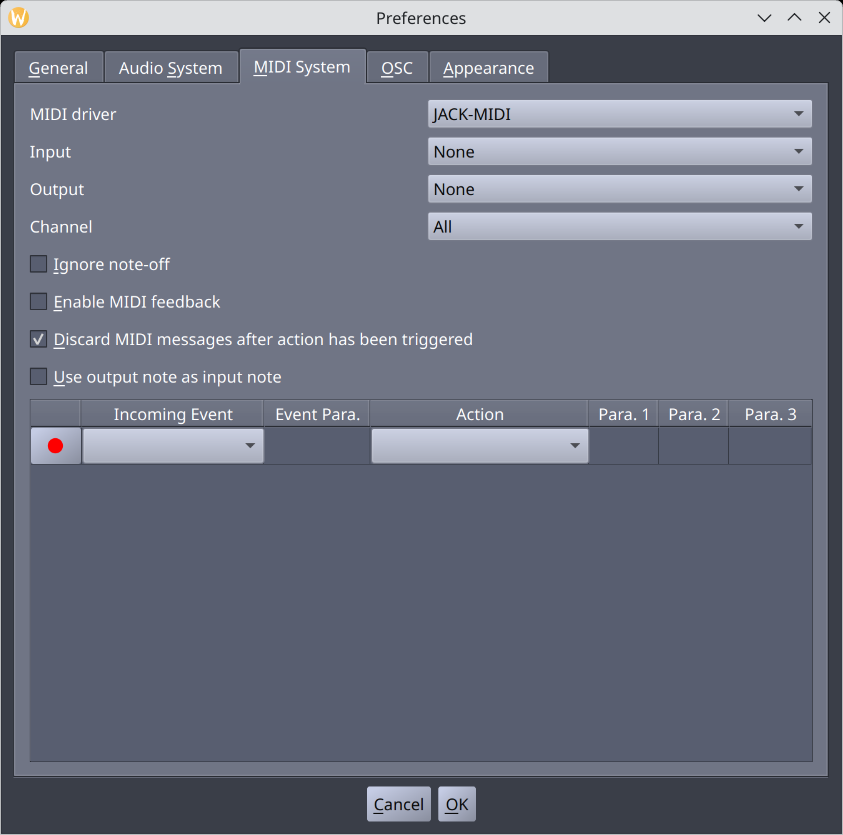
To turn Tuxguitar into a MIDI sequencer perform the following:
- via the Tools → Plugins, ensure that Jack Audio Connection Kit output plugin is checked ;
- via the Tools → Settings → Sound, select Jack Midi Port in the MIDI Port field.
Tuxguitar will now no longer generate sound but will generate MIDI events.
Start Qsynth and load the Xioad sound font into Qsynth via the Setup button.
For Qsynth, we need to take the following steps:
- in the MIDI tab, select Jack as MIDI Driver and be sure to check ‘Enable MIDI Input’. Rename the ‘Engine Name’ with a informative name of your choice;
- in the Audio tab, select Jack as Audio Driver and rename the ‘JACK Client Name ID’;
- in the Soundfonts tab, load the sound font you want (Xioad sound fount in our example) and remove the default one.
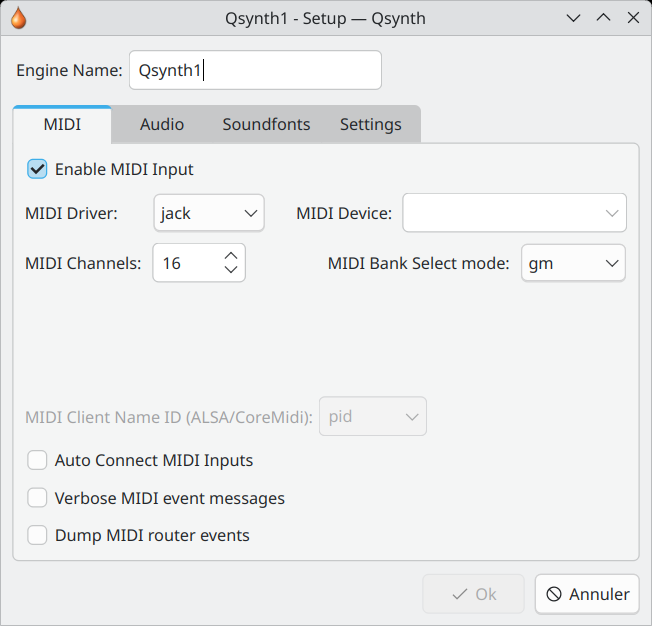
MIDI configuration for Qsynth
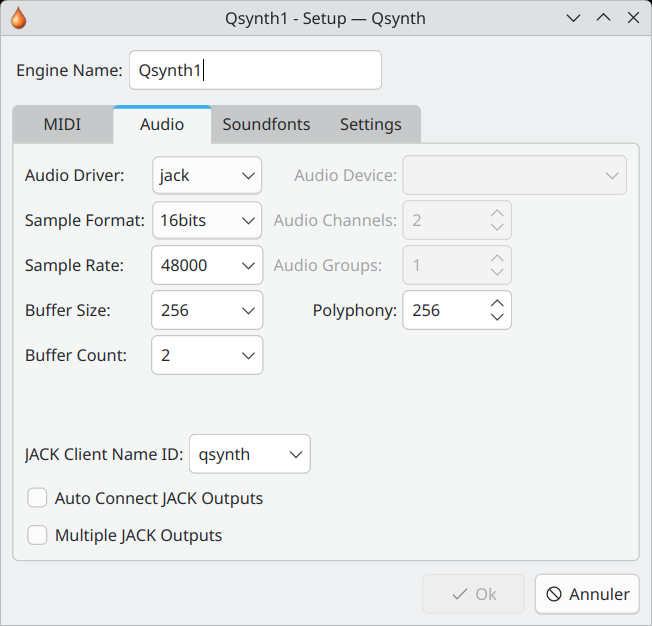
Qsynth Audio configuration
Qsynth sound font selection
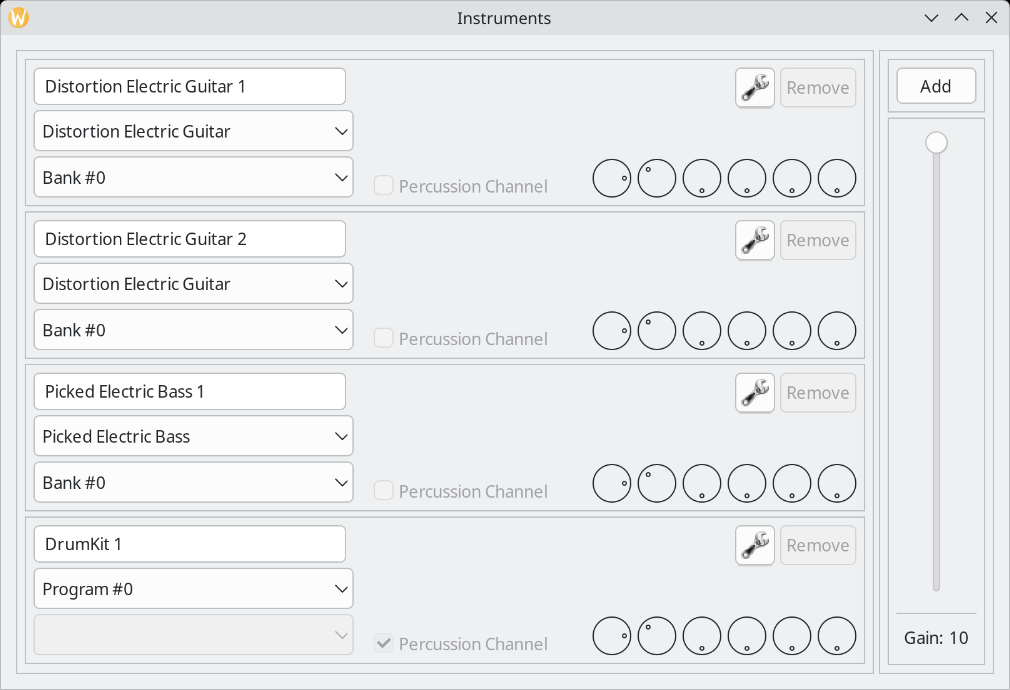
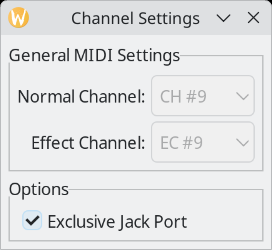
Now, open View→ Show Instruments and in the Drum Kit area, and select the wrench tool. A dialog shows up from which you select Exclusive Jack Port. This will add a specific output for the drum and a new output will show up and will gather all the other instruments (the 2 guitars and the bass).
MIDI exclusive port selection
Via Ray Session, you will have to create some audio connections (blue ports / blue wires) and some MIDI connections (pink ports / pink wires).

Ray Session connection view
We have now connected all the guitars and the bass to Qsynth and need to focus on the drum.
Now start Hydrogen
Hydrogen [13], [14] is a standalone application which is a drum sequencer with a lot of interesting drum kits. If you want to use Hydrogen as an audio plugin, some plugins exists and will be presented later in this article.
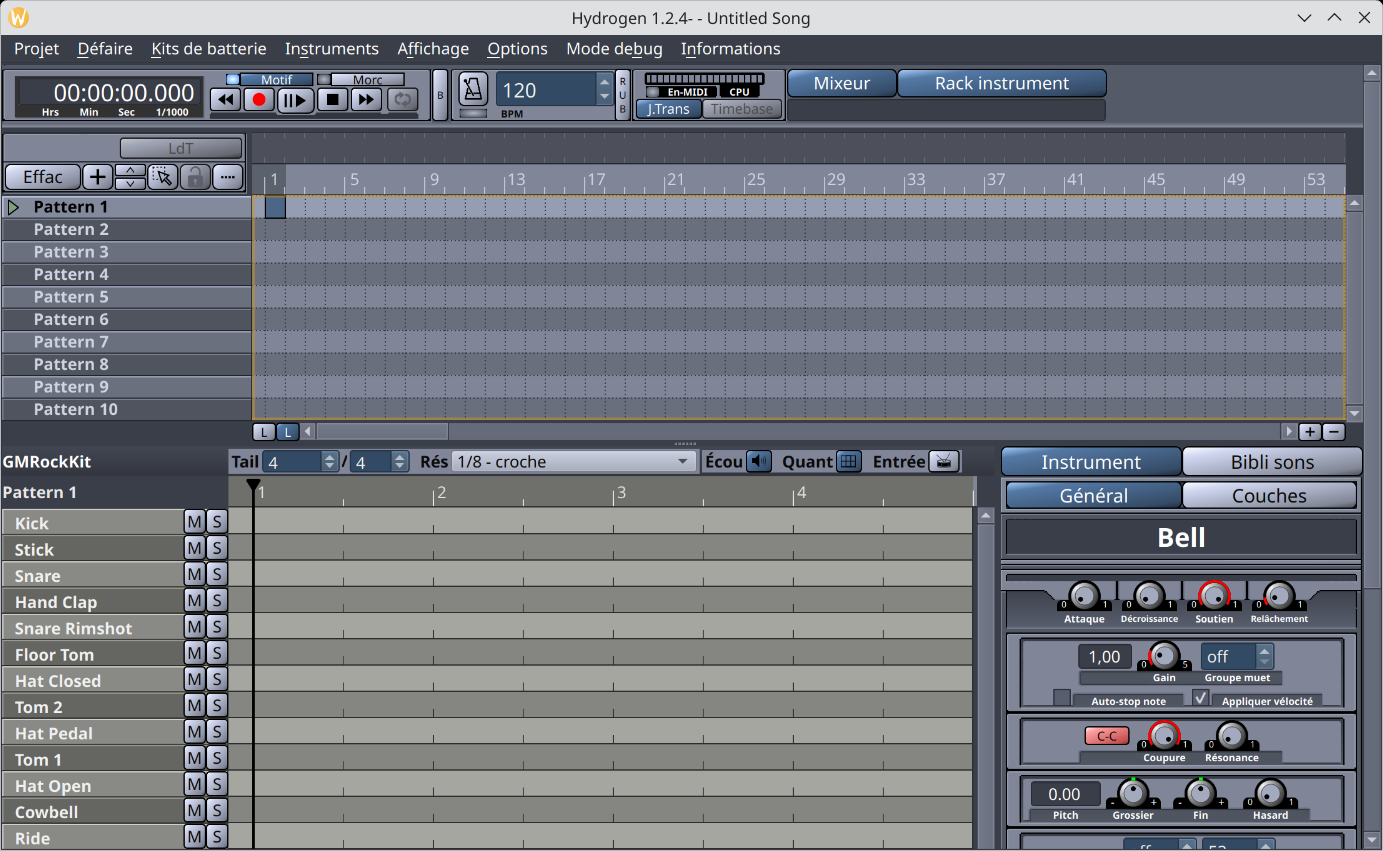
Main window for Hydrogen
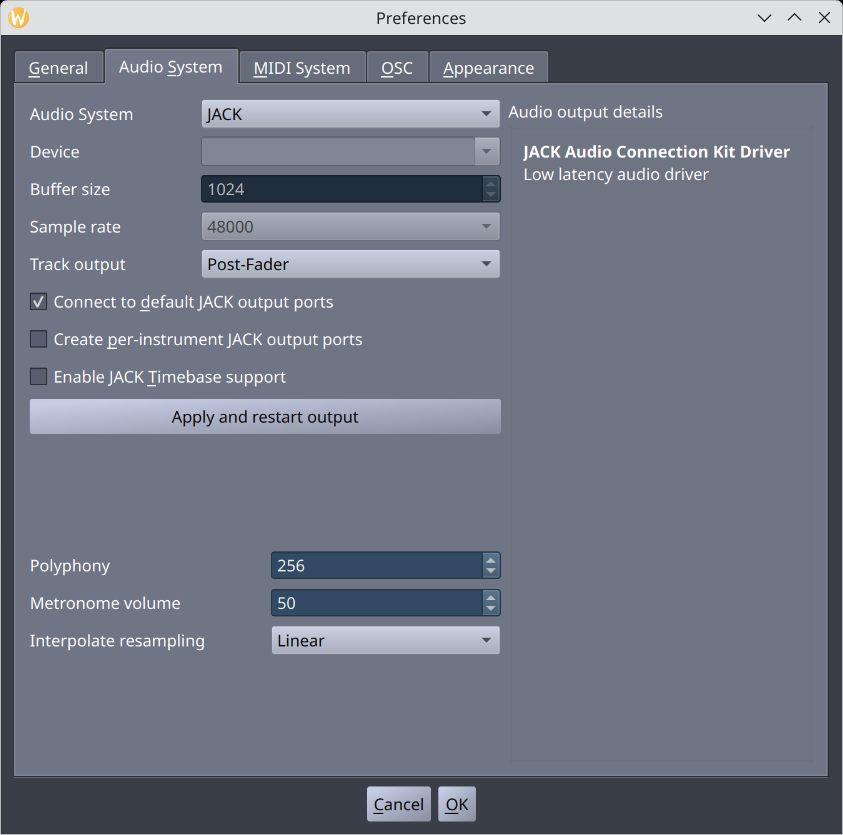
Audio configuration for Hydrogen
Hydrogen MIDI configuration
Under Ray Session, Hydrogen has 2 boxes : one for audio output and the other one for MIDI input / output.

Ray Session connection view
You can now install a Hydrogen drum kit from the annex and select it via the View → Instrument rack and then click on Sound Library in the instrument view. You will see all the drum kits installed.
Right click on a drum kit and select Load.
After that you can render the score via Tuxguitar → Play.
If you want to use Hydrogen as a LV2 plugin, you can use the Drmr plugin [18] or select other plugins available in Audinux.
Using Tuxguitar and Hydrogen / DrumGizmo
DrumGizmo is a professional drum sequencer [16]. It comes as an executable or as a LV2 plugin. We will use the executable version. Once installed, you will need to install a drum kit from DrumGizmo [17].
These drum kits are professionally recorded. From DrumGizmo[17], the description of the recording setup of the DRS drum kit : all microphones are connected to its own channel when loading the kit in DrumGizmo. A total of 13 channels. Remember to pan the relevant channels to give you a better stereo effect.
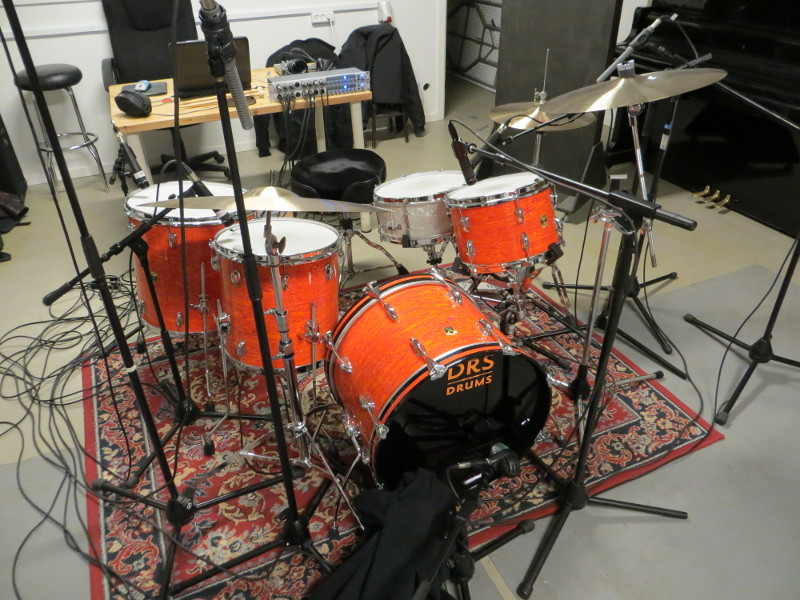
DRS drum kits recording setup:
- Channel 1: Ambiance left
- Channel 2: Ambiance right
- Channel 3: Kick drum back
- Channel 4: Kick drum front
- Channel 5: Hihat
- Channel 6: Overhead left
- Channel 7: Overhead right
- Channel 8: Ride cymbal
- Channel 9: Snare drum bottom
- Channel 10: Snare drum top
- Channel 11: Tom1
- Channel 12: Tom2 (Floor tom)
- Channel 13: Tom3 (Floor tom)
Using the DRS drum kit
For the demonstration, we will use the DRS drum kit.
The command line used to start the DrumGizmo sequencer (in the DRS kit directory) :
$ drumgizmo -i jackmidi -I midimap=Midimap_minimal.xml -o jackaudio DRSKit_minimal.xml
There are several MIDI map files available for DrumGizmo :
Midimap_basic.xml

Midimap_full.xml

Midimap_minimal.xml

Midimap_no_whiskers.xml

Midimap_whiskers_only.xml
Each file is activating some options in drum rendering. We will use the simple MIDI map available.
The minimal MIDI map has the following MIDI events :
Midi note: 44 -> Hihat_foot sample
Midi note: 37 -> Snare_rim sample
MIDI note: 49 -> Crash_left_shank sample
MIDI note: 57 -> Crash_right_shank sample
MIDI note: 42 -> Hihat_closed_shank sample
MIDI note: 46 -> Hihat_semi_open sample
MIDI note: 35 -> Kdrum_without_contact sample
MIDI note: 36 -> Kdrum_with_contact sample
MIDI note: 51 -> Ride_tip sample
MIDI note: 53 -> Ride_shank_bell sample
MIDI note: 38 -> Snare sample
MIDI note: 40 -> Snare_rest sample
MIDI note: 47 -> Tom1 sample
MIDI note: 43 -> Tom2 sample
MIDI note: 41 -> Tom3 sample
The first number corresponds to the MIDI event: 44 for the Hihat_foot sample.
The full MIDI map has the following MIDI events :
MIDI note 54 -> Crash_left_tip sample
MIDI note 60 -> Crash_left_whisker sample
MIDI note 55 -> Crash_right_tip sample
MIDI note 62 -> Crash_right_whisker sample
MIDI note 56 -> Hihat_closed sample
MIDI note 64 -> Hihat_closed_whisker sample
MIDI note 44 -> Hihat_foot sample
MIDI note 58 -> Hihat_open sample
MIDI note 61 -> Hihat_open_tip sample
MIDI note 65 -> Hihat_open_whisker sample
MIDI note 63 -> Ride_rest sample
MIDI note 66 -> Ride_shank sample
MIDI note 68 -> Ride_tip_bell sample
MIDI note 70 -> Ride_tip_bell_chain sample
MIDI note 73 -> Ride_tip_chain sample
MIDI note 67 -> Ride_whisker sample
MIDI note 69 -> Snare_circle_whisker sample
MIDI note 37 -> Snare_rim sample
MIDI note 71 -> Snare_whisker sample
MIDI note 72 -> Tom1_whisker sample
MIDI note 74 -> Tom2_whisker sample
MIDI note 76 -> Tom3_whisker sample
MIDI note 49 -> Crash_left_shank sample
MIDI note 57 -> Crash_right_shank sample
MIDI note 42 -> Hihat_closed_shank sample
MIDI note 46 -> Hihat_semi_open sample
MIDI note 35 -> Kdrum_without_contact sample
MIDI note 36 -> Kdrum_with_contact sample
MIDI note 51 -> Ride_tip sample
MIDI note 53 -> Ride_shank_bell sample
MIDI note 38 -> Snare sample
MIDI note 40 -> Snare_rest sample
MIDI note 47 -> Tom1 sample
MIDI note 43 -> Tom2 sample
MIDI note 41 -> Tom3 sample
Various options are available in DrumGizmo to enhance the audio rendering like:
- -t, –timing-humanizer: Enable moving of notes in time. NOTE: Adds latency to the output so do not use this with a real-time drumkit;
- -T, –timing-humanizerparms <x>: Timing humanizer options;
- -x, –velocity-humanizer: Enables adapting input velocities to make it sound more realistic;
- -X, –velocity-humanizerparms <x>: Velocity humanizer options.
And we also select Jack for audio output and Jack for MIDI input.
Connecting all the Inputs
Now, we have to connect all the audio and MIDI inputs. We have the following connections on Ray Session :

Tuxguitar, Qsynth and DrumGizmo connections on Ray Session
As you can see, the drum from DrumGizmo comes with many outputs.
There is now a huge difference in audio rendering when we consider the drum. We had a good result with the selection of a specific sound font, this result was improved a little bit via the use of Hydrogen but now, we have a nearly perfect drum rendering.
Some other solutions for the drum
We will now use some plugins as drum sequencers.
Audinux Plugins
The following plugins are available in Audinux:
- drumkv1 : an old-school drum-kit sampler
- drumlabooh : LV2/VSTi drum machine that can use Hydrogen, SFZ, and other drumkit formats
- drumrox : a hydrogen compatible drum LV2 plugin
- lv2-avldrums-x42-plugin : simple Drum Sample Player LV2 Plugin
- ChowKick : kick synthesizer based on old-school drum machine circuits
- boomer : a drum synth
- drmr : a drum LV2 plugin
- geonkick : drum Software Synthesizer
- kickmess : a kick drum synthesizer plugin
- lv2-fabla : an LV2 drum sequencer
- onetrick-cryptid : an FM drum synth with the cold clanging heart of a DX7 in the fearsome frame of an 808
- onetrick-simian2 : an open source drum synth inspired by hexagonal classics like the Simmons SDS-V
- onetrick-urchin : a hybrid drum synth that models the gritty lo-fi sound of beats from vintage records without sampling.
- sickbeatbetty : an open source MIDI drum machine / generator VST and standalone application
- stegosaurus : drum synthesizer
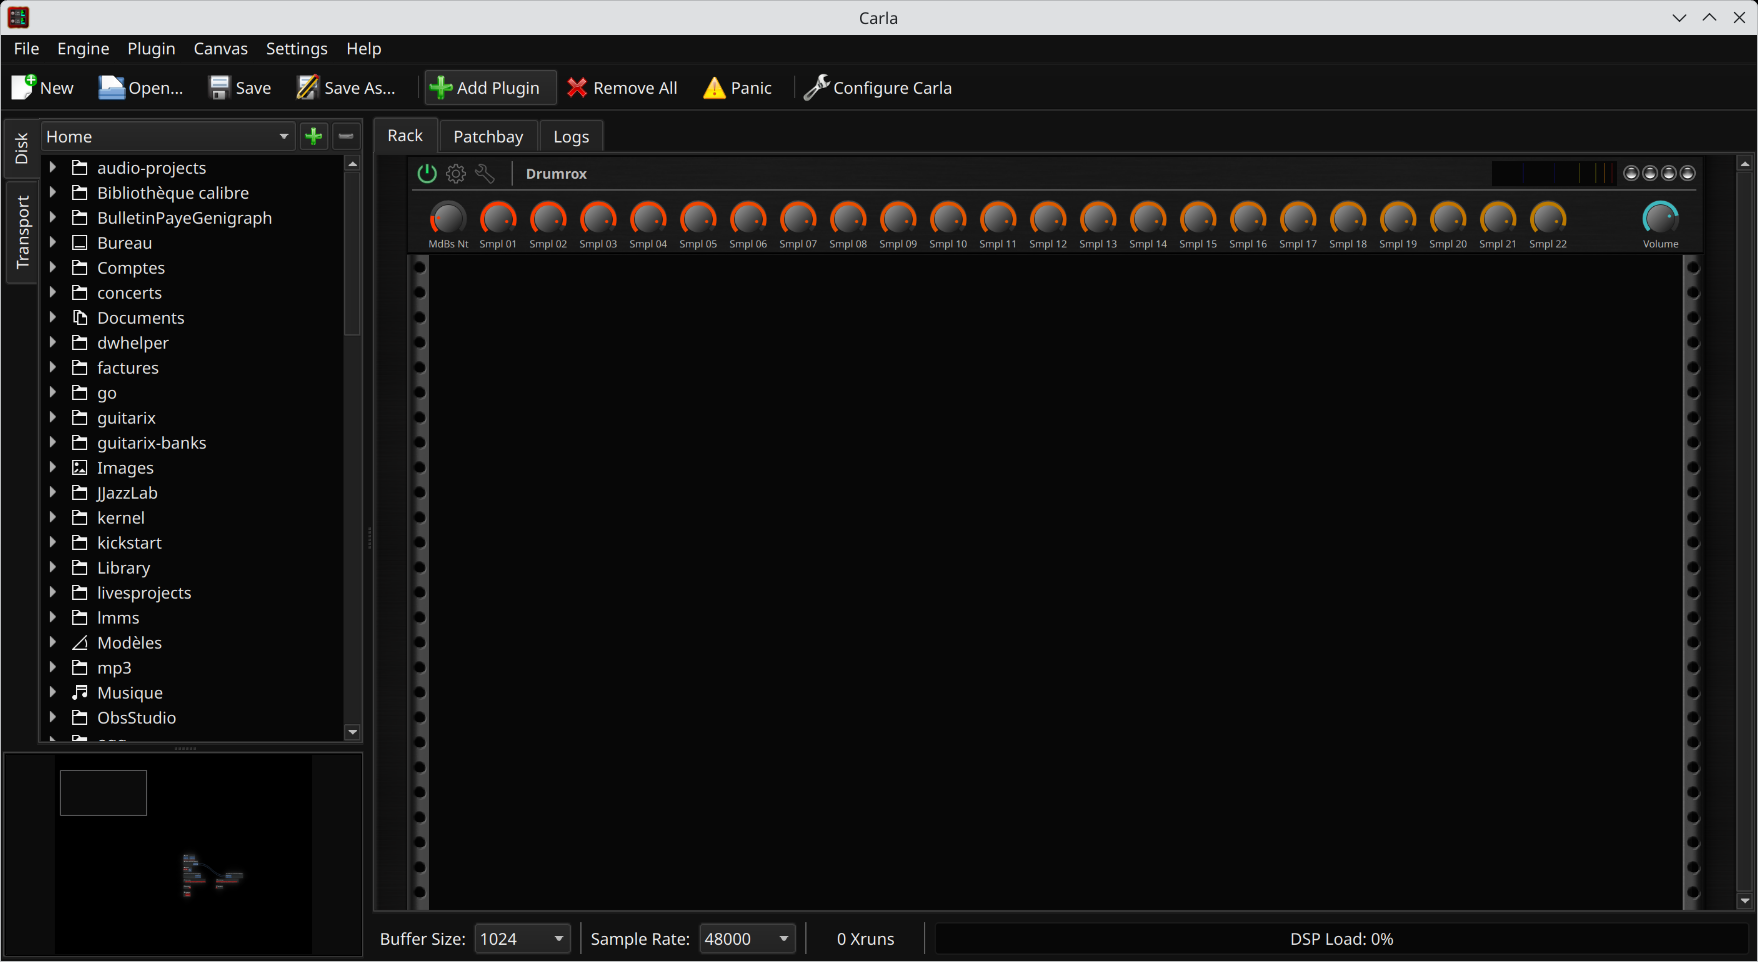
Using Drumrox
We will perform our test using the Drumrox LV2 plugin. To be able to use this sequencer, we will need to use the Carla rack.
Don’t forget to install either a hydrogen drum kit or a drumrox kit via
We can either install the Carla or Carla-mao RPM package. The second one provides some tools to allow loading a Windows VST plugin via Wine. We need also to install the Drumrox package.
Once
The
Investigating Drumrox
Now display the Drumrox GUI via a click on the nut button near the ON/OFF button and select an installed drum kit in the Kit field. This plugin is able to load a Hydrogen drum kit, but it can also load a Drumrox drum kit.
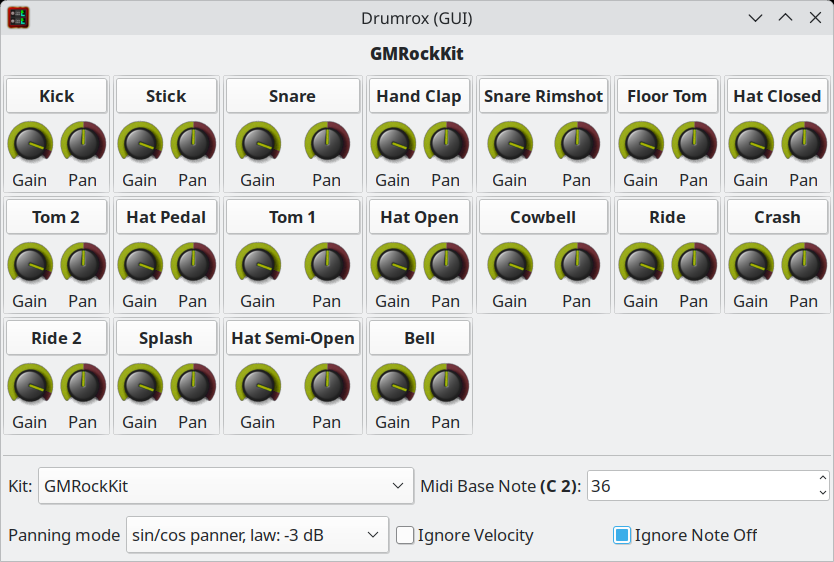
The drumrox LV2 plugin with the GMRockKit drum kit loaded
Drumrox plugin comes into 2 flavors :
- Drumrox : a plugin with 2 output channels
- Drumrox-Multi : a plugin with 36 output channels
We have the following audio / MIDI connections under Ray Session :
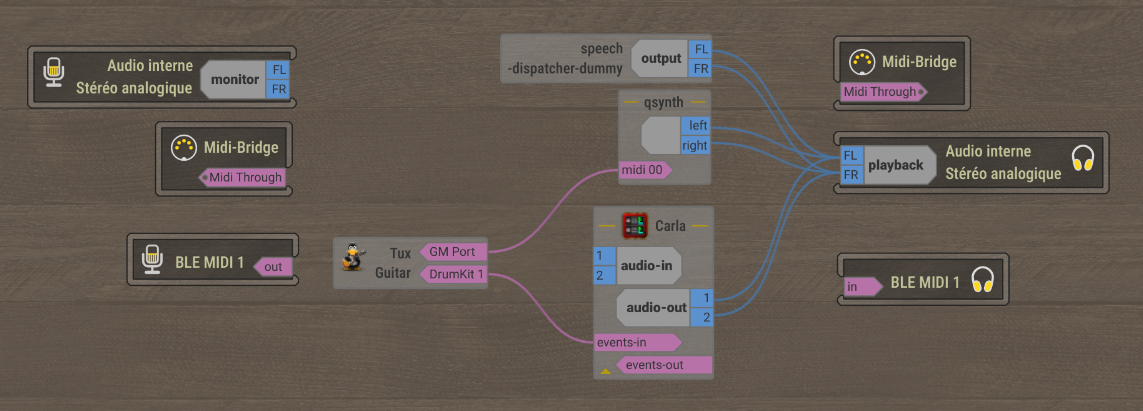
Carla / Qsynth / Tuxguitar audio / MIDI connections
Using a sound font by instrument
First we download some SF2 files from the Musical Artifacts website :
We will need to launch these applications :
- 4 x
. One will host the Drumrox plugin for drum and the 3 others will host one MIDI Event filter to filter out the bank change event sent by Tuxguitar and which resets the channels settings we made in Qsynth ;carla-rack
- Qsynth with one Fluidsynth engine by instrument ;
- Tuxguitar.
We will need these plugins :
- Drumrox : the drum plugin compatible with Hydrogen drum kits ;
- lv2-x42-plugins [26], [27] : a set of various plugins dedicated to MIDI management and in this set, we will use MIDI Event Filter.

Ray Session view of the connections made between all the applications
An Issue with Tuxguitar … and a workaround
The problem with Tuxguitar: each time we hit the play button, a MIDI event “bank change” is sent and this event erases all the set up made in Qsynth channelsassignment. So, to avoid this bank change event, we need to use the MIDI Event Filter plugin and filter out this event. The content of the MIDI Event Filter in Carla rack is :

Carla Rack view
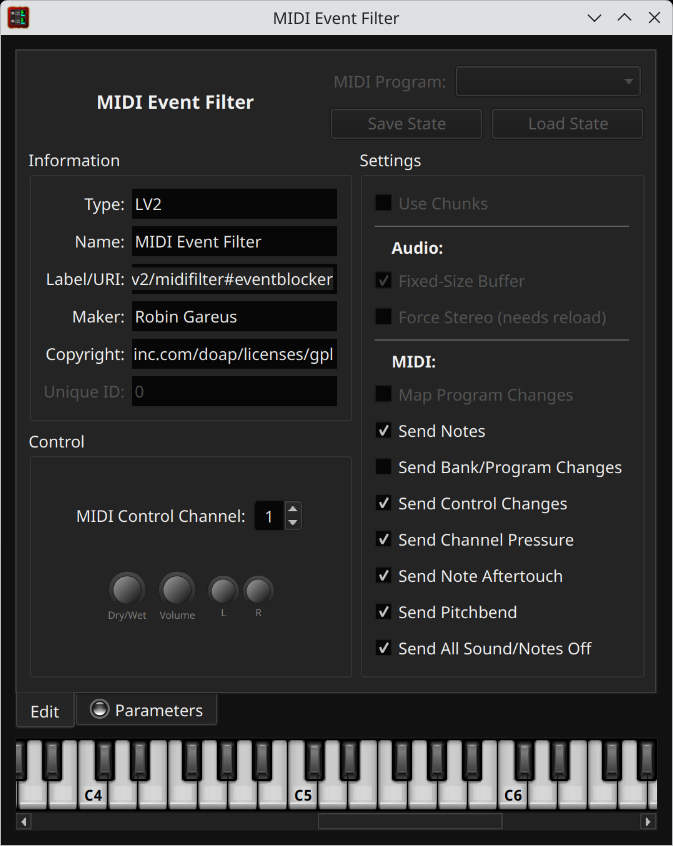
MIDI Event Filter settings
For Qsynth, we need to take the following steps:
- in the MIDI folder :
- rename the Engine Name (Guitar1 here) ;
- select ‘jack’ as MIDI Driver
- uncheck Auto Connect MIDI Inputs
- in the Audio folder :
- select ‘jack’ as Audio Driver
- rename the Jack Client Name ID as ‘Guitar1’
- uncheck the Auto Connect Jack Outputs
- in the Soundfonts folder :
- load the sound font we want
- remove the default sound font
We need to repeat these steps for each instrument we want to add.

MIDI settings for Qsynth

Audio settings Qsynth

Soundfonts settings for Qsynth
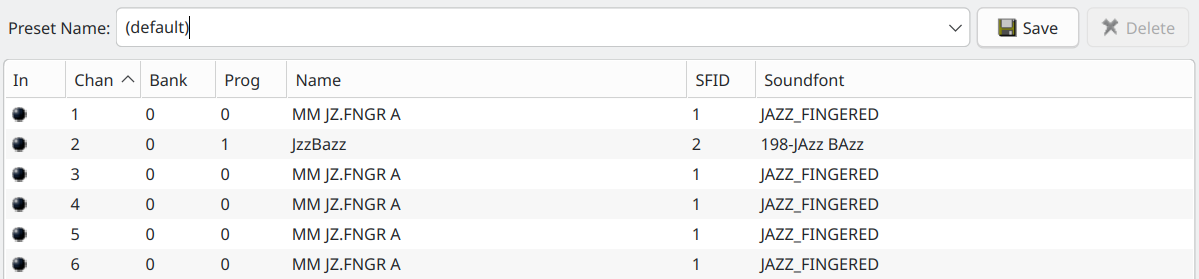
Last step : setting the channels assignment for each instrument.
Select instruments by channel
Depending on the sound font you have loaded, you will need to select some instrument, by channel.
When we selected the ‘Exclusive Jack Port’ in Tuxguitar, the MIDI program numbering switched from ‘General MIDI’ (from 0 to 127) to 2 channels only (one for the instrument and one for the instrument effects). In the Qsynth channel assignment GUI, we will need to make some correspondence between the 1/2 channels of Tuxguitar to the bank of the requested instrument (29 for the guitar sound font we used in the example).

Guitar Qsynth channel assignment
Bass Qsynth channel assignment
Now, in Tuxguitar, to you need to select the Jack MIDI Port in Tools → Settings → Sound → Port MIDI. Open the Instrument view (View → Show Instruments) and click each wrench icon of the guitars and bass to check Exclusive Jack Port. You will have to connect every box in Ray Session like the above figure.
The audio rendering will depend on the SF2 / SF3 sound fonts you loaded but with such a settings, everything is possible.
Conclusion
One of the main strength of music under Linux is the ability to connect several application between them and having the sound rendered in real time with a low latency.
With a tool like Ray Session, the management of complex application connection is really easy. This tool can start a set of application and reconnect all these really quickly.
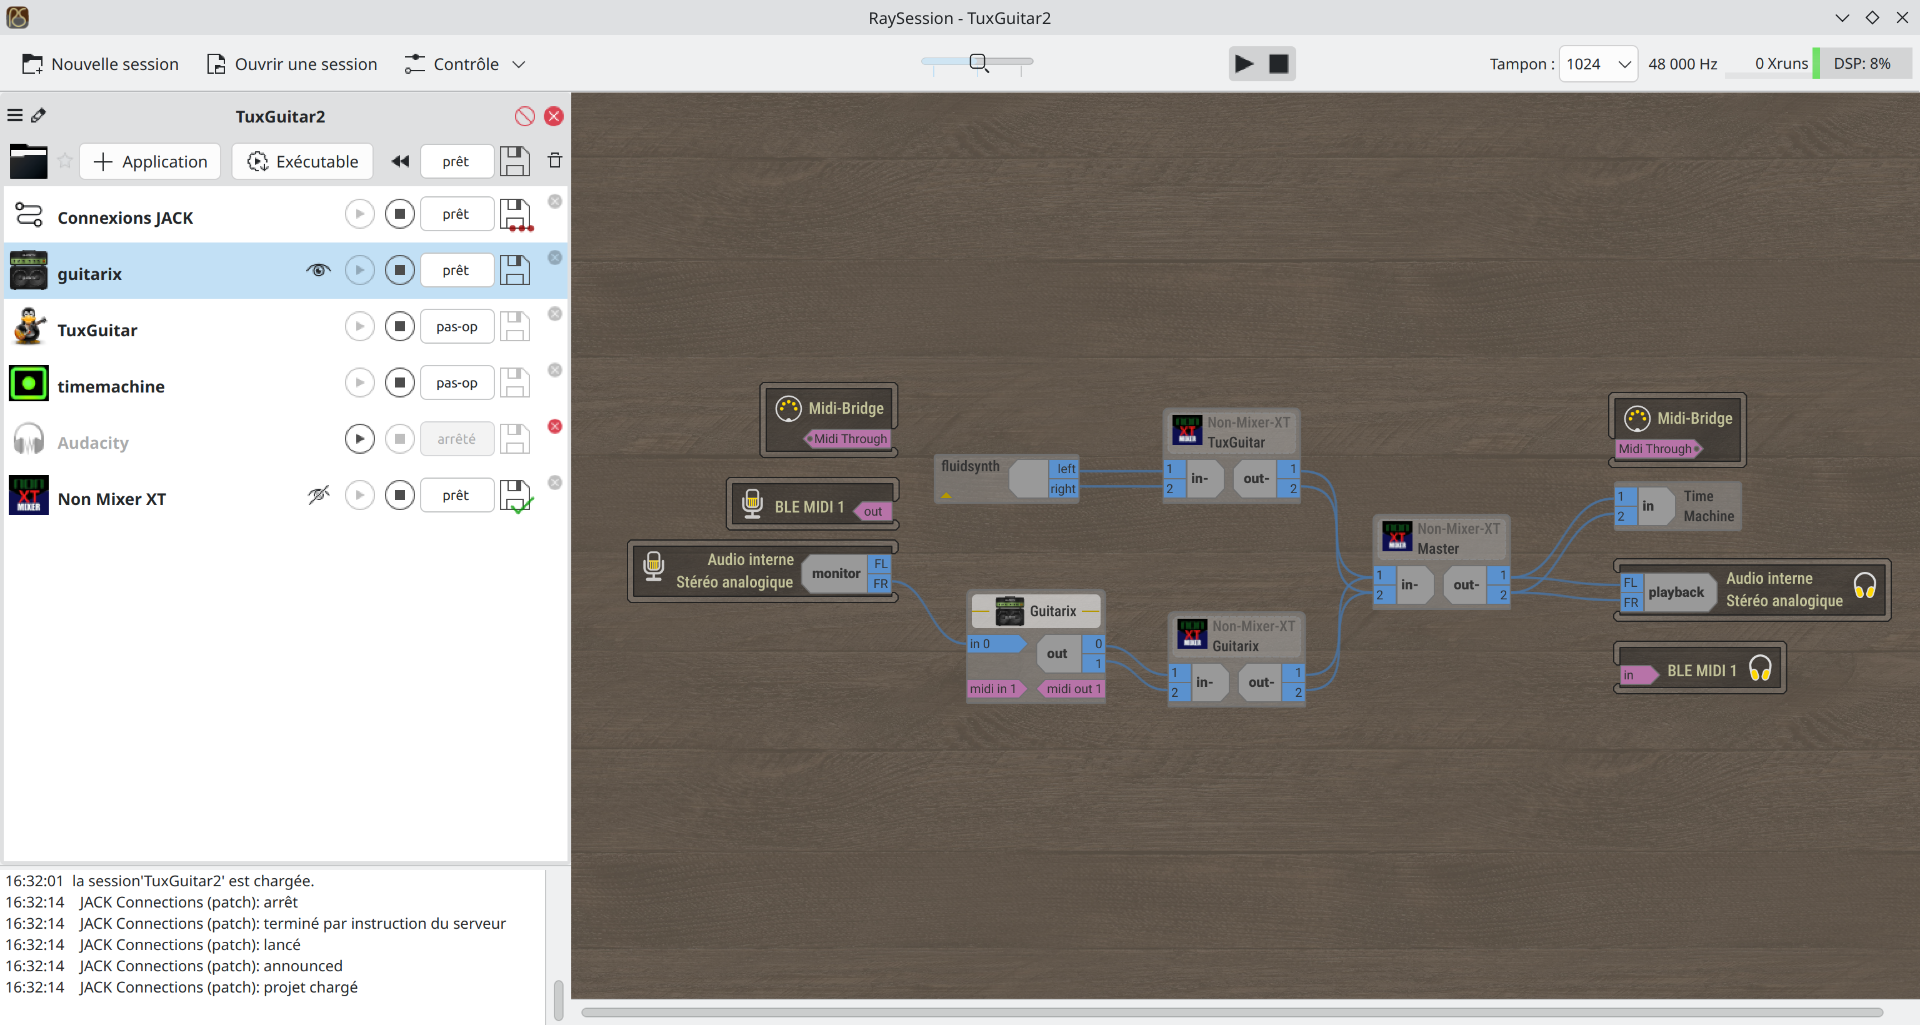
Ray Session main window with a set of application launched
The ergonomics and efficiency of audio applications has greatly improved and will continue to improve in the coming years. We can also notice that several pro audio tools are now available on Linux like Ardour [22] / Mixbus [23], Bitwig [24], Renoise [25] and many others. This allows us to use audio under Linux as people use audio on Apple and Windows.
So, now, it’s time to make some music on Linux and be careful, Linux can be really addictive.
Links
[1] – https://musical-artifacts.com/artifacts/362
[2] – https://www.tuxguitar.app/
[3] – https://github.com/helge17/tuxguitar
[4] – https://www.ultimate-guitar.com/explore?type[]=Pro
[5] – https://www.guitar-pro.com
[6] – https://github.com/FluidSynth/fluidsynth
[7] – https://tabs.ultimate-guitar.com/tab/amon-amarth/the-pursuit-of-vikings-guitar-pro-213840
[8] – https://polyphone-soundfonts.com/
[9] – https://github.com/davy7125/polyphone
[10] – https://github.com/Houston4444/RaySession
[11] – https://audinux.github.io/
[12] – https://copr.fedorainfracloud.org/coprs/ycollet/audinux/
[13] – http://hydrogen-music.org/
[14] – https://github.com/hydrogen-music/hydrogen
[15] – https://qsynth.sourceforge.io/
[16] – https://github.com/rncbc/qsynth
[16] – https://www.drumgizmo.org/wiki/doku.php?id=start
[17] – https://www.drumgizmo.org/wiki/doku.php?id=kits
[18] – https://github.com/falkTX/drmr
[19] – https://musical-artifacts.com/artifacts/3038
[20] – https://musical-artifacts.com/artifacts/2077
[21] – https://en.wikipedia.org/wiki/General_MIDI
[22] – https://ardour.org/
[23] – https://store.harrisonaudio.com/all-products/mixbus-11-daw
[24] – https://www.bitwig.com/
[25] – https://www.renoise.com/
[26] – https://github.com/x42/x42-plugins
[27] – https://x42-plugins.com/x42/
[28] – https://www.synthfont.com/sfspec24.pdf

nettux
Simplesmente fantástica essa matéria!
Isso que eu chamo de postagem profissional!
Por isso eu amo Linux…
Sou profissional de TI e sou músico (Tecladista) e sempre quis usar meu instrumento no Linux e, quando pensava nas barreiras e limitações, desistia, mas agora vou seguir esse tutorial e fazer de novo!
Obrigado!
Yann Collette
Muito obrigado por este comentário.
O Linux evoluiu muito ao longo dos anos e, francamente, a usabilidade desses aplicativos melhorou enormemente.
vadim s. sabinich
Boa tarde!
This is a first complete tutorial for install and setup audio software in Linux, which I found ever!
Thanks for it!
Yann Collette
Thanks a lot for your comment !
Jose Vicente Nunez
This is a fantastic article. The amount of detail and concise explanations are just great. Please write more about this and other topics.
Great job!
Yann Collette
Thanks a lot !
There will be more articles for sure ! 🙂
Pokerogue
Tuxguitar’s revival is exciting! Imagine composing Viking-inspired riffs then hearing them rendered flawlessly. Configuring audio for real-time processing can be tricky, like managing a busy kitchen.
Yann Collette
Yes, it’s exciting. If you are able to configure a nice sound font. The audio result is quite nice. And the visual score rendering has greatly improved too ..
Alexis
Es una pena que se publique en la revista de Fedora un excelente artículo para usar un programa que ni siquiera se encuentra oficialmente en sus repositorios a contar de Fedora 42, pese a que se encuentra en activo desarrollo actualmente (Ubuntu y OpenSuse si lo encuentran en sus repositorios)
Richard England
“It is a shame that an excellent article is published in Fedora magazine about using a program that is not even officially in its repositories as of Fedora 42, despite the fact that it is currently under active development (Ubuntu and OpenSUSE can find it in their repositories).”
Why is this a shame?
By the way, using English will probably generate a better response.
Alexis
“Shame” is not the correct term. “Es una pena” expresses a situation that I would like it to be one way, but it is not.
Richard, sorry for this misunderstanding.
Richard England
Thank you for the clarification. Google Translate isn’t ready for prime-time, obviously.