


The following article is the first of a series about how I’ve used the Fedora Linux operating system to create a home network. My goal is to demonstrate a few ways that Fedora Linux can be useful to a home user or a Small Office / Home Office (SOHO) user and to encourage more people to test, implement and use Fedora Linux. There is also demand in the workforce for Information Technology (IT) professionals who are ready to step into duties that require familiarity with Linux. With Linux, you can start without big investments. You can use what equipment you have and grow with your ideas.
Disclaimer
I’ve named the exact brand and models of the hardware I used for information only. I have no contracts with any of these companies or their vendors and I do not receive any income from them.
Prolog
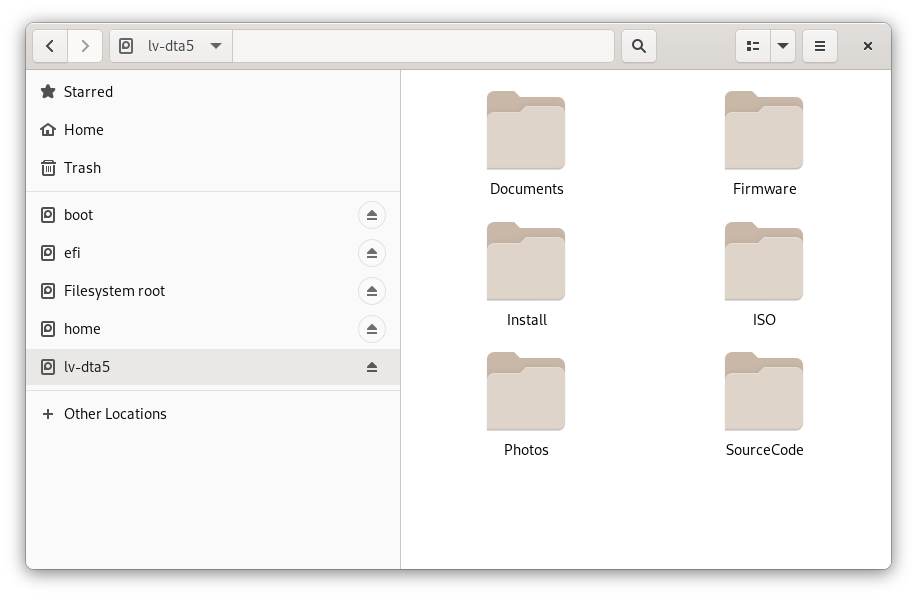
I came up with the idea to build a Linux-based storage server when I wanted to access some old photographs that were archived on various hard drives of differing makes, models, sizes, interface types and ages. I had used a fairly consistent naming scheme for my catalog of data files over the years (/Documents, /Photos, /Install, /Firmware, /Source Code, etc.). Also, I never changed the original names of the photo files. Most digital cameras automatically number the file names in ascending order (JS34005, JS34006, JS34008, etc.). So the photos remained in chronological order even if they were merged into a common directory from disparate hard drives. Between this systematic naming and the date stamps on the files and directories, it was relatively easy to copy, merge and otherwise manage the content.
I would typically copy the new files from my digital camera to the internal drive of my PC. When I switched to a new computer, I would copy over some of the files from the old PC and then take the old drive offline. Over several years I had accumulated several drives and I had no idea from which period they were. It was a little confusing. But people who change countries know what I mean. You cannot take all your belongings (like several old laptops) with you. Travelling between countries with such a mess is undesirable (and sometimes it is not permitted), but it happens.
At some point, external mobile drives are needed. But such drives tend to have limited capacity. Consequently you end up buying several of them and accumulating more and more drives whether you like it or not. It seems like a never ending story. Naturally, one wants to somehow combine their existing drivers into one larger device with greater storage capacity … or else buy yet another new drive with greater capacity to store all the content.
For my day-to-day use, I do not need extremely high performance storage on my PC. I just make a backup copy of my data once per month. Based on these needs and other circumstances, I decided to set up a central server for my data and central point for synchronization.
I decided that my storage server would go through the following stages over time:
- Build a storage server from a desktop computer using magnetic disks.
- Periodically make a backup of the storage server to one big offline drive.
- When the storage server reaches maximum capacity, I will reuse the offline drive as the internal drive.
- A new, bigger offline drive will be used in the same way as the old offline drive.
Fundamentally, I wanted to:
- organize my data into one easily-accessible place.
- test the performance of my hard drives individually and in combinations of 3, 4 and 5 drives.
- use Fedora Workstation.
- I wanted a GUI and I wanted to use an IDE for programming. I also wanted to use a 27-inch monitor rather than the 15-inch display on my laptop.
- have my home Fedora Linux based data server partially offline.
- It will be an isolated solution that will only be accessible via a physical cable (UTP5/6/7) connected to my home network.
I did not want to use any of the popular off-the-shelf standalone storage solutions designed for the typical SOHO because:
- the placement of data on a dedicated physical storage device can be risky due to ransom-ware attacks against known off-the-shelf hardware (such devices often support encryption which can be abused by remote hackers).
- there have been recent attacks on the firmware in such servers and/or errors in their firmware that resulted in the device’s configuration being erased.
- such devices often require that their drives be of the same type, interface and speed.
- their access rights are usually based on a built-in mechanism that is offered by the manufacturer.
- the storage administration console is usually an additional place to administer (users, access to resources and a table of rights).
- in some cases the data may be backed up to cloud-based storage servers without the user’s knowledge.
I chose Fedora Linux for this project:
- so I could use the hardware that I currently own.
- a desktop computer and drives which are of differing types, speeds and interfaces
- so I could use the same access rights that I use on my desktop (the same user).
- so I could isolate my storage device from the internet (on firewall and gateway level).
- so that access, even from the local network, could be limited to only the cable network.
- for the flexibility of transfer protocols (HTTPS, SMB, NFS, FTPS, etc.)
My equipment
For this project, I used a Asus A320M-K motherboard with an AMD A10-9700 APU (has a built-in graphics processing unit). This system has 8GiB of RAM. The motherboard only has four SATA ports. Two of the SATA ports were already allocated by the internal SSD and DVD drive. So only two SATA ports were available for additional devices. I had to install an additional SATA controller to add five more SATA ports. Initially, I tried to connect the drives to the motherboard’s native ports; SATA drives to the SATA ports and IDE drives to the IDE ports. But I found this approach too limiting with regard to the number of devices that I could connect. I found that it was better to connect everything to SATA. With some research, I discovered that I could purchase IDE-to-SATA converters for the older ATA drives.
| Sata PCI Express x4 Card 5x SATA based on Jmicron Chipset 6 Gb/s (Delock 90498) |
| BI-Directional IDE/SATA Converter (by LogiLink) |
| 40-Pin IDE 3,5” Disk to SATA Converter – allows to connect SATA Drive to IDE Controller on old MotherBoard or IDE Controller (By Startech.com Part#-IDE2SAT2) |
| 44-Pin IDE 2,5” Disk to SATA port converter (Delock) |
| 40-Pin IDE 3,5” Disk to SATA port converter (Delock) |
The next problem I encountered was with the power output from my PC’s power supply. It was immediately apparent that the 500-watt power supply my PC came with could not deliver the needed power for the additional drives. They did not show up in the PC’s configuration settings and I could hear them restarting. I decided to use a modular power supply with a minimum power output of 850 watts (a Be Quiet – Straight Power 11 Platinum – Model E11-PT-850W).
| Size | Interface | Form | Remarks | |
| Crucial CT120BX500SSD1 (M6CR013) | 120 GB | SATA | 2,5 inch | OS System Disk |
| TOSHIBA MK3256GSY (LH013U) | 320 GB | SATA | 2,5 inch | Data Disk |
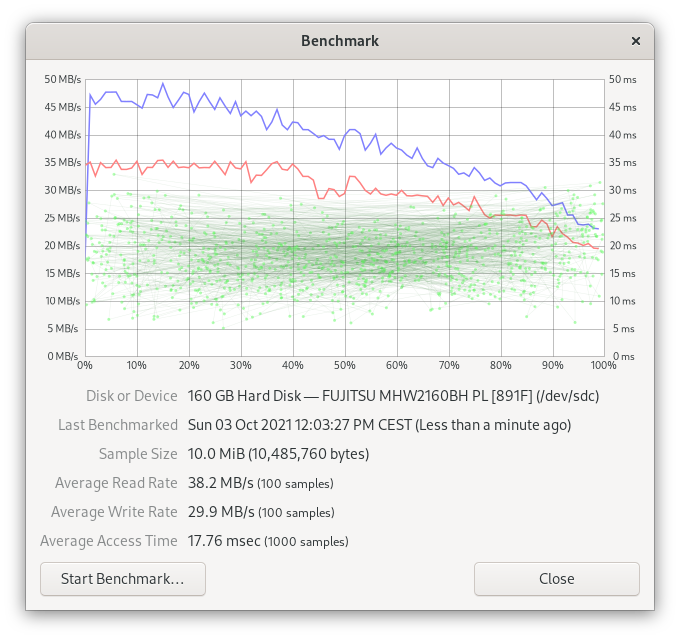
| FUJITSU MHW2160BH PL (891F) | 160 GB | SATA | 2,5 inch | Data Disk |
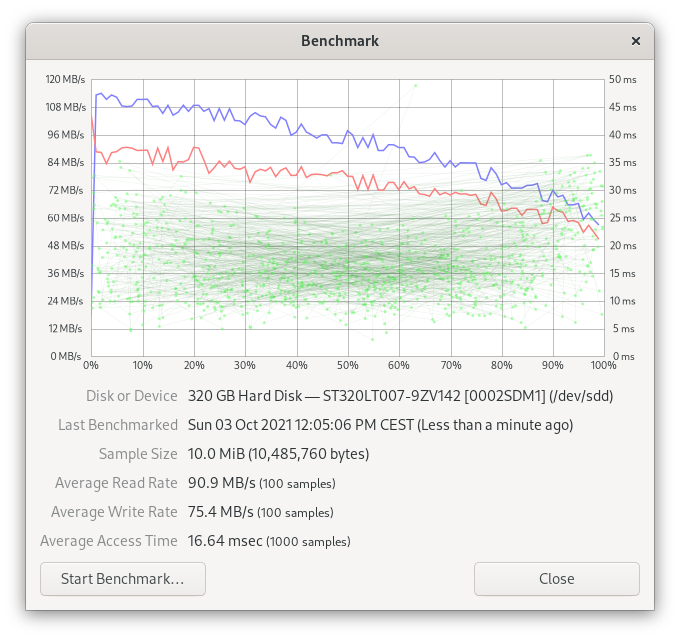
| Seagate ST320LT007-9ZV142 (0002SDM1) | 320 GB | SATA | 2,5 inch | Data Disk |
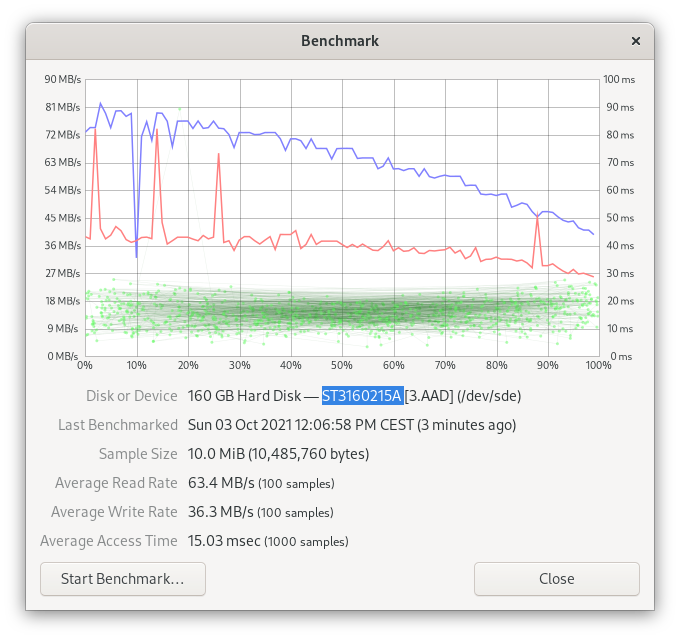
| Seagate ST3160215A (3.AAD) | 160 GB | ATA | 3,5 inch | Data Disk |
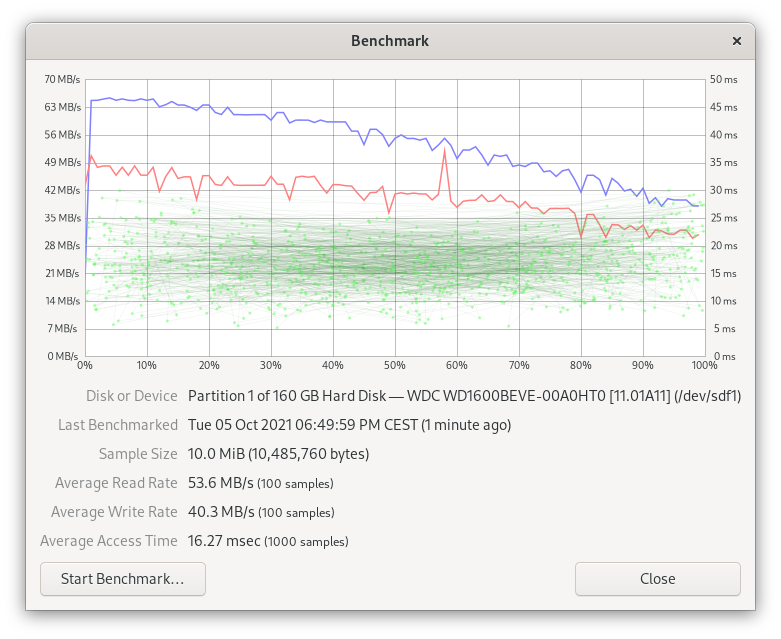
| Western Digital WD1600BEVE | 160 GB | ATA | 2,5 inch | Data Disk |
| Seagate IronWolf NAS ST4000VN008 | 4 TB | SATA | 3,5 inch | Backup Disk |
During my experimentation, I observed that the Logical Volume Management service was excellent at reconstructing the storage volumes it manages. The drives are tagged with universally unique identifiers (UUIDs) as part of their initiation process. It does not matter where you connect the drive – to the motherboard ports or to additional controller ports or via USB – the drives will be recognized and the logical volumes will be available.
While the particular interface that the drives were connected to did not matter, I found it was important that all the drives in the striped or linear logical volume were connected. Any single disconnected drive will render the volume inactive. If you are experiencing problems with the availability of your logical volume, I recommend that you closely read the logs to identify the cause of the problem. In my case, I had a low-quality SATA cable that was causing intermittent connectivity.
Also, this is not a hot-pluggable configuration. All operations (connecting, replacing or moving drives) must be done offline – with the system power switched off – to protect the electronics from power spikes.
Due to the time that it may take to restore the volume from backups in the event of a drive failure, this configuration is not suitable for environments that require high availability or 99% uptime. This configuration is mainly suitable for home usage or SOHO usage.
Configurations that I considered for my home storage server solution:
1) Stripe set
| Size | Stripe Member | Size Left | |
| TOSHIBA MK3256GSY (LH013U) | 320 GB | 140 GB | 160 GB |
| FUJITSU MHW2160BH PL (891F) | 160 GB | 140 GB | 0 GB |
| Seagate ST320LT007-9ZV142 (0002SDM1) | 320 GB | 140 GB | 160 GB |
| Seagate ST3160215A (3.AAD) | 160 GB | 140 GB | 0 GB |
| Wester Digital WD1600BEVE | 160 GB | 140 GB | 0 GB |
| 690 GB | 320 GB |
2) Linear
| Size | Linear Member | Size Left | |
| TOSHIBA MK3256GSY (LH013U) | 320 GB | 310 GB | 0 GB |
| FUJITSU MHW2160BH PL (891F) | 160 GB | 150 GB | 0 GB |
| Seagate ST320LT007-9ZV142 (0002SDM1) | 320 GB | 310 GB | 0 GB |
| Seagate ST3160215A (3.AAD) | 160 GB | 150 GB | 0 GB |
| Wester Digital WD1600BEVE | 160 GB | 150 GB | 0 GB |
| 1070 GB | 0 GB |
Note: Neither stripped nor linear volumes will tolerate broken or disconnected drives. The more drives you use, the higher the likelihood that one of them will fail. It is very important to maintain a backup of your data!
I decided to use a striped set of five drives. The linear configuration is also good but the data will be written to the first disk, then second, etc. Consequently, the access time for the linear configuration depends on the speed of a single disk.
| Before you start configuring a similar system, make sure you have a backup of your data! |
Single drive benchmarks
The below benchmarks were obtained directly from the GNOME Disks application (10 MiB of data, 100 samples for read/write and 1000 samples for calculating access time).


Logical volume creation
Three drives = three SATA drives
New VG-DTA Group:
[tomasz@fedora34-aliensit-com ~]$ sudo vgcreate VG-DTA /dev/sdb1 /dev/sdc1 /dev/sdd1
  WARNING: Devices have inconsistent physical block sizes (512 and 4096)
  Volume group "VG-DTA" successfully created
[tomasz@fedora34-aliensit-com ~]$
New LV-DTA volume stripped across three drives:
[tomasz@fedora34-aliensit-com ~]$ sudo lvcreate -L 430G -n LV-DTA -i3 VG-DTA
  Using default stripesize 64.00 KiB
  Rounding size 430.00 GiB (110080 extents) up to stripe boundary size <430.01 GiB (110082 extents).
  Volume group "VG-DTA" has insufficient free space (107517 extents):110082 required.
[tomasz@fedora34-aliensit-com ~]$ sudo lvcreate -L 420G -n LV-DTA -i3 VG-DTA
  Using default stripesize 64.00 KiB
  Volume group "VG-DTA" has insufficient free space (107517 extents):107520 required.
[tomasz@fedora34-aliensit-com ~]$ sudo lvcreate -L 400G -n LV-DTA -i3 VG-DTA
  Using default stripesize 64.00 KiB
  Rounding size 400.00 GiB (102400 extents) up to stripe boundary size <400.01 GiB (102402 extents).
  Logical volume "VG-DTA" created.
[tomasz@fedora34-aliensit-com ~]$
Details of the configuration:
[tomasz@fedora34-aliensit-com ~]$ sudo lvdisplay VG-DTA/LV-DTA
[sudo] password for tomasz:
  --- Logical volume ---
  LV Path                /dev/VG-DTA/LV-DTA
  LV Name                LV-DTA
  VG Name                VG-DTA
  LV UUID                8CpQWP-Tigr-I0Do-tQG7-JBKo-lck0-Bdgu37
  LV Write Access        read/write
  LV Creation host, time fedora34-aliensit-com, 2021-10-03 12:47:49 +0200
  LV Status              available
  # open                 0
  LV Size                <400.01 GiB
  Current LE             102402
  Segments               1
  Allocation             inherit
  Read ahead sectors     auto
  - currently set to     768
  Block device           253:0

[tomasz@fedora34-aliensit-com ~]$
Details listing the extents on the drives:
[tomasz@fedora34-aliensit-com ~]$ sudo lvdisplay VG-DTA/LV-DTA -m
[sudo] password for tomasz:
  --- Logical volume ---
  LV Path                /dev/VG-DTA/LV-DTA
  LV Name                LV-DTA
  VG Name                VG-DTA
  LV UUID                8CpQWP-Tigr-I0Do-tQG7-JBKo-lck0-Bdgu37
  LV Write Access        read/write
  LV Creation host, time fedora34-aliensit-com, 2021-10-03 12:47:49 +0200
  LV Status              available
  # open                 0
  LV Size                <400.01 GiB
  Current LE             102402
  Segments               1
  Allocation             inherit
  Read ahead sectors     auto
  - currently set to     768
  Block device           253:0


  --- Segments ---
  Logical extents 0 to 102401:
    Type		striped
    Stripes		3
    Stripe size		64.00 KiB
    Stripe 0:
      Physical volume	/dev/sdb1
      Physical extents	0 to 34133
    Stripe 1:
      Physical volume	/dev/sdc1
      Physical extents	0 to 34133
    Stripe 2:
      Physical volume	/dev/sdd1
      Physical extents	0 to 34133

[tomasz@fedora34-aliensit-com ~]$
This last command creates a new ext4 file system on the logical volume.
[tomasz@fedora34-aliensit-com ~]$ sudo mkfs.ext4 /dev/VG-DTA/LV-DTA
mk3fs 1.45.6 (20-Mar-2020)
Creating filesystem with 104859648 4k blocks and 26222592 inodes
Filesystem UUID: bc345ac-d31b-4d37-9b98-b350c33c6c71
Superblock backups stored on blocks:
        32768, 98304, 163840, 229376, 294912, 819200, 884736, 1605632, 2654208,
        4096000, 7962624, 11239424, 20480000, 23887872, 71663616, 78675968,
        102400000

Allocating group tables: done
Writing inode tables: done
Creating journal (262144 blocks)
done
Writing superblocks and filesystem accouting information: done

[tomasz@fedora34-aliensit-com ~]$
Four drives = three SATA drives + one IDE drive
sudo vgcreate VG-DTA dev/sdb1 dev/sdc1 dev/sdd1 dev/sde1
lvcreate -L 540G -n LV-DTA -i4 VG-DTA
Five drives = three SATA drives + two IDE drives
sudo vgcreate VG-DTA dev/sdb1 dev/sdc1 dev/sdd1 dev/sde1 dev/sdf1
lvcreate -L 690G -n LV-DTA -i5 VG-DTA
Logical volume benchmarks
LVM on a single drive
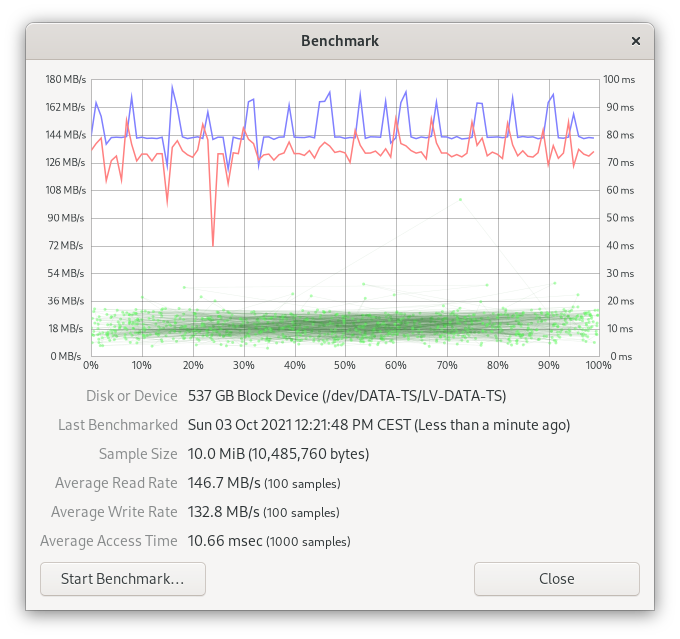
LVM on three drives
For this benchmark, I created a striped volume from three SATA drives. The physical extends allowed me to allocate 400GB of storage (3 x 140GB = 400GB).

LVM on four drives
For this next benchmark, I added another drive to the system and I created a new striped volume from four drives (three SATA drives and one IDE drive). The physical extends allowed me to allocate 550GB of storage (4 x 140GB = 550GB).

LVM on five drives
For the last benchmark, I added another drive and I created a new striped volume from five drives (three SATA drives and two IDE drives). The physical extends allowed me to allocate 690GB of storage (5 x 140GB = 690GB).

LVM performance summary
Connecting several drives into a stripe set improved both read and write speed for the volume. For my home storage server I decided to use the striped configuration. The reader should understand that this proposed logical volume configuration is not fault tolerant. It is necessary to maintain a backup copy of your data. For my uses, I find that the convenience of having my drives combined into a single large volume outweighs the increased likelihood of failure. But the reader should determine for themselves if they personally consider such increased risk acceptable and manageable.
Administration of the storage
On Fedora Linux 34, LVM volumes are automatically visible in the system. But they are not automatically mounted. Also, super user privileges are required to manage the configuration.
You may find it easier to use the Fdisk application to set the mount options.
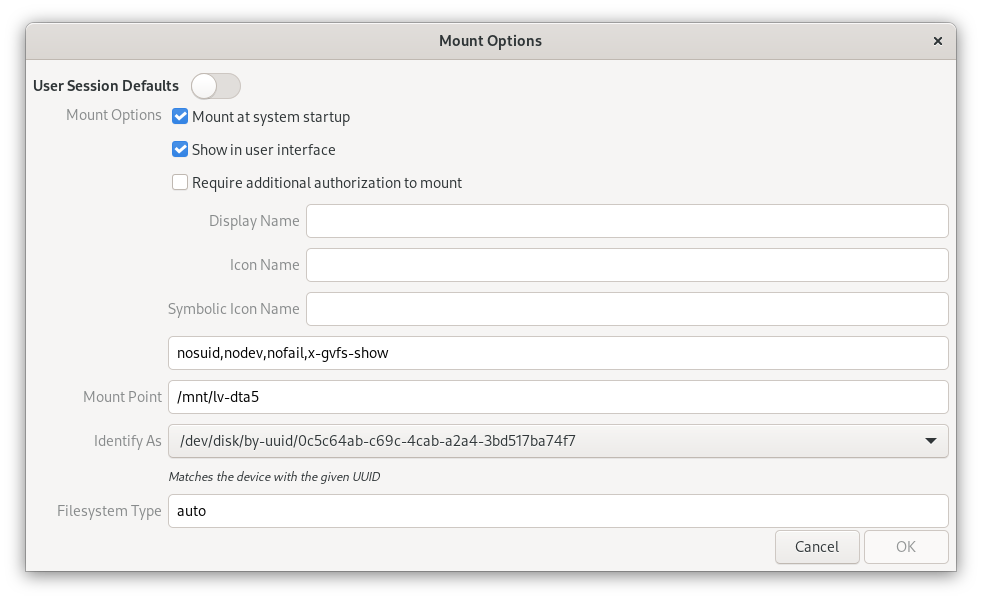
The mount options shown above will be written to the /etc/fstab configuration file. The contents of my fstab file are provided below as an example. Your fstab file will likely be a little different. The presents of the last line in the below example configuration file indicates that the logical volume will be mounted during system startup.
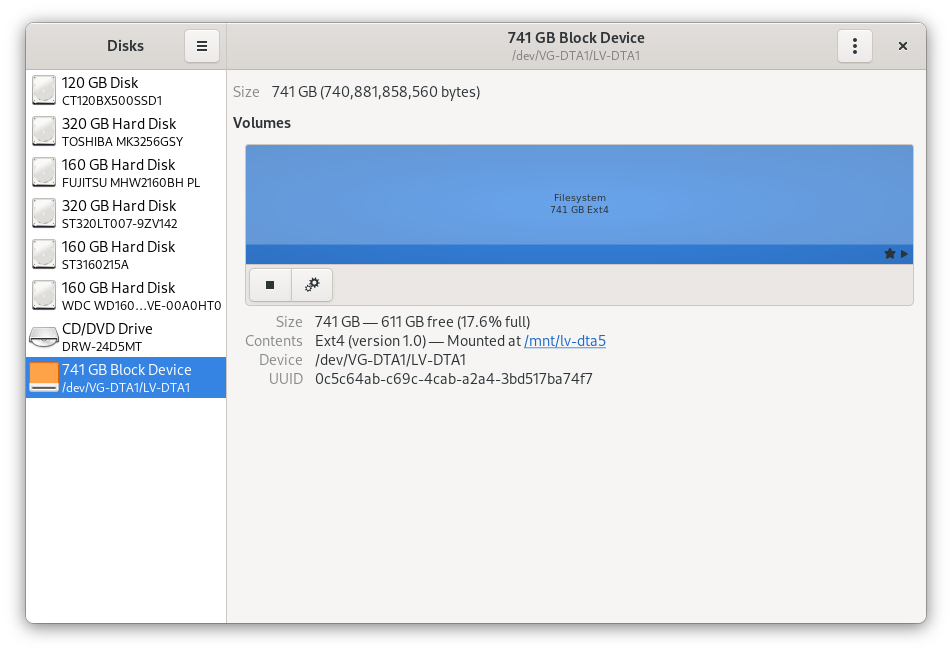
#
# /etc/fstab
# Created by anaconda on Fri Sep  3 23:58:31 2021
#
# Accessible filesystems, by reference, are maintained under '/dev/disk/'.
# See man pages fstab(5), findfs(8), mount(8) and/or blkid(8) for more info.
#
# After editing this file, run 'systemctl daemon-reload' to update systemd
# units generated from this file.
#
UUID=db58af8e-5fa2-49d5-821b-92edebb15693 /                       btrfs   subvol=root,compress=zstd:1 0 0
UUID=f2ccf7c4-b2d8-4274-9ac2-80611ef2eef8 /boot                   ext4    defaults        1 2
UUID=E184-95F4          /boot/efi               vfat    umask=0077,shortname=winnt 0 2
UUID=db58af8e-5fa2-49d5-821b-92edebb15693 /home                   btrfs   subvol=home,compress=zstd:1 0 0
/dev/disk/by-uuid/0c5c64ab-c69c-4cab-a2a4-3bd517ba74f7 /mnt/lv-dta5 auto nosuid,nodev,nofail,x-gvfs-show 0 0
Hint
Drives from different operating systems may contain protected system and hidden files. Access could also be limited to specific user ids. In such cases, attempts to copy or move the files may end with an error. You may need to use the privileged root user to organize your data before setting any other security or read/write permissions. To gain privileged access to your files, you can use the following command.
[tomasz@fedora34-aliensit-com ~]$ sudo nautilus
When you run the command shown above in a terminal, a window should pop up with additional options to access your storage as shown below.
| Before you begin everyday use of a similar system, make sure you have a backup plan for your data and that you have successfully restored your data from the backup at least twice! |
Summary
This article is part of series about building a Fedora Linux based home network. Future parts will cover: network configuration, application configuration and security configuration. The hardware tests are exclusive to this first part of the series. The remaining parts will concentrate on software and services.
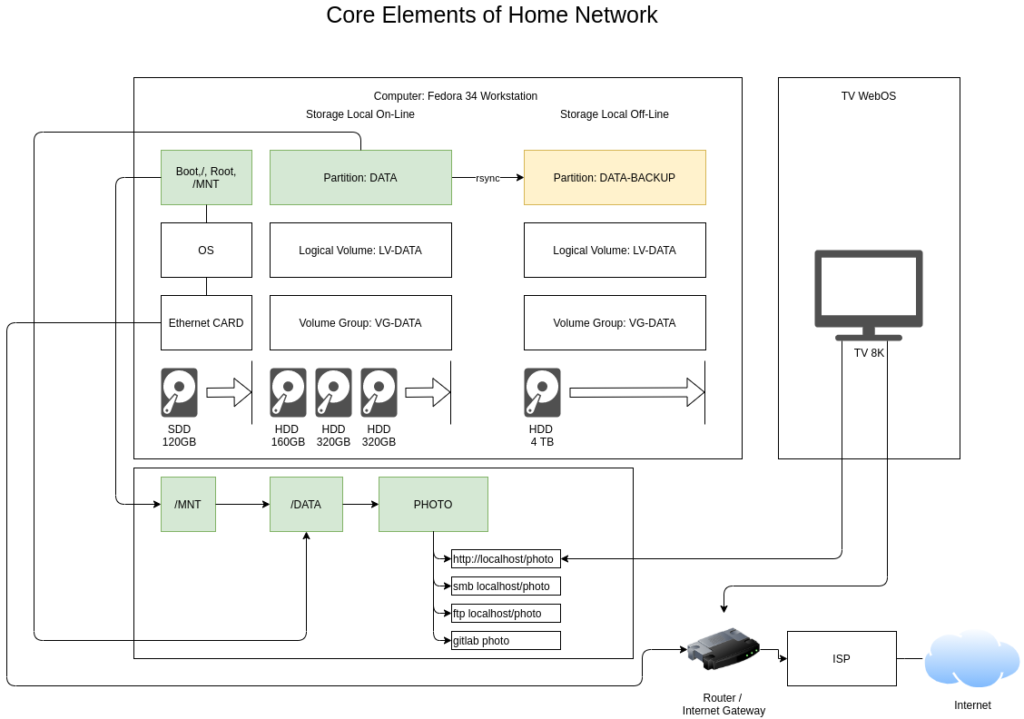
Below is a draft diagram showing the full Fedora Linux based network that I intend to further detail in future parts to this series.

Thomas
Great HOWTO Tomasz.
I’ve done this myself and I know that it can be a drag to look it up in all those manuals, so your tutorial should help many people out there a lot.
Tomasz Szymanski
Thomas,
thank you for your comment.
I try to popularize and share solutions which are simple, easy to maintain and I hope I will “turn on curiosity”. It is worth to test or even replicate what I write. I would like to see more setups based on similar approach.
If at least 2 people will implement these at home/soho I will be very happy because I believe we are not limited to some solutions from big tech.
People should be somehow independent!
Michael
Which RAID level are you using on VG-DATA?
Tomasz Szymanski
Michael, this is RAID 0 – Striped Volumes.
I wanted to test what is the impact on performance (different disk types, speed and RPM) and what are benefits of such RAID.
I mentioned that for such RAID … backup is really needed!
In case of broken disk you have to restore it from backup.
Heliosstyx
Very good written article: easy to read and to understand. One of the best publication about a very complex technical theme I have read.
Tomasz Szymanski
Thank you for your support.
P.s. Editor corrections were done by Gregory Lee Bartholomew and content suggestions by Richard England. So I can say: final shape is team work to go in direction that article must: be easy to read, ready to implement in real scenario and show what we can do with Fedora.
Tim
Great article should be more of these – concise – easy to read – for anyone wanting to do this would spend a far amount of time in docs etc.
Tomasz Szymanski
This is the goal … somehow ready to use solution.
Dule
Thank you ! Respect !
Tomasz Szymanski
Cool!
Hanku Lee
I was tempted to own a home server but dithering on cost-effective solutions. I wasn’t too convinced of ready-made NAS vendors.
The home server use case seems promising. A little bit of brush-up training is required on the computer network, though. Earmarked for a winter DIY project. Looking forward to your next article on network configuration. Thanks for the awesome article.
Tomasz Szymanski
Great! Hanku Lee, build your solution and share your experience … here on Fedora Magazine.
Hank
Definitely intrigued by your article, I ventured out to tinker with the latest Fedora ARM server 35 on Raspberry Pi 3B+.
My goal is a low-energy space-saving backup server using Pi 3B+ to keep family photos and files securely and access anywhere. I’ll use two internal SSDs to fit into the cute pi enclosure. Quite ambitious, indeed.
Image writing and text-mode installation are a bit of a learning curve for me. I’m grateful to the Ask Fedora forum.
There are many challenging tasks I need to test and document like headless server set-up with ssh, SAMBA, rdiff back-up, and Cockpit.
Robert
Hallelujah, this article and it further parts is and will be an incredible tool for many. I will make them my PDF out of these (for myself only) these, as reference for (near) future. Thanks!
Tomasz Szymanski
You are welcome. Share the link, promote Fedora Magazine and just implement similar solutions. 🙂 And share with us … your solution.
Bob Hepple
You need the -E option to do the sudo nautilus!!
Gregory Bartholomew
It seems to work for me without it. Maybe it depends if you are using X11 or Wayland? Does it work for you with the following?
Bruno
-E option will use the environment variables. (They are not used by default for security reasons. They are user’s environment and you are running as root).
Whether things work or not depends on whether specific environment variables are required in your specific case.
(You can configure them in the sudoer file too)
Jim
Instead of using Raid 0, i use separate drives with a main drive mounted at /z and 2 others at /x and /w. I then use a soft link from /z/vms that points to /x/vms for my virtual machines. I use another softlink from /z/backups that points to /w/backups. This way, it looks like one big /z drive to my apps and rsync backup script (with some extra switches so it doesn’t backup the same data twice). And it also has the advantage that if one drive dies I dont lose everything.
Tomasz Szymanski
Jim, but then you are limited to the max capacity of mounted physical drive. It is also accepted solution and very popular for software applications and some software flexible solutions.
Thank you for your comment – I like to see other options.
Frank
I just wondered why you use so many physical drives. (it looks like you accumulated hard drives over your life (which I also do). I wonder if it would make sense to buy one large hard drive and copy each of your legacy hard drives into a different partition. It would have saved you from having to buy more power and you would not have to deal with a panoply of aging hard drives.
Tomasz Szymanski
Hi Frank,
Decision depends on reader, how they would like to manage disk(s).
I thought it will be interesting to check how so many connected disks are performing. Of course we can build and test it on virtual disks but it is not the same as physical disks. So this is a kind of overview, what can people expect when they would like to build – similar storage server.
So this article showed that by using (even different speed/type of) disks we are getting better performance (circa 15-20%) than on single big drive. It is surprising for me, but proved by numbers. At the beginning I thought that rather it will be between a little over the half of the speed – between slowest and fastest drive. By using the same logic – by connecting together bigger, newer and exactly the same type of drives we can also expect better performance than single drive. Must be proved in practice by somebody who has the same type of the drives.
As I stated it is not fault tolerant solution. But this solution is very recommended for databases (logs/db file) because of improved read/write performance. Without hardware acceleration any parity solution (raid5, raid6) will be slower and will have impact on system performance (processor). Of course important is to have DB tuned to (one or multiple) 64 KiB as stripe size is set. This is quite different topic.
I still have several old drives 😉 but for now I achieved max connectivity limit (8 disks and 1 dvd).
And for the end last remark. In my professional life I had had to build several storage servers with the main function: backup on huge continuous space for copy of VM Disks (ERP systems) which were between 50 GB and 250GB.
Because the priority was to have at least 2 copy of data in local network connected by 1 Gbps links, I always had decided to use: the same type of disks with RAID5 (on ZFS) but it was 10 years ago ;-). Original VM Disks were on Enterprise Storage connected to Virtualization Hosts by FiberChannel x2 links of 8 Gbps and single drive was 72 GB, 146 GB and later 300 GB. Huge cost of professional storage disk forced me to find the storage solution which will be cheap and ready to use for my duties to give me some protection about data and space between 8TB and 12 TB (at that time the largest affordable disks were 1 TB).
By using Fedora people can learn how to do similar things at small scale. They can experiment at home and then later offer/use better solutions. But first step is always to understand architecture of the solution, limitations, performance and physical implementation. This is why I share it.
All the best to all readers.