


NetworkManager is the network configuration daemon used on Fedora and many other distributions. It provides a consistent way to configure network interfaces and other network-related aspects on a Linux machine. Among many other features, it provides a Internet connection sharing functionality that can be very useful in different situations.
For example, suppose you are in a place without Wi-Fi and want to share your laptop’s mobile data connection with friends. Or maybe you have a laptop with broken Wi-Fi and want to connect it via Ethernet cable to another laptop; in this way the first laptop become able to reach the Internet and maybe download new Wi-Fi drivers.
In cases like these it is useful to share Internet connectivity with other devices. On smartphones this feature is called “Tethering” and allows sharing a cellular connection via Wi-Fi, Bluetooth or a USB cable.
This article shows how the connection sharing mode offered by NetworkManager can be set up easily; it addition, it explains how to configure some more advanced features for power users.
How connection sharing works
The basic idea behind connection sharing is that there is an upstream interface with Internet access and a downstream interface that needs connectivity. These interfaces can be of a different type—for example, Wi-Fi and Ethernet.
If the upstream interface is connected to a LAN, it is possible to configure our computer to act as a bridge; a bridge is the software version of an Ethernet switch. In this way, you “extend” the LAN to the downstream network. However this solution doesn’t always play well with all interface types; moreover, it works only if the upstream network uses private addresses.
A more general approach consists in assigning a private IPv4 subnet to the downstream network and turning on routing between the two interfaces. In this case, NAT (Network Address Translation) is also necessary. The purpose of NAT is to modify the source of packets coming from the downstream network so that they look as if they originate from your computer.
It would be inconvenient to configure manually all the devices in the downstream network. Therefore, you need a DHCP server to assign addresses automatically and configure hosts to route all traffic through your computer. In addition, in case the sharing happens through Wi-Fi, the wireless network adapter must be configured as an access point.
There are many tutorials out there explaining how to achieve this, with different degrees of difficulty. NetworkManager hides all this complexity and provides a shared mode that makes this configuration quick and convenient.
Configuring connection sharing
The configuration paradigm of NetworkManager is based on the concept of connection (or connection profile). A connection is a group of settings to apply on a network interface.
This article shows how to create and modify such connections using nmcli, the NetworkManager command line utility, and the GTK connection editor. If you prefer, other tools are available such as nmtui (a text-based user interface), GNOME control center or the KDE network applet.
A reasonable prerequisite to share Internet access is to have it available in the first place; this implies that there is already a NetworkManager connection active. If you are reading this, you probably already have a working Internet connection. If not, see this article for a more comprehensive introduction to NetworkManager.
The rest of this article assumes you already have a Wi-Fi connection profile configured and that connectivity must be shared over an Ethernet interface enp1s0.
To enable sharing, create a connection for interface enp1s0 and set the ipv4.method property to shared instead of the usual auto:
$ nmcli connection add type ethernet ifname enp1s0 ipv4.method shared con-name local
The shared IPv4 method does multiple things:
- enables IP forwarding for the interface;
- adds firewall rules and enables masquerading;
- starts dnsmasq as a DHCP and DNS server.
NetworkManager connection profiles, unless configured otherwise, are activated automatically. The new connection you have added should be already active in the device status:
$ nmcli device
DEVICE         TYPE      STATE         CONNECTION
enp1s0         ethernet  connected     local
wlp4s0         wifi      connected     home-wifi
If that is not the case, activate the profile manually with nmcli connection up local.
Changing the shared IP range
Now look at how NetworkManager configured the downstream interface enp1s0:
$ ip -o addr show enp1s0
8: enp1s0 inet 10.42.0.1/24 brd 10.42.0.255 ...
10.42.0.1/24 is the default address set by NetworkManager for a device in shared mode. Addresses in this range are also distributed via DHCP to other computers. If the range conflicts with other private networks in your environment, change it by modifying the ipv4.addresses property:
$ nmcli connection modify local ipv4.addresses 192.168.42.1/24
Remember to activate again the connection profile after any change to apply the new values:
$ nmcli connection up local

$ ip -o addr show enp1s0
8: enp1s0 inet 192.168.42.1/24 brd 192.168.42.255 ...
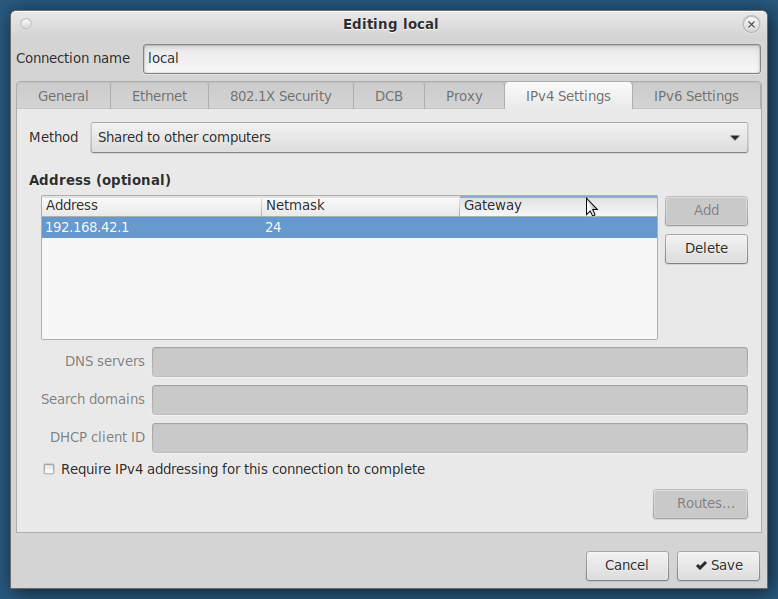
If you prefer using a graphical tool to edit connections, install the nm-connection-editor package. Launch the program and open the connection to edit; then select the Shared to other computers method in the IPv4 Settings tab. Finally, if you want to use a specific IP subnet, click Add and insert an address and a netmask.
Adding custom dnsmasq options
In case you want to further extend the dnsmasq configuration, you can add new configuration snippets in /etc/NetworkManager/dnsmasq-shared.d/. For example, the following configuration:
dhcp-option=option:ntp-server,192.168.42.1
dhcp-host=52:54:00:a4:65:c8,192.168.42.170
tells dnsmasq to advertise a NTP server via DHCP. In addition, it assigns a static IP to a client with a certain MAC.
There are many other useful options in the dnsmasq manual page. However, remember that some of them may conflict with the rest of the configuration; so please use custom options only if you know what you are doing.
Other useful tricks
If you want to set up sharing via Wi-Fi, you could create a connection in Access Point mode, manually configure the security, and then enable connection sharing. Actually, there is a quicker way, the hotspot mode:
$ nmcli device wifi hotspot [ifname $dev] [password $pw]
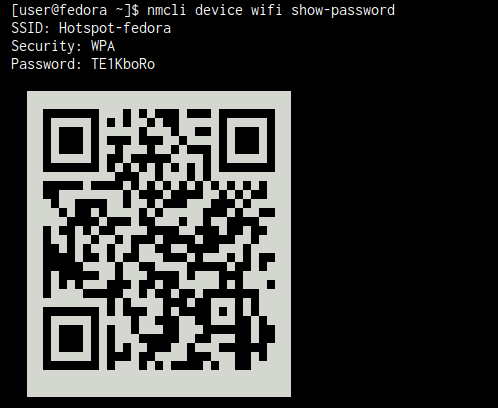
This does everything needed to create a functional access point with connection sharing. The interface and password options are optional; if they are not specified, nmcli chooses the first Wi-Fi device available and generates a random password. Use the ‘nmcli device wifi show-password‘ command to display information for the active hotspot; the output includes the password and a text-based QR code that you can scan with a phone:
What about IPv6?
Until now this article discussed sharing IPv4 connectivity. NetworkManager also supports sharing IPv6 connectivity through DHCP prefix delegation. Using prefix delegation, a computer can request additional IPv6 prefixes from the DHCP server. Those public routable addresses are assigned to local networks via Router Advertisements. Again, NetworkManager makes all this easier through the shared IPv6 mode:
$ nmcli connection modify local ipv6.method shared
Note that IPv6 sharing requires support from the Internet Service Provider, which should give out prefix delegations through DHCP. If the ISP doesn’t provides delegations, IPv6 sharing will not work; in such case NM will report in the journal that no prefixes are available:
policy: ipv6-pd: none of 0 prefixes of wlp1s0 can be shared on enp1s0
Also, note that the Wi-Fi hotspot command described above only enables IPv4 sharing; if you want to also use IPv6 sharing you must edit the connection manually.
Conclusion
Remember, the next time you need to share your Internet connection, NetworkManager will make it easy for you.
If you have suggestions on how to improve this feature or any other feedback, please reach out to the NM community using the mailing list, the issue tracker or joining the #nm IRC channel on freenode.

grace
Nmcli is way more complex that what is highlighted here! But great material
linksys router is blinking
Hi, all the time i used to check website posts here
early in the dawn, as i enjoy to find out more and more.
Vernon Van Steenkist
Great article. Regarding command
nmcli device wifi hotspot [ifname $dev] [password $pw]
Will this command support simultaneous AP+STA? In other words, if I am already connected to the Internet via WiFi, will this command create an AP which will allow me to share my WiFi Internet connection with other devices?
Is there a way to specify the the AP SSID and make it hidden? Is there a way to have a open AP without a password?
bengal
Simultaneous AP+STA mode on the same interface is not supported. You need two Wi-Fi adapters.
You can specify the SSID adding a “ssid MySSID” option to the command line. Note that nmcli supports bash autocompletion and so when you type the command and press , it shows the available options:
$ nmcli device wifi hotspot
band channel con-name ifname password ssid
There isn’t a direct option to make the SSID hidden; you have to modify the generated connection (“Hotspot”) and then reactivate it:
nmcli connection modify Hotspot wifi.hidden yes
nmcli connection up Hotspot
To create an open hotspot, manually add a Wi-Fi connection in AP mode and activate it:
nmcli connection add type wifi ssid MySSID con-name my-hotspot wifi.mode ap ipv4.method shared
nmcli connection up my-hotspot
Vernon Van Steenkist
Thanks very much for your responses!
Tomasz Gąsior
What’s the difference between this method and GNOME Settings -> Wi-Fi panel -> three dots menu -> Enable Wi-Fi hotspot?
Beniamino Galvani
The GNOME Wi-Fi hotspot functionality is equivalent to “nmcli device hotspot …”.
On Fedora 32, GNOME Control Center also allows setting the “Shared to other computers” mode for Ethernet interfaces. This wasn’t available on Fedora 31.
Roseanna
Znaleźć pomysł na dobry interes nnie jawi się być trudno.
Anirban Kar
Can the Network Manager create a DSL connection with user-id & Password. Lately this is has become a problem on Ubuntu.
Beniamino Galvani
Yes, DSL connections are supported. If you have problems, please file an issue at:
https://gitlab.freedesktop.org/NetworkManager/NetworkManager/-/issues