


In the previous article we touched upon some of the new features introduced to Cockpit over the years. This article will look into some of the tools within the UI to perform everyday storage management tasks. To access these functionalities, install the cockpit-storaged package:
sudo dnf install cockpit-storaged
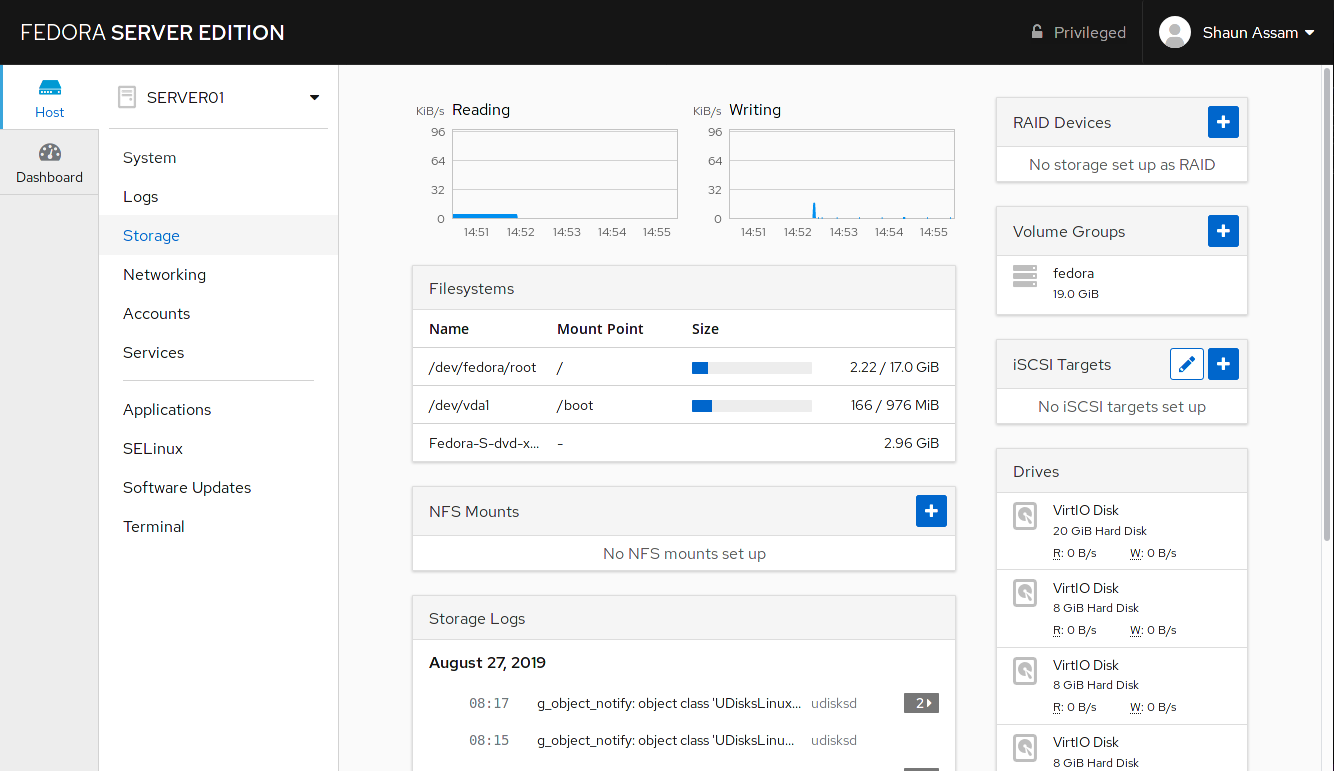
From the main screen, click the Storage menu option in the left column. Everything needed to observe and manage disks is available on the main Storage screen. Also, the top of the page displays two graphs for the disk’s reading and writing performance with the local filesystem’s information below. In addition, the options to add or modify RAID devices, volume groups, iSCSI devices, and drives are available as well. In addition, scrolling down will reveal a summary of recent logs. This allows admins to catch any errors that require immediate attention.
Filesystems
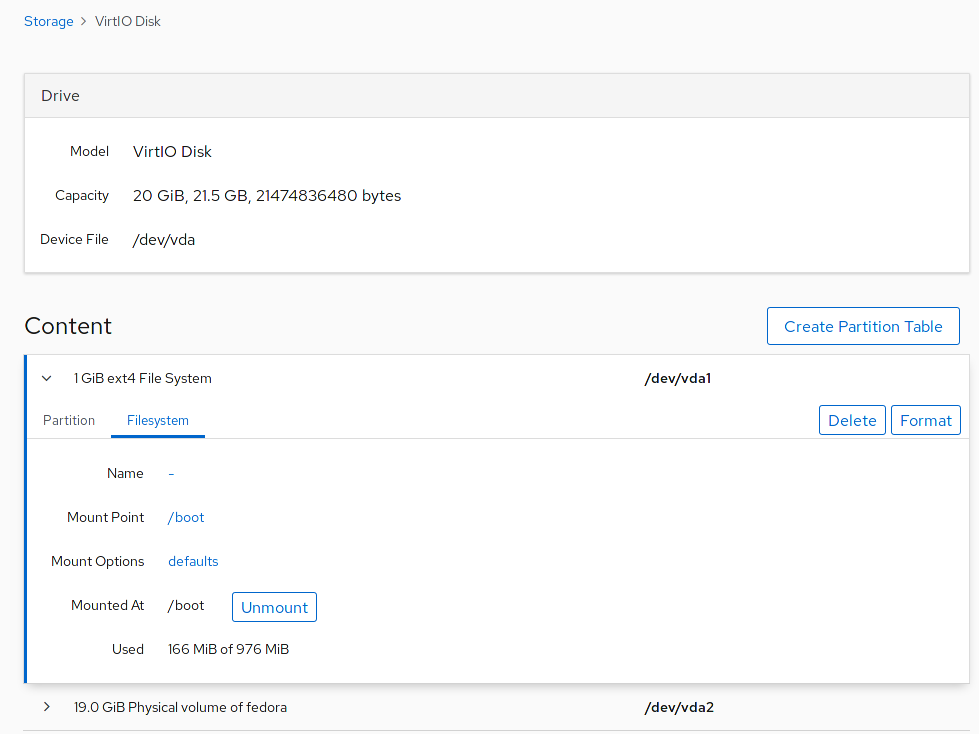
This section lists the system’s mounted partitions. Clicking on a partition will display information and options for that mounted drive. Growing and shrinking partitions are available in the Volume sub-section. There’s also a filesystem subsection that allows you to change the label and configure the mount.
If it’s part of a volume group, other logical volumes in that group will also be available. Each standard partition has the option to delete and format. Also, logical volumes have an added option to deactivate the partition.
RAID devices
Cockpit makes it super-easy to manage RAID drives. With a few simple clicks the RAID drive is created, formatted, encrypted, and mounted. For details, or a how-to on creating a RAID device from the CLI check out the article Managing RAID arrays with mdadm.
To create a RAID device, start by clicking the add (+) button. Enter a name, select the type of RAID level and the available drives, then click Create. The RAID section will show the newly created device. Select it to create the partition table and format the drive(s). You can always remove the device by clicking the Stop and Delete buttons in the top-right corner.
Logical volumes
By default, the Fedora installation uses LVM when creating the partition scheme. This allows users to create groups, and add volumes from different disks to those groups. The article, Use LVM to Upgrade Fedora, has some great tips and explanations on how it works in the command-line.
Start by clicking the add (+) button next to “Volume Groups”. Give the group a name, select the disk(s) for the volume group, and click Create. The new group is available in the Volume Groups section. The example below demonstrates a new group named “vgraiddemo”.
Now, click the newly made group then select the option to Create a New Logical Volume. Give the LV a name and select the purpose: Block device for filesystems, or pool for thinly provisioning volumes. Adjust the amount of storage, if necessary, and click the Format button to finalize the creation.
Cockpit can also configure current volume groups. To add a drive to an existing group, click the name of the volume group, then click the add (+) button next to “Physical Volumes”. Select the disk from the list and click the Add button. In one shot, not only has a new PV, been created, but it’s also added to the group. From here, we can add the available storage to a partition, or create a new LV. The example below demonstrates how the additional space is used to grow the root filesystem.
iSCSI targets
Connecting to an iSCSI server is a quick process and requires two things, the initiator’s name, which is assigned to the client, and the name or IP of the server, or target. Therefore we will need to change the initiator’s name on the system to match the configurations on the target server.
To change the initiator’s name, click the button with the pencil icon, enter the name, and click Change.
To add the iSCSI target, click the add (+) button, enter the server’s address, the username and password, if required, and click Next. Select the target — verify the name, address, and port, — and click Add to finalize the process.
To remove a target, click the “checkmark” button. A red trashcan will appear beside the target(s). Click it to remove the target from the setup list.

NFS mount
Cockpit even allows sysadmins to configure NFS shares within the UI. To add NFS shares, click the add (+) button in the NFS mounts section. Enter the server’s address, the path of the share on the server, and a location on the local machine to mount the share. Adjust the mount options if needed and click Add to view information about the share. We also have the options to unmount, edit, and remove the share. The example below demonstrates how the NFS share on SERVER02 is mounted to the /mnt directory.
Conclusion
As we’ve seen in this article, a lot of the storage-related tasks that require lengthy, and multiple, lines of commands can be easily done within the web UI with just a few clicks. Cockpit is continuously evolving and every new feature makes the project better and better. In the next article we’ll explore the features and components on the networking side of things.

nehemiah
when can we mount Samba/CIFS shares in cockpit?
Shaun Assam
Hello nehemiah, the feature request for CIFS shares is discussed at https://github.com/cockpit-project/cockpit/issues/3534. Accessing and creating these shares would definitely be a great add-on for Cockpit.
nehemiah
sweet!
Raphael Groner
Nice article! Thanks for the hints.
Eugen
Danke schön!
jenrry
hello some days ago I installed it on my fedora 30 and after an update let it like this, and now it doesn’t work.
root@soporte 02:02 AM /home/jsd
systemctl start cockpit
Failed to start cockpit.service: Unit cockpit.socket not found.
root@soporte 02:03 AM /home/jsd
systemctl status cockpit
● cockpit.service – Cockpit Web Service
Loaded: loaded (/usr/lib/systemd/system/cockpit.service; static; vendor pres>
Active: inactive (dead)
Docs: man:cockpit-ws(8)
please how can I resolve this, thank you
Miorin
Try
systemctl enable cockpit.socket
systemctl start cockpit.socket
That should create and activate the listening socket that automagically starts the service when you connect to it from a browser.
This is mentioned in the intro article that’s linked at the beginning of this article.