


Image Builder is a tool that allows you to create custom OS images (based on the upstream project Weldr), and it’s included in the base repos so you can build images right from the start.
You can use the command line or a Cockpit plugin, and it’s a fairly simple and straightforward process which allows you to create images for most of the major platforms – Libvirt/KVM (RHV or general Linux virtualisation), VMware, Openstack, AWS and Azure. You can also deploy these images from Satellite.
Installing Image Builder
To install Image Builder, run this command:
sudo dnf install -y osbuild-composer composer-cli cockpit-composer
If you’re not using Cockpit then omit that last package and you’ll just have the cli tool.
If you are using Cockpit, then make sure you add the service to firewalld to allow access like this:
sudo firewall-cmd --add-service=cockpit && sudo firewall-cmd --runtime-to-permanent
You need to enable the osbuild-composer socket (and cockpit if you installed it and haven’t yet enabled it):
sudo systemctl enable --now osbuild-composer.socket
sudo systemctl enable --now cockpit.socket
Image Builder is now running and ready to use so let’s create an image using the cli first, then move on to using Cockpit.
Image Builder CLI
The main cli command is composer-cli, which you use to create, list, examine and delete blueprints. It is also used to build, list, delete and download images for upload to their intended platform.
Available commands
The following is a list of the Image Builder commands and their functions:
| Blueprint manipulation | |
| List all available blueprints | sudo composer-cli blueprints list |
| Show a blueprint contents in the toml format | sudo composer-cli blueprints show blueprint-name |
| Save (export) blueprint contents in the toml format into a file blueprint-name.toml | sudo composer-cli blueprints save blueprint-name |
| Remove a blueprint | sudo composer-cli blueprints delete blueprint-name |
| Push (import) a blueprint file in the toml format into Image Builder | sudo composer-cli blueprints push blueprint-name |
| Composing images from blueprints | |
| Start a compose | sudo composer-cli compose start blueprint-name image-type |
| List all composes | sudo composer-cli compose list |
| List all composes and their status | sudo composer-cli compose status |
| Cancel a running compose | sudo composer-cli compose cancel compose-uuid |
| Delete a finished compose | sudo composer-cli compose delete compose-uuid |
| Show detailed information about a compose | sudo composer-cli compose info compose-uuid |
| Download image file of a compose | sudo composer-cli compose image compose-uuid |
| Additional resources | |
| The composer-cli man page provides a full list of the available subcommands and options | man composer-cli |
| The composer-cli command provides help on the subcommands and options | sudo composer-cli help |
Creating an image blueprint
The first step in using Image Builder is to use your favorite editor to create the blueprint of the image itself. The blueprint includes everything the image needs to run. Let’s create a really simple one to begin with, then take it from there.
Create the blueprint file
Blueprint files are .toml files, created in your favorite editor, and the minimal required information is shown here:
name = "image-name"
description = "my image blueprint"
version = "0.0.1"
modules = []
groups = []
The file above can be used to create a minimal image with just the essential software required to run. Typically, images need a few more things, so let’s add in some additional packages. Add in the following below the groups item to add in extra packages:
[[packages]]
name = "bash-completion"
version = "*"
You will need to repeat this block for every package you wish to install. The version can be a specific version or the asterisk to denote the latest.
Going into a bit more detail, the groups declaration is used to add any groups you might need in the image. If you’re not adding any you can use the format above, but if you need to create a group remove the line shown above:
groups = []
and add this:
[[groups]]
name = "mygroup"
Again, you need to repeat this block for every group you want to add.
It is recommended that you create at least a “root” user using something similar to this:
[[customizations.user]]
 name = "root"
 description = "root"
 password = "$6$ZkdAX1t8QwEAc/GH$Oi3NY3fyTH/87ALiPfCzZTwpCoKv7P3bCVnoD9JnI8f5gV9I3A0bq5mZrKrw6isuYatmRQ.SVq3Vq27v3X2yu."
 home = "/home/root/"
 shell = "/usr/bin/bash"
 groups = ["root"]
An example blueprint is available at https://github.com/amott-rh/image-builder-blueprint and it contains an explanation for creating the password hash. It doesn’t cover everything, but has the majority of the options shown.
Push the blueprint to Image Builder
Once you have your blueprint ready, you need to push it to Image Builder. This command pushes file blueprint-name.toml to Image Builder:
sudo composer-cli blueprints push blueprint-name.toml
Check that it has been pushed with the blueprints list command:
sudo composer-cli blueprints list
Generate the image
Now you have your blueprint uploaded and can use it to generate images. Use the compose-cli start command for this, giving the blueprint name and the output format you want (qcow, ami, vmdk, etc):
sudo composer-cli compose start blueprint-name qcow2
You can obtain a list of image types with:
sudo composer-cli compose types
The compose step creates a minimally-sized image – if you want more space on your OS disk then add –size and a size, in Gb, to the command.
The image compose will take a short time, and you can see the status of any images with the
sudo composer-cli compose status
Using the image
When the image build is complete the status will show “FINISHED” and you can download it and use it to build your VM:
sudo composer-cli compose image image-uuid
The image UUID is displayed when you start the compose. It can also be found at the beginning of the compose status command output.
The downloaded image file is named with the UUID of the image plus the appropriate extension for the image type. You can copy this file to an image repository and rename as appropriate before creating a VM with it.
A simple qemu/kvm machine is started like this:
sudo qemu-kvm --name test-image -m 1024 -hda ./UUID-disk.qcow2
Alternatively, you can copy this image to a new file and use that file as the OS disk for a new VM.
Image Builder in Cockpit
If you want to use Image Builder in Cockpit, you need to install the cockpit-composer package as described in the installation section above.
After installation, log into your Cockpit URL (localhost:9090) and select Image Builder in the Tools>Applications section. This will take you to the initial Image Builder page, where you can create new blueprints:

Create a blueprint
Selecting the Create blueprint button will display a dialogue box where you need to enter a name for your blueprint plus an optional description:

After you enter a name and select Create, you move to the add packages page. Create a minimal image here by simply selecting the Create Image button, or add extra packages by entering the name in the search box under Available Components and then selecting the + button to add it to your image. Any dependencies required by the package will also be added to the image. Add as many packages as you require.
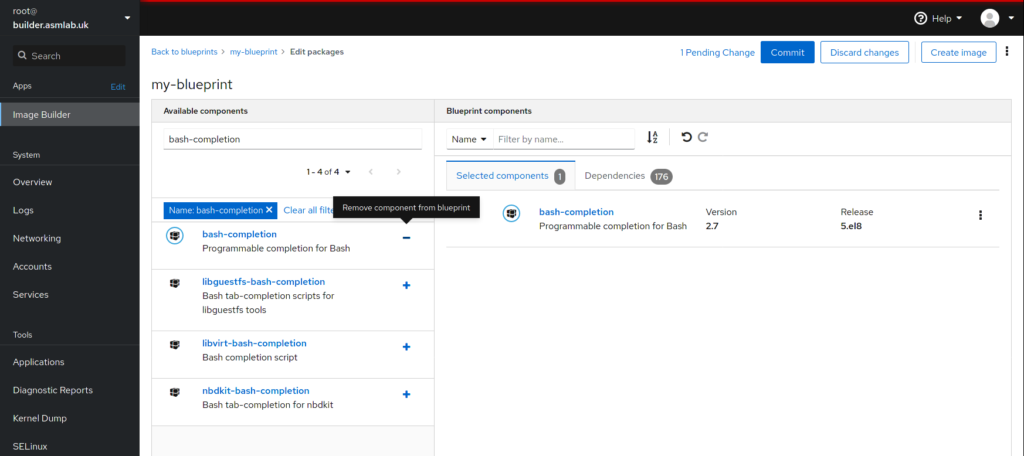
After adding your packages, select the Commit button to save your blueprint. You will be shown the changes your actions will make with the option to continue with your commit or discard the changes next.
When the commit has been made, you will be returned to the same screen where you can add more packages. If you’re done with that, select the name of your blueprint in the breadcrumbs at the top left of the screen to go to the main screen for that blueprint. From here you can add customizations (users, groups etc), more packages, or create the image:
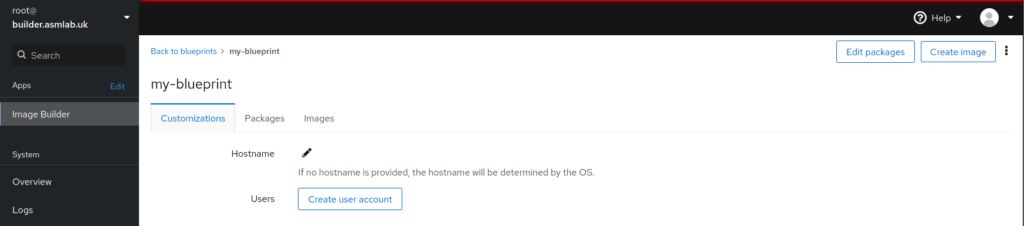
If your image requires any specific users, or if you want to edit the root user (I’d recommend this, either to set a password or add an ssh key so you can log in without having to further edit or customize the image), then you can do this here. You can also create a hostname, which is useful for a single-use image but less so if the image will be used as the base for multiple deployments.
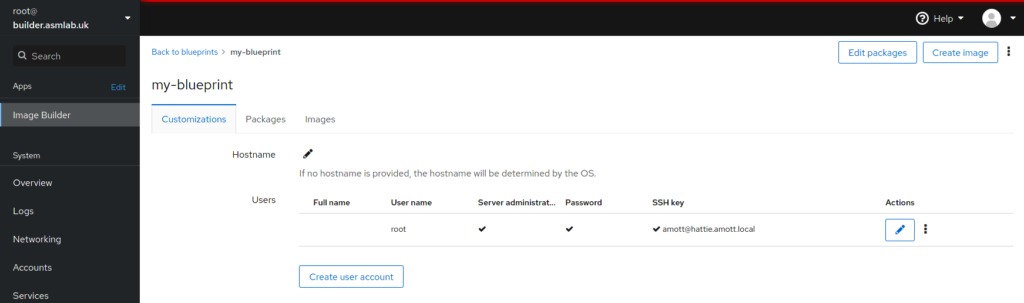
To add a user, select the Create user account button. If you name this user root you can update the root account as you need. Enter a user name, description, any password and/or ssh public key, and if this user will be an administrative user (like root) then tick the box to signify this:

Select the Create button at the bottom to create the user and return to the main blueprint page. Here you will see the new user, and can create more as necessary. Once you’ve created all your users and added all your packages you can create am image from the blueprint by selecting the Create image button at the upper right.
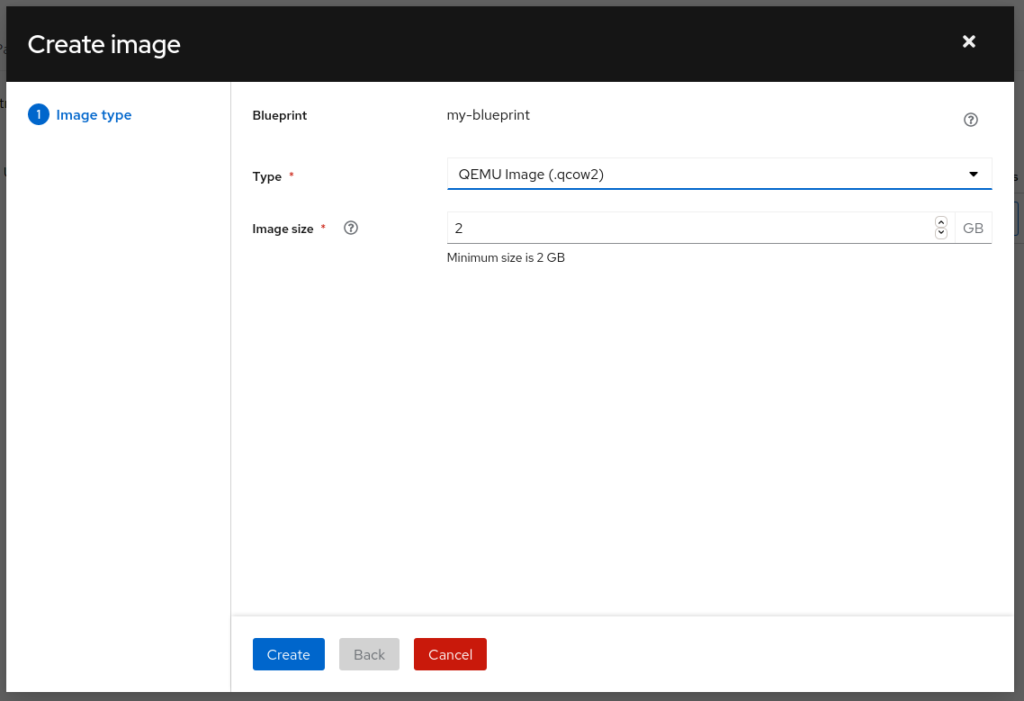
Create an image
In the Create image dialogue select an image type from the dropdown list, then select a size. This will effectively be the size of the disk available in the OS, just like you’d specify the virtual disk size when creating a VM manually. This will be thin-provisioned, so the actual image file won’t be this size! Select Create, when finished, to add your image to a build queue.
Building images takes a little time, and you can check progress or view completed images in the Images page:
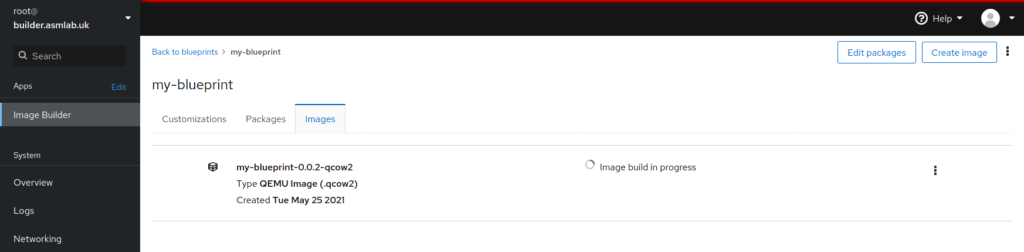
You can create multiple image types from the same blueprint, so you can deploy the exact same image on multiple platforms, increasing your security and making maintenance and administration easier.
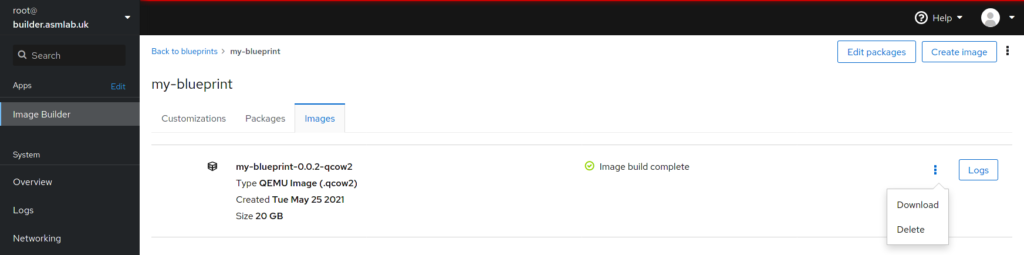
Download the image
To use your image, you need to download it, then upload to your chosen platform. To download the image, select the 3-dot menu next to the image and choose Download:
That’s it – your image is ready to deploy. For a simple QEMU/KVM example use the same command from the CLI section above.
sudo qemu-kvm --name test-image -m 1024 -hda ./UUID-disk.qcow2
Final thoughts
- You can always edit your blueprints at a later date. The Cockpit UI will automatically increment the version number, but you will need to do this yourself in the toml file if using the CLI. Once you’ve edited the blueprint you will also need to create a new image.
- You may verify the TOML format using this web site https://www.toml-lint.com/ Note that this verifies only the file formatting, not correctness of the content.
- You can create images with different sizes if your environment has such requirements.
- Create a different blueprint for each specific image you need – don’t update the same one with different packages and version numbers then create images from those.
- Image Builder does not allow disks to be partitioned. The output types that have a partitioned disk will have a single partition and additionally any platform-specific partitions that are required to boot the system image. For example, qcow2 image type has a single root partition, and possibly a platform specific boot partition – like PReP for PPC64 system – that the image requires to boot.
- Images types that may be created are listed in the following table:
| Description | CLI name | File Extension |
| QEMU QCOW2 Image | qcow2 | .qcow2 |
| Ext4 File System Image | 80 | .qcow2 |
| Raw Partitioned Disk Image | partitiond-disk | .img |
| Live Bootable ISO | live-iso | .iso |
| TAR Archive | tar | .tar |
| Amazon Machine Image Disk | ami | .ami |
| VMware Virtual Machine Disk | vmdk | .vmdk |
| Openstack | openstack | .qcow2 |
Image Builder is a fantastic tool for anyone who needs to have repeatable based images for their environment. It’s definitely still a work in progress, but new features are coming all the time, with plans to allow uploading directly into various hypervisors and cloud platforms and other cool stuff.
Image Builder documentation
Official Weldr documentation: https://weldr.io/lorax/

power46
Thanks for the article. Is there a way to select the fedora version? 34/Rawhide?
Andrew
@power46
According to the docs the image “will use the same distribution version (e.g. Fedora 33) and architecture (e.g. aarch64) as the host system”. It doesn’t seem there is an option to choose otherwise.
https://www.osbuild.org/guides/user-guide/building-an-image-from-cli.html
Andy Mott
Yes, this is correct. At the moment Image Builder can only build images for the OS it runs on.
jenny
This was really so great for us all.
Krish Roy
It is really a helpful tool to create custom OS images.