

This article explains how to configure Yubico’s YubiKey, a hardware security token, and Fedora Linux Workstation for typical use-cases such as logging into GDM, authentication for the sudo command, OpenSSH authentication and key management, or as a second-factor on the web.
Motivation
In times of sophisticated malware and always-and-everything-on(line), software based storage of credentials becomes at least unsettling. Hardware security tokens are a physical, cryptographically secured storage for secrets. Such a token and its secrets can not be copied by large malware attacks.
Applications and services that have to authenticate your access can use a physical token as a factor of ownership and identification. These tokens require extreme dedication, time and money to forge or maliciously acquire.
Nowadays hardware security tokens are quite versatile and can be used for a variety of interesting things. Use-cases are roughly divided into two categories: convenience and added security. Convenience covers anything from using the hardware token to unlock your LUKS encrypted disk to logging in to your Fedora Workstation with the press of a button. Added security on the other hand covers multi-factor authentication (MFA) scenarios as well as storing private credentials.
Always setup a backup key
As soon as you start working with security tokens you have to account for the potential to lock yourself out of accounts tied to these tokens. As hardware security tokens are unique and designed to be extremely hard to copy you can’t just make a backup of it as with software vaults like Keepass or AndOTP. All registrations you do with a primary key you should do with a second backup key which you store in a secure location like a safe or at least leave at home.
In practice you register both hardware tokens with your linux and web accounts, generate private keys on both keys, and configure their public keys at remote services.
Security considerations
Most features of the key can be used either with button press only or require entering an additional PIN. Keep in mind that without a PIN YubiKey authentication is only a button press away. This means that presence is required but is also enough. For example if configured to work as an alternative login factor it is enough to be in front of the machine with the key slotted to login.
YubiKey models and features
Yubico offers multiple models of the YubiKey with different connectors (USB A/C, NFC) and supported features. Depending on the model, the device can be used for a variety of things.
With OTP (One Time Password) you can:
- Log into the system via terminal
- Log into GDM
- Use sudo
The OATH TOTP (Time-based One-Time Passwords) feature is an alternative to Google Authenticator (or andOTP). OATH (Open Authorization) is an organization that specifies two open authentication standards: TOTP and HOTP (HMAC- or Hash-based Message Authentication Code One-Time Password).
The PIV (Personal Identity Verification) module let’s you:
- Store OpenSSL certificates and private keys
- Store OpenSSH private keys
With FIDO U2F (Fast IDentity Alliance Universal 2nd Factor) you can use the key as second-factor in web browser authentication flows. The web page, or more specifically the browser, will ask you to insert the key and press the button on login if you configured the key as second-factor. This is an alternative to OTP that does not require you to lookup a 6-digit code in an Authenticator-App.
In the FIDO2 / WebAuthn module you can store ssh public keys or register your smart card as a password-less authentication method at supporting services, as opposed to it being “just” a second factor alongside a password. FIDO2 is a combined standard consisting of WebAuthn and CTAP2 (Client to Authenticator Protocol 2).
In general the YubiKey can act as either an alternative or second factor. The difference is that an alternative factor may make the input of another factor like a passphrase obsolete while a second factor is required in addition to, for example, a passphrase or a fingerprint.
Storage limitations
For some features, private keys and other secrets are stored on the YubiKey. Each feature has its own storage space and hence maximum number of credential slots:
- OTP – Unlimited, as only one secret per key is required
- FIDO U2F – Unlimited, as only one secret per key is required
- FIDO2 – 25 credentials / identities
- OATH – 32 credentials
- PIV – 24 X.509 certificates and their respective private keys
- OpenPGP – 3 keys; one for encryption, signing and authentication each
Prerequisites
First, install the management applications to configure the YubiKey. With these you can disable or reconfigure features, set PINs, PUKs, and other management passphrases.
$ sudo dnf install -y yubikey-manager yubikey-manager-qt
For System Authentication install the yubico PAM module:
$ sudo dnf install -y pam_yubico
The OpenSSH agent and client support YubiKey FIDO2 without further changes. For older keys without FIDO2 you need the PKCS#11 extension which is shipped in the official repositories:
$ sudo dnf install -y yubico-piv-tool-devel
For OATH you need the yubioath-desktop application and/or a mobile client:
$ sudo dnf install -y yubioath-desktop
Configuration of the YubiKey
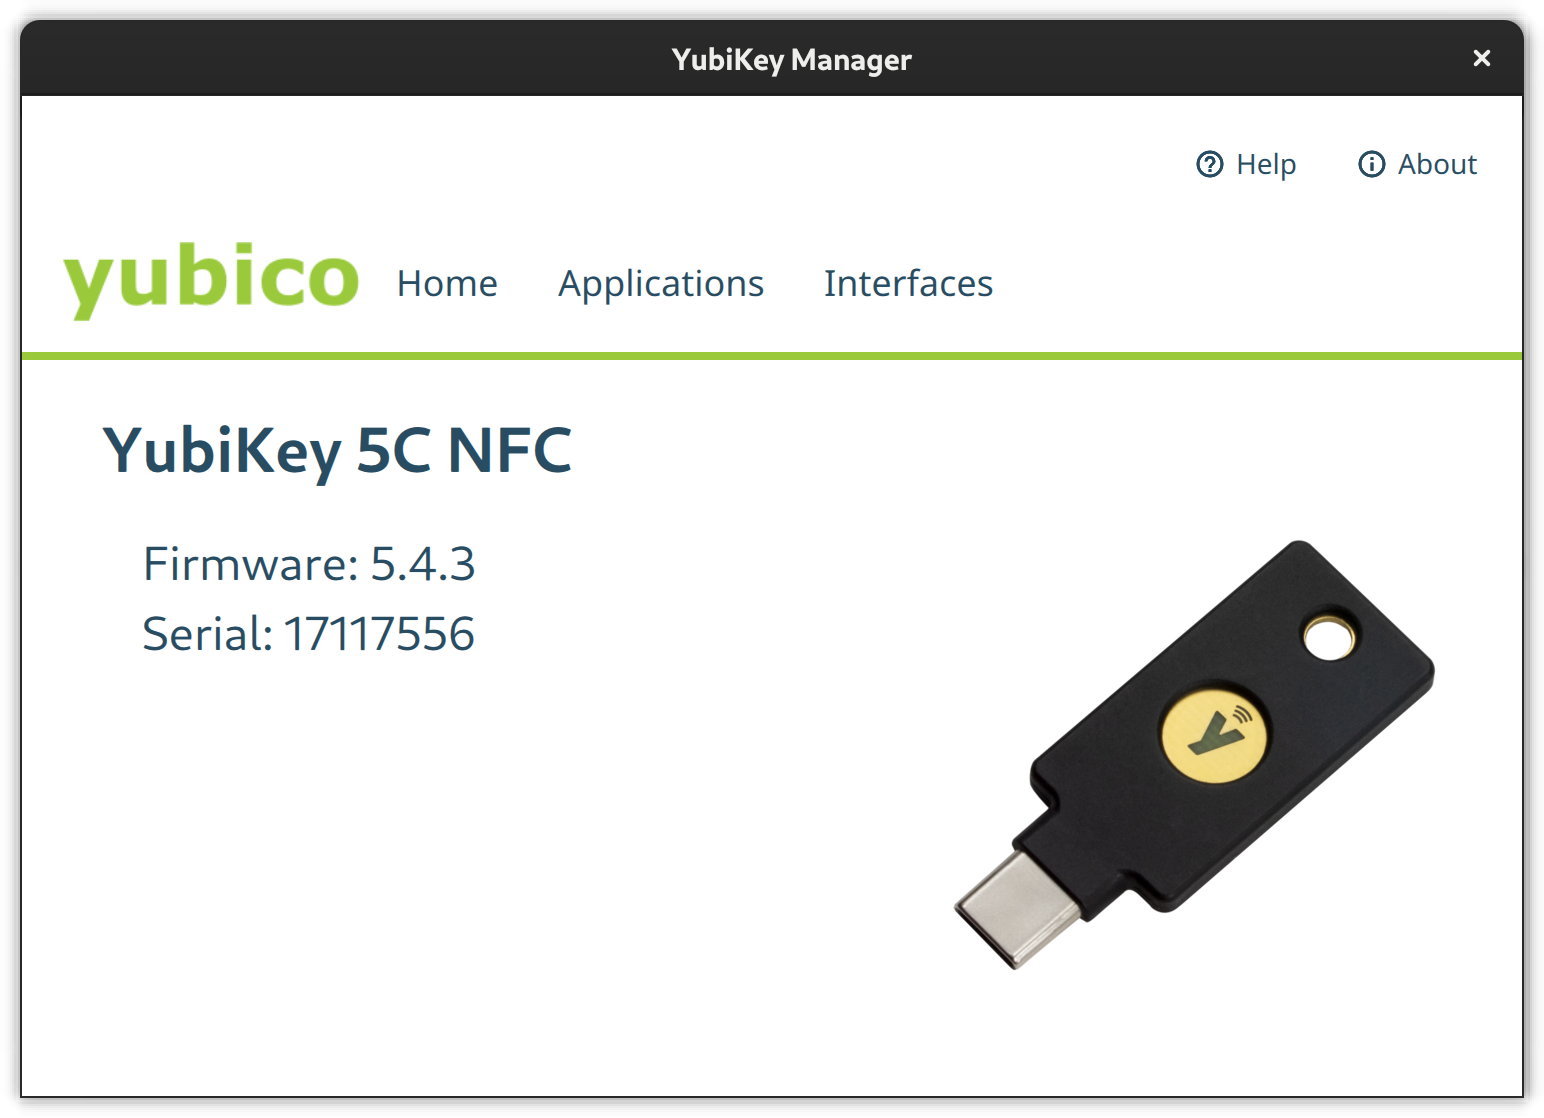
A YubiKey comes pre-configured for Yubico OTP and uses public default PINs for all other modules which you are strongly advised to change. Use either the yubikey-manager CLI or yubikey-manager GUI application to configure the YubiKey.
Select the Applications button in the YubiKey Manager and a drop-down will appear to navigate to the single module configuration pages. Via the Interfaces button you open a page full of check-boxes where you can activate/deactivate single features on a per physical connector basis (e.g., USB C or NFC).
PIV
Go to the PIV configuration page and configure PIN and PUK. Their default values are 123456 and 12345678 respectively. Then set a new management key protected by your previously set pin.
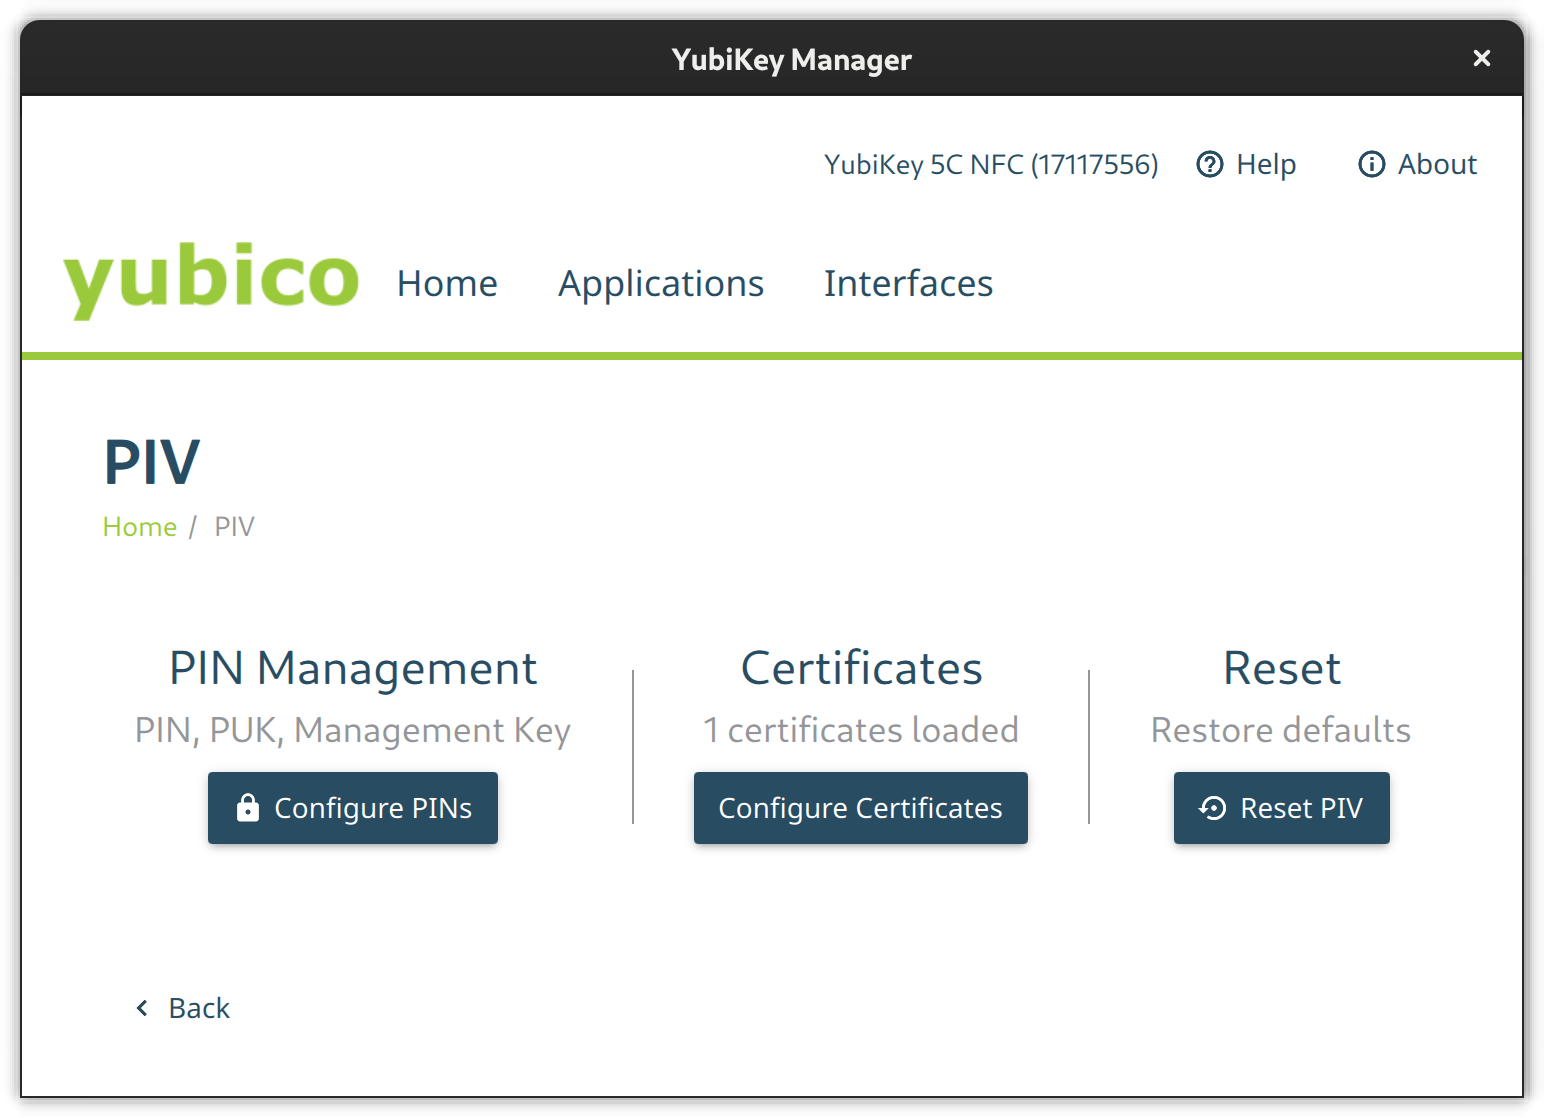
Using the CLI tool change the default PIN like so:
$ ykman piv access change-pin
Enter the current PIN: 123456
Enter the new PIN: ********
Repeat for confirmation: ********
New PIN set.
Change the default PUK:
$ ykman piv access change-puk
Enter the current PUK: 12345678
Enter the new PUK: ********
Repeat for confirmation: ********
New PUK set.
Generate a new random management key, protect it with our previously set PIN, and replace the default key:
$ ykman piv access change-management-key --generate --protect
Enter the current management key [blank to use default key]:
Enter PIN: ********
FIDO2
Go to the FIDO2 page and set a pin.
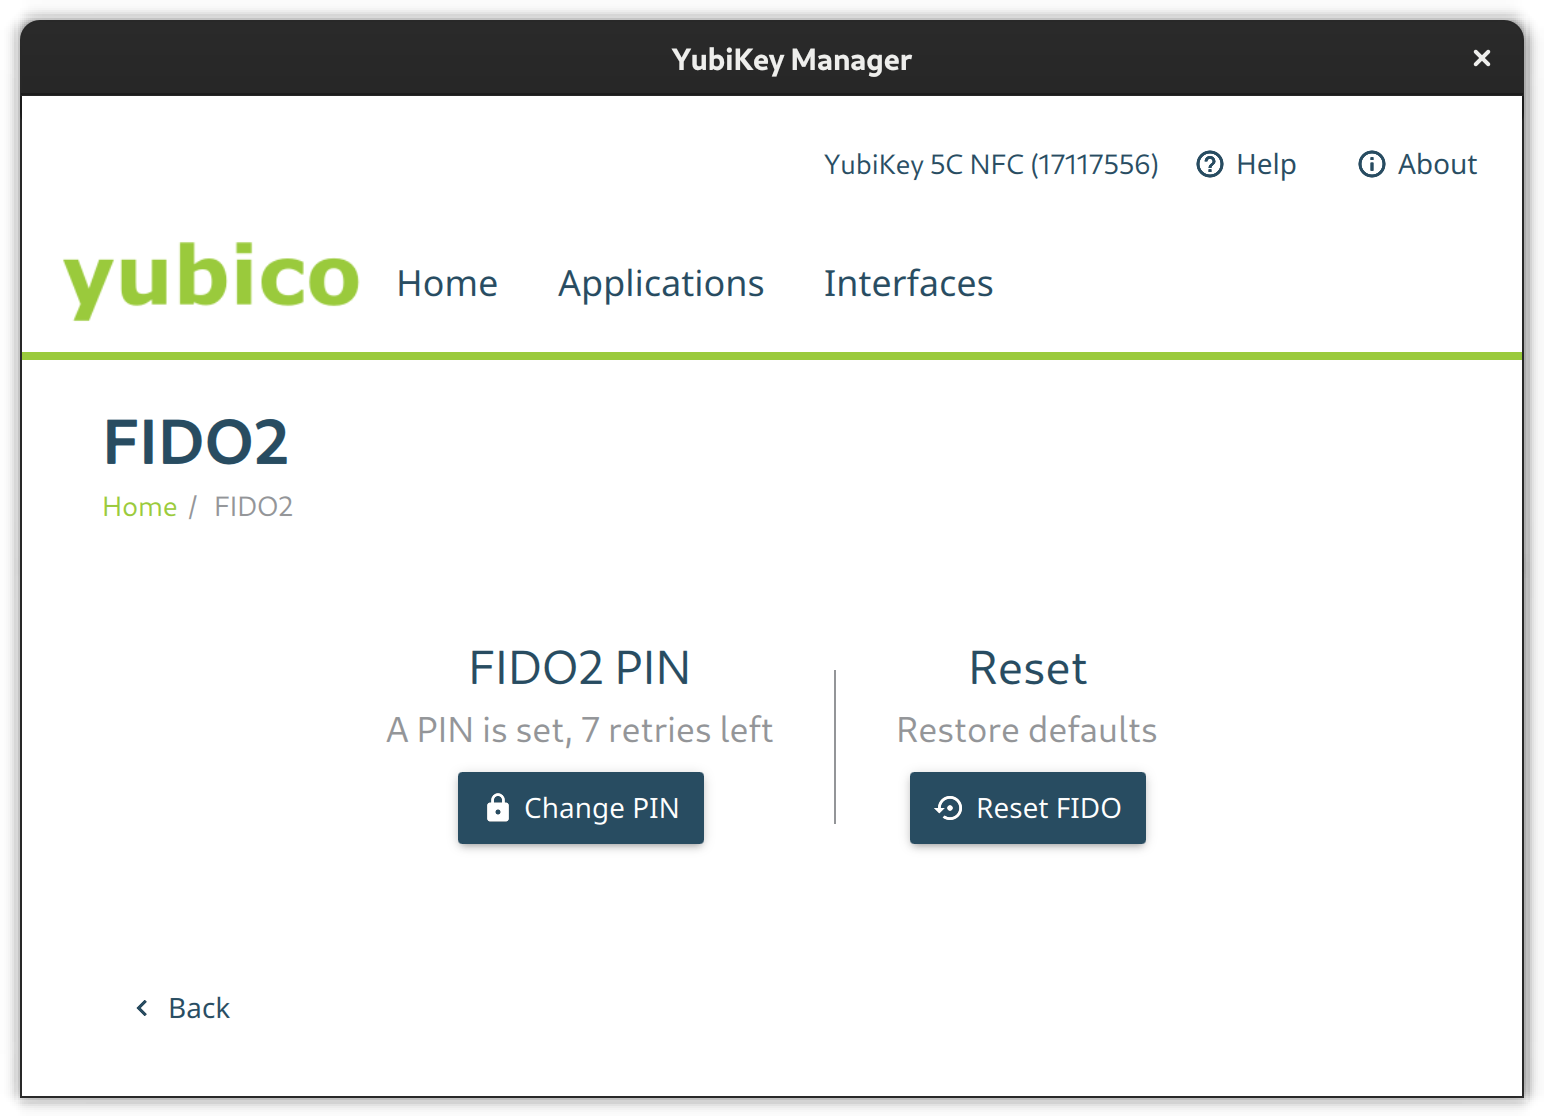
Set the FIDO2 pin on a terminal like this:
$ ykman fido access change-pin
Enter the current PIN: 123456
Enter the new PIN: ********
Repeat for confirmation: ********
New PIN set.
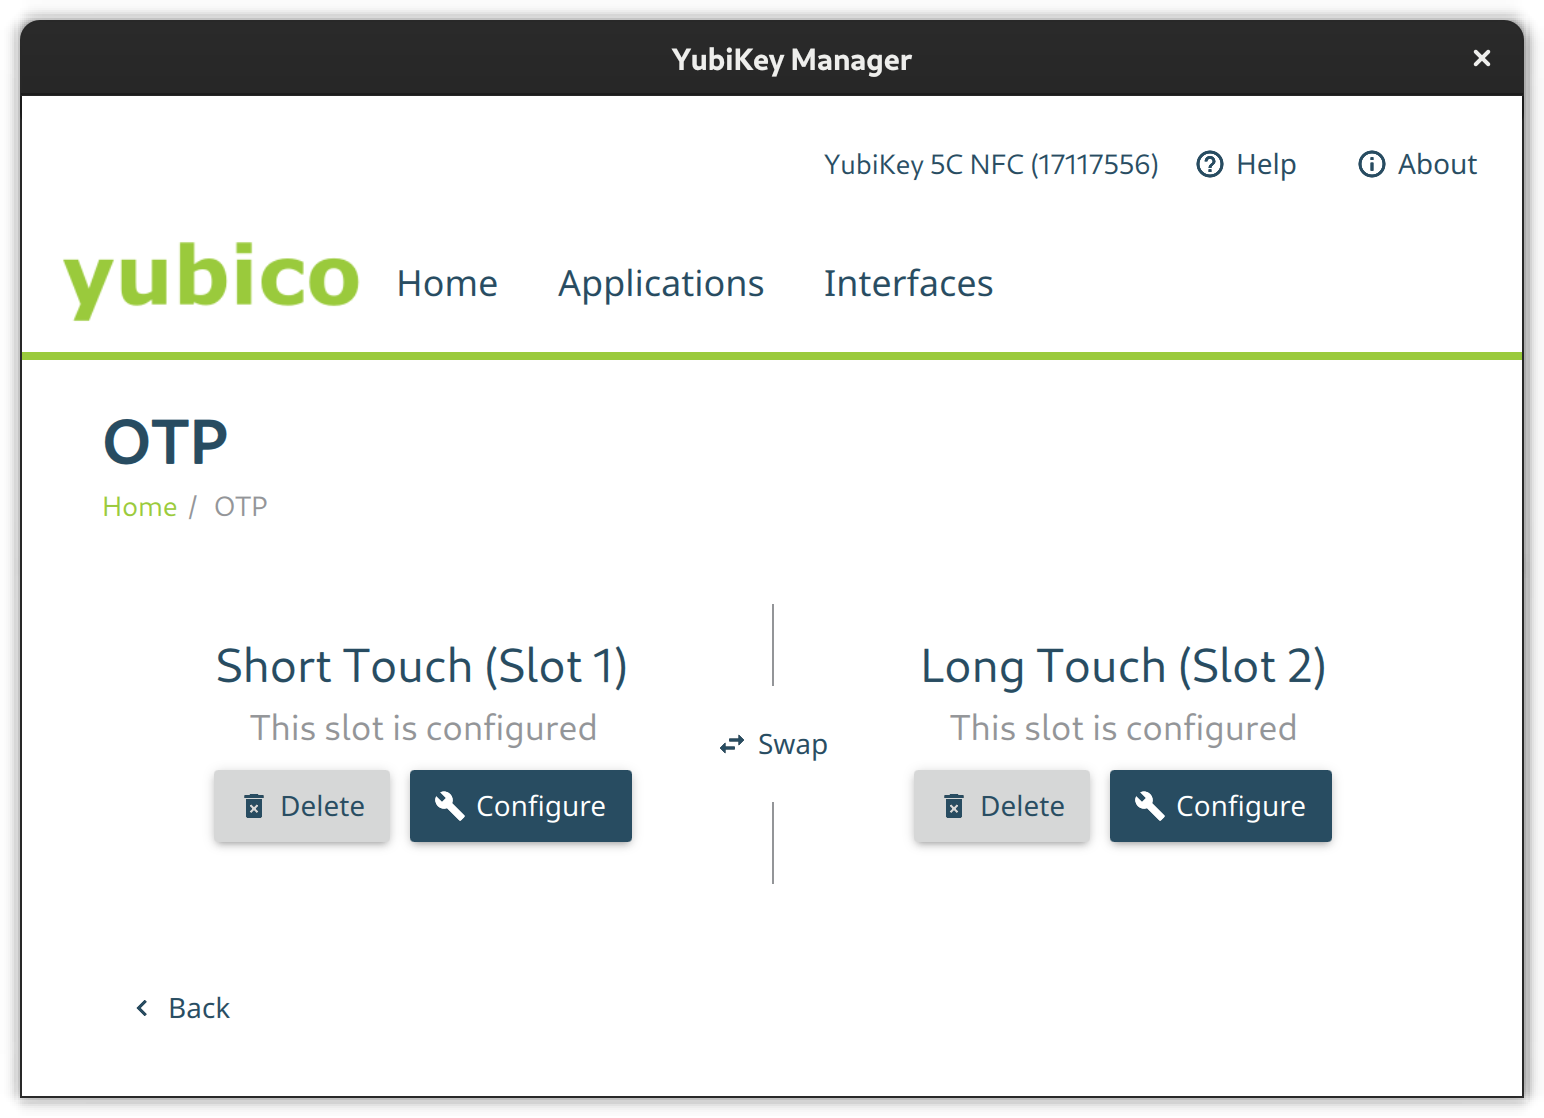
OTP
The OTP feature is configured out-of-the-box. There is nothing to do here except to configure Slot 2 if you like. Slot 1 is used for challenge-response by default. Slot 2, however, is empty at first. You can configure it to output a static key of your liking on a long touch of the YubiKey’s button (approximately 2.5 seconds).
Note: Slot 1 is special as it contains a factory credential already uploaded to YubiCloud. Deleting and recreating a Yubico OTP secret and uploading it to YubiCloud yourself will put a special mark on it which has consequences: service providers might not trust such a key and Yubico might delete those secrets at anytime for practically any reason.
If you like, set the second slot from a terminal via ykman otp static like this:
ykman otp static --keyboard-layout US 2 u25bohg87bmtj247ts725v5f
OATH
Use the OATH module to store TOTP codes. By default, this module does not have a passphrase. But you can assign one. Without a passphrase you can query all stored credentials and get TOTP codes without additional authentication.
The GUI does not have the means to change the passphrase so the CLI is required.
ykman oath access change
You can configure your device to remember the YubiKey so you only have to enter the passphrase once.
ykman oath access remember
In the same way, let your device forget the YubiKey OATH credential.
ykman oath access forget
Local (PAM) authentication via OTP
Add the YubiKey to local system authentication through PAM (Pluggable Authentication Modules). You can either do this using the default online or an alternative offline method. The online method uses the Yubico servers to validate the OTP tokens and thus requires an online connection while the offline method uses challenge-response.
Create base configuration files
Create two base configuration files using the pam_yubico module. One which instructs PAM to consider the YubiKey an alternative factor and one so PAM requires the key as an additional factor.
For the online YubiCloud method use the appropriate command shown here:
/etc/pam.d/yubikey-required
#%PAM-1.0
auth       required     pam_yubico.so id=[Your API Client ID] key=[Your API Client Key]

/etc/pam.d/yubikey-sufficient
#%PAM-1.0
auth       sufficient     pam_yubico.so id=[Your API Client ID] key=[Your API Client Key]
You need to register your YubiKey at YubiCloud and obtain an API key. The module will work without an API key but then the client will not verify OpenSSL certificates and be susceptible to MitM (Man in the Middle) Attacks.
Note: This authentication method will not work if your device is offline or it cannot connect to the YubiCloud.
For offline challenge-response use the appropriate command shown here:
/etc/pam.d/yubikey-required
#%PAM-1.0
auth       required     pam_yubico.so mode=challenge-response

/etc/pam.d/yubikey-sufficient
#%PAM-1.0
auth       sufficient     pam_yubico.so mode=challenge-response
Register your YubiKey with your local account
After the base configuration files are setup nothing has really changed — yet. It is advised that you now register your YubiKey(s) with the respective user accounts on your machines before changing the active PAM configuration of your systems.
If you use the online YubiCloud method you need the ID of your YubiKey. To find this just enter the key and retrieve an OTP code with a short press on the button and extract the first 12 characters – this is your key ID:
cccccbcgebif | bclbtjihhbfbduejkuhgvhkehnicrfdj
Next create a configuration file in ~/.yubico/authorized_yubikeys and add all authorized key IDs after your username separated by colons:
fedora-user:cccccbcgebif[:<another-key-id>]
If you go for the offline challenge-response method, you need at least one slot configured for challenge-response. Let’s assume Slot 1 is used in its default configuration with YubiCloud OTP for other things. So configure the 2nd slot for challenge-response:
ykman otp chalresp --generate --touch 2
Now register a connected YubiKey with your user account via challenge-response:
ykpamcfg -2
This creates a file in ~/.yubico/challenge-<key-serial> that contains a challenge response configuration for the key.
Choose PAM configuration
Now choose the PAM modules to consider the YubiKey and then include the respective configuration file, either before or after the system-auth import depending on whether sufficient or required is what you want:
- /etc/pam.d/login – For console logins
- /etc/pam.d/sudo – For sudo authentication
- /etc/pam.d/gdm-password – For GNOME authentication
- /etc/pam.d/ssh – SSH authentication against a local OpenSSH Server
For YubiKey as additional / required factor:
auth include system-auth
...
auth include yubikey-required
For YubiKey as alternative / sufficient factor:
auth include yubikey-sufficient
...
auth include system-auth
Note: If you add the YubiKey as a factor in sudo authentication, make certain to have a root shell open and test it thoroughly in another shell. Otherwise you could lose the ability to use sudo.
Lock the system on YubiKey removal
Wouldn’t it be cool to lock your Gnome session when removing the YubiKey? If that behavior fits your style just add a script which does just that and let udev trigger it.
Create an udev rule to catch the device detach event with a shell script. The model ID in this example might differ so please check your lsusb output to confirm it. Save the following udev rule into /etc/udev/rules.d/20-yubikey.rules:
ACTION=="remove", ENV{ID_BUS}=="usb", ENV{ID_MODEL_ID}=="0407", ENV{ID_VENDOR_ID}=="1050", RUN+="/usr/local/bin/lockscreen.sh"
Add the following script to the /usr/local/bin/lockscreen.sh file:
#!/bin/sh
#Author: https://gist.github.com/jhass/070207e9d22b314d9992
 for bus in /run/user/*/bus; do
   uid=$(basename $(dirname $bus))
   if [ $uid -ge 1000 ]; then
     user=$(id -un $uid)
     export DBUS_SESSION_BUS_ADDRESS=unix:path=$bus
     if su -c 'dbus-send --session --dest=org.freedesktop.DBus --type=method_call --print-reply  /org/freedesktop/DBus org.freedesktop.DBus.ListNames' $user | grep org.gnome.ScreenSaver; then
       su -c 'dbus-send --session --type=method_call --dest=org.gnome.ScreenSaver /org/gnome/ScreenSaver org.gnome.ScreenSaver.Lock' $user
     fi
    fi
 done
Add execution permission to this script and reload udev:
$ sudo chmod +x /usr/local/bin/lockscreen.sh
$ sudo udevadm control -R
OpenSSH with FIDO2 or PKCS#11
Some newer YubiKeys support FIDO2. If you have one of those and are running a recent version of Fedora Linux with at least OpenSSH 8.2+ it’s very simple to maintain your SSH keys with the YubiKey.
Use OpenSSH ssh-keygen to generate a public key you can later use in authorized_keys files on remote systems. The following generates such a key directly on the YubiKey in a FIDO2 slot, making it portable.
ssh-keygen -t ed25519-sk -O resident -O application=ssh:fedora -O verify-required
The resident option instructs ssh-keygen to store the key handle on the YubiKey, making it easier to use the key across multiple systems as ssh-add can load and use the ssh keys from the YubiKey directly. The application option assigns a designated name for the this specific private-public-key-pair and is useful if working with different ssh identities. The verify-required option is mandatory for resident keys and adds requirement to enter a pin on key usage.
If you did not set a FIDO2 pin on the key omit the verify-required flag. If you don’t want to use FIDO2 slots, omit the resident and application options and make sure to backup generated public keys.
YubiKeys without FIDO2 support
Your YubiKey can store OpenSSH private keys in the PIV module, generate public keys from them, and require PIN and touch of the YubiKey button upon use.
Generate a private key (e.g. ED25519) with touch and pin requirement in the 9a slot:
$ ykman piv keys generate --algorithm ED25519 --pin-policy ONCE --touch-policy ALWAYS 9a public.pem
Enter PIN: ********
The slot 9A is for “PIV Authentication”.
Create a self-signed certificate for that key. The only use for the X.509 certificate is to satisfy PIV/PKCS #11 lib. It is needed to extract the public key from the smart card.
$ ykman piv certificates generate --subject "CN=OpenSSH" --hash-algorithm SHA384 9a pubkey.pem
Enter PIN: ********
Touch your YubiKey…
Generate a public key from the X.509 certificate stored on the YubiKey.
$ ssh-keygen -D /usr/lib/libykcs11.so -e
Login to systems with this public key:
$ ssh -I /usr/lib/libykcs11.so user@remote.example.org
Caching OpenSSH connections
In the OpenSSH default configuration, every time you connect to a machine via ssh you’ll be prompted to touch your key. To let your OpenSSH client cache connections even after you close the session and thus no longer need to touch the key again, add the following option to your ~/.ssh/config:
Host *
    ControlMaster auto
    ControlPath ~/.ssh/S.%r@%h:%p
    ControlPersist 5m
Introspection
Get information on the PIV slot 9a:
$ ykman piv info
PIV version: 5.4.3
PIN tries remaining: 3/3
Management key algorithm: TDES
CHUID:	REDACTED
CCC: 	No data available.
Slot 9a:
	Algorithm:	RSA2048
	Subject DN:	CN=SSH key
	Issuer DN:	CN=SSH key
	Serial: REDACTED
	Fingerprint: REDACTED
	Not before:	2022-01-01 20:00:00
	Not after:	2023-01-01 20:00:00
List stored FIDO2 public keys with:
$ ykman fido credentials list
ssh:fedora 0000000000000000000000000000000000000000000000000000000000000000 openssh
Authenticating in the web
YubiKey Authenticator is a TOTP application for Desktop and Android and is similar to Google Authenticator and AndOTP. However, it uses the YubiKey as storage device. Either scan a QR code or enter the secret directly, choose a name and that’s it. Just keep in mind that the storage on a YubiKey is limited to 32 TOTP codes.
Since the TOTP codes are stored on the YubiKey they are portable and you may access them e.g. via USB C on desktop or via NFC on the android application.
Use the yubikey-manager to add a TOTP credential:
ykman oath accounts add fedora <TOTP secret>
Then retrieve a TOTP code with:
ykman oath accounts code fedora
WebAuthn and U2F as alternative
WebAuthn and U2F are modern alternatives to TOTP which just requests the presence of your key and a button press through your browser of preference. If previously registered at the web service in question, you can use it as a far more convenient factor than TOTP codes.
This feature is supported at least in Firefox but not in Gnome Web.
The difference between FIDO U2F and FIDO2 WebAuthn is that the latter stores an identity in the keys storage and thus the application or service can extract the user identity and authentication from the key without the need of an identity server.
Other use cases
There are more use cases not covered in this article which might be worth revisiting at some point. These Include but are not limited to:
- OpenPGP to encrypt, sign or authenticate
- x509 certificate management for Public Key Infrastructure
- LUKS disk decryption
What other use-cases do you have in mind? Let us know in the comments.
REVISED 2022-02-14 to include separate OpenSSH instructions for YubiKeys with and without FIDO2 support.

Sergey Zolotorev
Wow, it is one of the best and clear YubiKey guide for Linux I ever seen. Thanks!
Alexander Wellbrock
Thank you very much! Glad that you like it
msandy
This is so good, I’ve had a yubikey for a few years but have only used it in multifactorial use cases the other uses I couldn’t quite get my head wrapped around. This article just made me excited to try out some of them. Thank you!
Alexander Wellbrock
Nice to hear that it sparked something in you 🙂
Gareth
This is great, thank you!
Franco B.
Very clear guide, many thanks!
tfks
Very nice! Thanks!
Frederico Tavares
Thank you very much, that what I was looking for 😉
Leslie
I would very much like to see an article about using YubiKey for both GPG mail authentication and LUKS crypto.
Alexander Wellbrock
Noted. It’s not unlikely that I’ll cover that in an upcoming article.
Darvond
Uh huh. And the TL;DR, for those of us who aren’t paranoid cryptonauts?
My loose interpretation based on scrubbing this overt wall of text is that by using a physical device one could easily lose as an alternative to typical PAM/OTP has intangible benefits which cannot be readily described to a lay user.
What pray tell, does this constant vigilance offer over a simple biometric solution?
Todd Lewis
Hardware tokens can be replaced, and lost hardware tokens can be revoked. Revoking fingerprint or retina scans is possible, but replacing fingers or eye-balls is much less convenient.
They all have their place. I can imagine a YubiKey-like device with a touch-pad that only responds to recognized fingerprints: best (or worst) of both!
Matt
With the OTP setup I would probably mention that if you reconfigure the first preset slot, it becomes “untrusted” with some providers.
Jakub
Wow, that’s a pretty good and clear guide. Thanks for that!
Alexander Wellbrock
Nice catch! That sounds reasonable. Just crawled up a forum post about it: https://forum.yubico.com/viewtopicaafc.html?f=26&t=1592
We’ll put a warning up that Slot 1 uses special factory marked “cc” flag credentials and that after deleting those you only have the option to created new keys and upload them to YubiCloud marked with the “vv” flag – which A) some services don’t accept and B) Yubico might delete those at anytime for practically any reason
Gregory Bartholomew
The warning has been added. Thanks for bringing this to our attention!
Stephen
Thank you for the post! However, I would like to have one for the Nitro Pro key, which is completely open in contrast to the Yubikey. Any chance you’ll give us some good article in the future how to utilize fully it with Fedora? Thank you in advance.
James
Hi, I have been using the system authentication with yubikey for some months, with no problem. However, I was using the auth_sufficient method with out a yubico API key.
So, I have obtained an api key and have changed my configuration files in accordance with your article, and whilst sudo is working, and I also have polkit working, so that I can use my key with privilege escalation gdm prompts, I cannot get su to work.
When I try and su, I get the following error in journalctl:
Mar 07 09:27:44 fedora su[7986]: PAM adding faulty module: /usr/lib64/security/yubikey-sufficient
I have the pam-yubico module installed, and the old way, with:
in the file
works fine. I am on a silverblue fedora fyi.
I also think that it is worth mentioning that if you use the sufficient method, then should you press enter when prompted for your yubikey, you will be asked for your password. So, it is probably worth setting up the key as auth-sufficient to test it before using it as auth-required…
And one last point 🙂 Do you know if it is possible to list the authorized users in a system location as opposed to a home folder?
Something like /etc/yubikeys instead of ~/.yubico/authorized_yubikeys
Gregory Bartholomew
It looks like you put “auth sufficient yubikey-sufficient” instead of “auth include yubikey-sufficient”.
mstch
There is a
library that can be used instead of the
library. It might be a better solution as it doesn’t rely on a third party approval, it’s a standard and it works with any hardware key that support FIDO U2F.
About PAM, some of its configurations files are automatically generated by authselect (which is a tool made by RedHat). As you can imagine, it’s not a good idea to modify directly these generated files. Learning how to deal with authselect could be a nice further article.
Another good topic that could be a good addendum: hardware token can also be used for full disk encryption.
Alexander Wellbrock
These are some very useful bits of information. I’ll incorporate them in the docs and consider them in upcoming articles. Much appreciated!
pl
Does Fedora support Google Titan keys?
mstch
From what I read, Google Titan keys support FIDO U2F and FIDO2 (Webauthn). So the SSH and web authentication part should works. About PAM, you might need to use “pam_u2f.so” library instead of the “pam_yubico.so” library. I have done that following this guide “https://github.com/Zer0CoolX/Fedora-KDE-Yubikey-U2F-2FA-Logins-Guide”. I personally think it should be the advised method as U2F is a standardized method that are implemented on all hardware token (instead of the method presented here that works only on some specific kind of Yubikeys).
Jed Baldwin
This article is very helpful, but makes me disappointed that the process of setting up smart cards/hardware keys is so difficult and not straightforward. As a great example, the instructions that Yubico’s website link to that explain how to setup a yubikey (I believe it links to a Fedora wiki article) are not great. If followed exactly, they only allow you to configure your yubikey for sudo and login authentication and only make a passing note about how maybe the wiki article should make a reference to setting up your yubikey to login with GDM. As a non-technical user that wanted to use a yubikey to replace my password for local desktop authentication and for second factor authentication with online services (e.g. Bitwarden), the experience of trying to setup a yubikey was extremely frustrating. I spent several days trying to configure it properly and ultimately failed. Reading this article helps me see where there were likely missing instructions in the guides I read, but nowhere in my troubleshooting was I able to find this information myself. In fact, my experience was so soured that after reading this article I’m LESS likely to go back and try to set up my yubikey again.
Ultimately, I was able to get a working solution. I used slot 2 on my yubikey to output my (long and easy to mistype) password in plain text. That way I don’t have to type it in. I just find it ironic that the instructions I was provided were so poor that I’ve ended up compromising the security of my desktop rather than using the tool how I wanted to in the first place.
Alexander Wellbrock
As I put more time into research after some comments here pointed me in new directions it turns out that there is a much more straight forward way of doing this with the already mentioned pam_u2f module. It is more general and works with other keys too and is not as complicated to setup. Also using authselect simplifies activation of the u2f method for gdm login by a great deal (sudo authselect select sssd with-pam-u2f => done).
I’m currently rewriting the wiki pages based on this as well as working on (an) upcoming article(s). I might also reference a shorter update post from my blog soon
Alexander Wellbrock
Could you tell me which yubico article points to the fedora wiki page? I remember something like that and I think that they link to an old wiki page which will probably never see an update opposed to the newer quick-docs wiki page: https://docs.fedoraproject.org/en-US/quick-docs/using-yubikeys/
Jed Baldwin
The article is linked in the getting started page of the yubico website. You go to “getting started”, then select your key (in my case, the link is here: https://www.yubico.com/setup/yubikey-5-series/), then select a service. When selecting Fedora, their website links to this article: https://fedoraproject.org/wiki/Using_Yubikeys_with_Fedora
The quick-docs page you linked never came up when looking on the Yubico website, nor did I find it in my googling. I wish I would have found it sooner! Darn SEO really short changed me here! Terms like “yubikey setup Fedora 37” would lead me to one of the two links above, or to a number of stackexchange/reddit threads complaining about issues trying to use yubikeys with Fedora specifically.
Gregory Bartholomew
Thanks for letting us know about this! FYI, a redirection is now in place for that wiki URL to send users to the newer quick docs version.
Jab
Very good tutorial. Thanks! It would be nice also a guide to unencrypt a LUKS removable partition (a pendrive for example). Use a yubikey to unblock a boot partition is quite popular, not so for removable devices.
Omar Kotb
I believe
will be removed from Fedora repositories in F38. However, the the Flatpak package should now work in that release because they fixed pcsc-lite in F38.
https://discussion.fedoraproject.org/t/f38-yubioath-desktop-will-no-longer-be-available-in-fedora-repository/45921
https://github.com/flathub/com.yubico.yubioath/issues/35
paweł
I am totally lost. Just wanted to start with something easy, like logging to gnome (gdm) with yubikey, without password. and after this tutorial, arch wiki, https://wiki.archlinux.org/title/Universal_2nd_Factor#Authentication_for_Arch_Linux, chatgpt, just don’t know what should i do. can someone provide guide, how should i configure fedora 37 to use yubikey to login to gnome? i feel that i am close, now i need to enter password and than press yubikey, but i just want yubikey, no password. and as a bonus, when yubikey is not plugged, than password
Gregory Bartholomew
If you put “auth include yubikey-sufficient” above the “auth substack password-auth” line in /etc/pam.d/gdm-password you should get that effect.
paweł
nope, it blocked me completly from login to gnome (ctrl-alt-f3 for rescue)
Gregory Bartholomew
As long as you defined the yubikey-sufficient file beforehand as detailed in the article, it should have worked.
paweł
lol. i managed to login to gnome, with pam_u2f and guide from arch. but i still have to provide password to unclock gnome keyring. looks like my dream about passwordless gnome desktop cannot be realized.
Alexander Wellbrock
I covered that particular problem in a blog post on my blog: https://221b.uk/gnome-login-using-u2f-security-tokens
tl;dr: if your disk is encrypted and you run a single-user system I assume it’s safe to store the keyring unencrypted
This is going into my next article about pam_u2f (FIDO2 keys in general, opposed to YubiKey only). Which, as you already discovered, is far less trouble in setting up 🙂
Jonah Benton
Good piece, would suggest covering the use case of running Fedora in a kvm VM. The shenanigans to have the yubikey get passed through to the VM with guest udev rules properly configured are a mess and are not fully documented.
Alexander Wellbrock
Sounds like an interesting use-case! If anyone has info on that feel free to reach out here, or in the forums or on Mastodon: @w4tsn@darmstadt.social