


The How to Build a Netboot Server, Part 1 article provided a minimal iPXE boot script for your netboot image. Many users probably have a local operating system that they want to use in addition to the netboot image. But switching bootloaders using the typical workstation’s BIOS can be cumbersome. This part of the series shows how to set up some more complex iPXE configurations. These allow the end user to easily choose which operating system they want to boot. They also let the system administrator manage the boot menus from a central server.
An interactive iPXE boot menu
The commands below redefine the netboot image’s boot.cfg as an interactive iPXE boot menu with a 5 second countdown timer:
$ MY_FVER=29
$ MY_KRNL=$(ls -c /fc$MY_FVER/lib/modules | head -n 1)
$ MY_DNS1=192.0.2.91
$ MY_DNS2=192.0.2.92
$ MY_NAME=server-01.example.edu
$ MY_EMAN=$(echo $MY_NAME | tr '.' "\n" | tac | tr "\n" '.' | cut -b -${#MY_NAME})
$ MY_ADDR=$(host -t A $MY_NAME | awk '{print $4}')
$ cat << END > $HOME/esp/linux/boot.cfg
#!ipxe

set timeout 5000

:menu
menu iPXE Boot Menu
item --key 1 lcl 1. Microsoft Windows 10
item --key 2 f$MY_FVER 2. RedHat Fedora $MY_FVER
choose --timeout \${timeout} --default lcl selected || goto shell
set timeout 0
goto \${selected}

:failed
echo boot failed, dropping to shell...
goto shell

:shell
echo type 'exit' to get the back to the menu
set timeout 0
shell
goto menu

:lcl
exit

:f$MY_FVER
kernel --name kernel.efi \${prefix}/vmlinuz-$MY_KRNL initrd=initrd.img ro ip=dhcp rd.peerdns=0 nameserver=$MY_DNS1 nameserver=$MY_DNS2 root=/dev/disk/by-path/ip-$MY_ADDR:3260-iscsi-iqn.$MY_EMAN:fc$MY_FVER-lun-1 netroot=iscsi:$MY_ADDR::::iqn.$MY_EMAN:fc$MY_FVER console=tty0 console=ttyS0,115200n8 audit=0 selinux=0 quiet
initrd --name initrd.img \${prefix}/initramfs-$MY_KRNL.img
boot || goto failed
END
The above menu has five sections:
- menu defines the actual menu that will be shown on the screen.
- failed notifies the user that something went wrong and drops the user to a shell so they can troubleshot the problem.
- shell provides an interactive command prompt. You can reach it either by pressing the Esc key while at the boot menu or if the “boot” command returns with a failure code.
- lcl contains a single command that tells iPXE to exit and return control back to the BIOS. Whatever you want to boot by default (e.g. the workstation’s local hard drive) must be listed as the next boot item right after iPXE in your workstation’s BIOS.
- f29 contains the same netboot code used earlier but with the final exit replaced with goto failed.
Copy the updated boot.cfg from your $HOME/esp/linux directory out to the ESPs of all your client systems. If all goes well, you should see results similar to the image below:
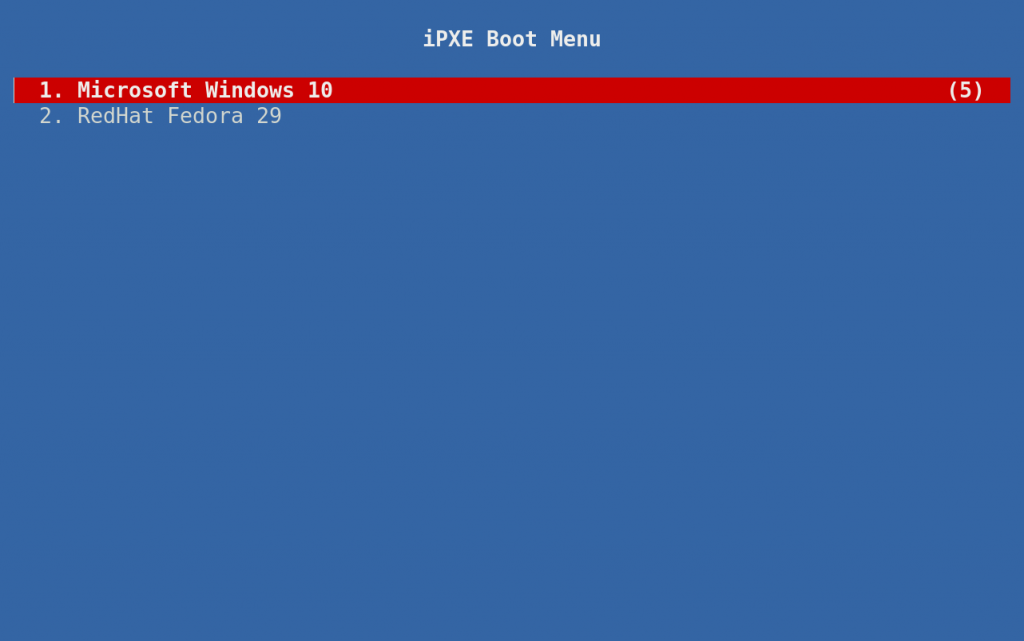
A server hosted boot menu
Another feature you can add to the netboot server is the ability to manage all the client boot menus from one central location. This feature can be especially useful when rolling out a new version of the OS. It lets you perform a sort of atomic transaction to switch all clients over to the new OS after you’ve copied the new kernel and initramfs out to the ESPs of all the clients.
Install Mojolicious:
$ sudo -i
# dnf install -y perl-Mojolicious
Define the “bootmenu” app:
# mkdir /opt/bootmenu
# cat << END > /opt/bootmenu/bootmenu.pl
#!/usr/bin/env perl
use Mojolicious::Lite;
use Mojolicious::Plugins;

plugin 'Config';

get '/menu';

app->start;
END
# chmod 755 /opt/bootmenu/bootmenu.pl
Define the configuration file for the bootmenu app:
# cat << END > /opt/bootmenu/bootmenu.conf
{
  hypnotoad => {
    listen => ['http://*:80'],
    pid_file => '/run/bootmenu/bootmenu.pid',
  }
}
END
This is an extremely simple Mojolicious application that listens on port 80 and only answers to /menu requests. If you want a quick introduction to what Mojolicious can do, run man Mojolicious::Guides::Growing to view the manual. Use the Q key to quit the manual.
Move boot.cfg over to our netboot app as a template named menu.html.ep:
# mkdir /opt/bootmenu/templates
# mv $HOME/esp/linux/boot.cfg /opt/bootmenu/templates/menu.html.ep
Define a systemd service to manage the bootmenu app:
# cat << END > /etc/systemd/system/bootmenu.service
[Unit]
Description=Serves iPXE Menus over HTTP
After=network-online.target

[Service]
Type=forking
DynamicUser=true
RuntimeDirectory=bootmenu
PIDFile=/run/bootmenu/bootmenu.pid
ExecStart=/usr/bin/hypnotoad /opt/bootmenu/bootmenu.pl
ExecReload=/usr/bin/hypnotoad /opt/bootmenu/bootmenu.pl
AmbientCapabilities=CAP_NET_BIND_SERVICE
KillMode=process

[Install]
WantedBy=multi-user.target
END
Add an exception for the HTTP service to the local firewall and start the bootmenu service:
# firewall-cmd --add-service http
# firewall-cmd --runtime-to-permanent
# systemctl enable bootmenu.service
# systemctl start bootmenu.service
Test it with wget:
$ sudo dnf install -y wget
$ MY_BOOTMENU_SERVER=server-01.example.edu
$ wget -q -O - http://$MY_BOOTMENU_SERVER/menu
The above command should output something similar to the following:
#!ipxe

set timeout 5000

:menu
menu iPXE Boot Menu
item --key 1 lcl 1. Microsoft Windows 10
item --key 2 f29 2. RedHat Fedora 29
choose --timeout ${timeout} --default lcl selected || goto shell
set timeout 0
goto ${selected}

:failed
echo boot failed, dropping to shell...
goto shell

:shell
echo type 'exit' to get the back to the menu
set timeout 0
shell
goto menu

:lcl
exit

:f29
kernel --name kernel.efi ${prefix}/vmlinuz-4.19.4-300.fc29.x86_64 initrd=initrd.img ro ip=dhcp rd.peerdns=0 nameserver=192.0.2.91 nameserver=192.0.2.92 root=/dev/disk/by-path/ip-192.0.2.158:3260-iscsi-iqn.edu.example.server-01:fc29-lun-1 netroot=iscsi:192.0.2.158::::iqn.edu.example.server-01:fc29 console=tty0 console=ttyS0,115200n8 audit=0 selinux=0 quiet
initrd --name initrd.img ${prefix}/initramfs-4.19.4-300.fc29.x86_64.img
boot || goto failed
Now that the boot menu server is working, rebuild the ipxe.efi bootloader with an init script that points to it.
First, update the init.ipxe script created in part one of this series:
$ MY_BOOTMENU_SERVER=server-01.example.edu
$ cat << END > $HOME/ipxe/init.ipxe
#!ipxe

dhcp || exit
set prefix file:///linux
chain http://$MY_BOOTMENU_SERVER/menu || exit
END
Now, rebuild the boot loader:
$ cd $HOME/ipxe/src
$ make clean
$ make bin-x86_64-efi/ipxe.efi EMBED=../init.ipxe
Copy the updated bootloader to your ESP:
$ cp $HOME/ipxe/src/bin-x86_64-efi/ipxe.efi $HOME/esp/efi/boot/bootx64.efi
After you’ve copied the updated bootloader to all your clients, you can make future updates to the boot menu simply by editing /opt/bootmenu/templates/menu.html.ep and running:
$ sudo systemctl restart bootmenu.service
Making further changes
If the boot menu server is working properly, you’ll longer need the the boot.cfg file on your client systems.
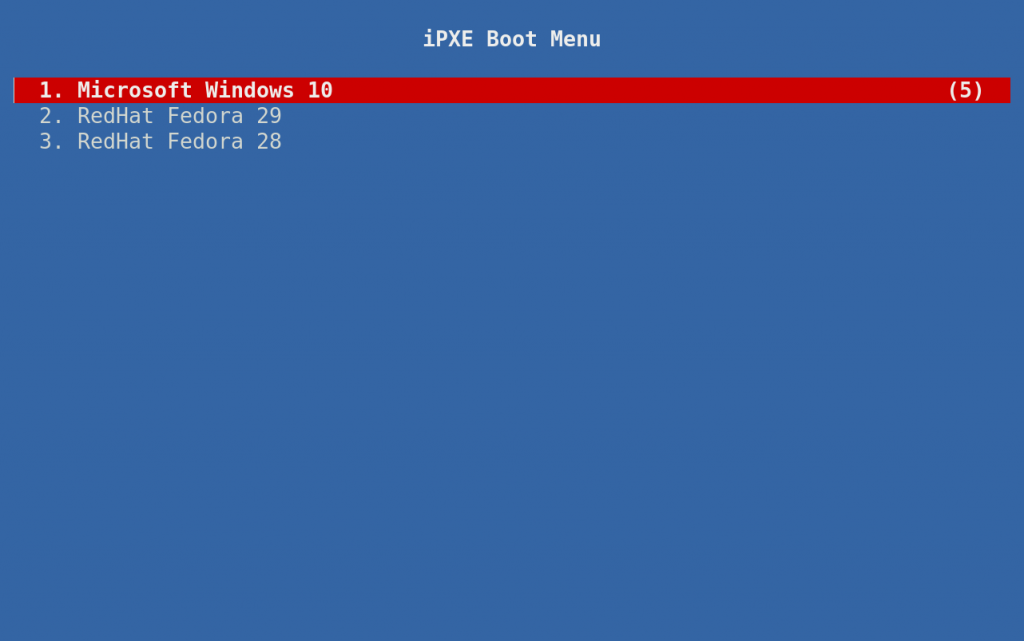
For example, re-add the Fedora 28 image to the boot menu:
$ sudo -i
# MY_FVER=28
# MY_KRNL=$(ls -c /fc$MY_FVER/lib/modules | head -n 1)
# MY_DNS1=192.0.2.91
# MY_DNS2=192.0.2.92
# MY_NAME=$(</etc/hostname)
# MY_EMAN=$(echo $MY_NAME | tr '.' "\n" | tac | tr "\n" '.' | cut -b -${#MY_NAME})
# MY_ADDR=$(host -t A $MY_NAME | awk '{print $4}')
# cat << END >> /opt/bootmenu/templates/menu.html.ep

:f$MY_FVER
kernel --name kernel.efi \${prefix}/vmlinuz-$MY_KRNL initrd=initrd.img ro ip=dhcp rd.peerdns=0 nameserver=$MY_DNS1 nameserver=$MY_DNS2 root=/dev/disk/by-path/ip-$MY_ADDR:3260-iscsi-iqn.$MY_EMAN:fc$MY_FVER-lun-1 netroot=iscsi:$MY_ADDR::::iqn.$MY_EMAN:fc$MY_FVER console=tty0 console=ttyS0,115200n8 audit=0 selinux=0 quiet
initrd --name initrd.img \${prefix}/initramfs-$MY_KRNL.img
boot || goto failed
END
# sed -i "/item --key 2/a item --key 3 f$MY_FVER 3. RedHat Fedora $MY_FVER" /opt/bootmenu/templates/menu.html.ep
# systemctl restart bootmenu.service
If all goes well, your clients should see results similar to the image below the next time they boot:

Sinan
Why “Redhat” Fedora 2x ??
Gregory Bartholomew
I was going for ” “. It is true though that Fedora is the product of many companies and individuals; not just Red Hat. See https://getfedora.org/en/sponsors for a partial list of companies that contribute to Fedora.
Gregory Bartholomew
WordPress mutilated my reply — Between the quotes should have been “<company> <product> <version>”.
Gregory Bartholomew
TIP:
If you need iPXE to provide different options depending on the machine type, you can use the iseq command to test the value of the ${product:hex} variable like so:
...
set initrd initramfs-4.19.4-300.fc29.x86_64.img
iseq ${product:hex} 50:72:65:63:69:73:69:6f:6e:20:54:31:36:35:30 && set initrd initramfs-4.16.3-301.fc28.x86_64.img
...
initrd --name initrd.img ${prefix}/${initrd}
In the example above, a different initramfs is provided if the client is a “Precision T1650” computer.
You can get the hex value either by echoing the ${product:hex} variable at an iPXE command prompt:
Or by piping the string through the xxd command in a bash shell:
Gregory Bartholomew
Oops, the “iseq …” line needs a “||” at the end or else the script will stop if the equality fails. That line should have been: