


The article How to Build a Netboot Server, Part 1 showed you how to create a netboot image with a “liveuser” account whose home directory lives in volatile memory. Most users probably want to preserve files and settings across reboots, though. So this second part of the netboot series shows how to reconfigure the netboot image from part one so that Active Directory user accounts can log in and their home directories can be automatically mounted from a NFS server.
Part 3 of this series will show how to make an interactive and centrally-configurable iPXE boot menu for the netboot clients.
Setup NFS4 Home Directories with KRB5 Authentication
Follow the directions from the previous post “Share NFS Home Directories Securely with Kerberos,” then return here.
Remove the Liveuser Account
Remove the “liveuser” account created in part one of this series:
$ sudo -i
# sed -i '/automaticlogin/Id' /fc28/etc/gdm/custom.conf
# rm -f /fc28/etc/sudoers.d/liveuser
# for i in passwd shadow group gshadow; do sed -i '/^liveuser:/d' /fc28/etc/$i; done
Configure NTP, KRB5 and SSSD
Next, we will need to duplicate the NTP, KRB5, and SSSD configuration that we set up on the server in the client image so that the same accounts will be available:
# MY_HOSTNAME=$(</etc/hostname)
# MY_DOMAIN=${MY_HOSTNAME#*.}
# dnf -y --installroot=/fc28 install ntp krb5-workstation sssd
# cp /etc/ntp.conf /fc28/etc
# chroot /fc28 systemctl enable ntpd.service
# cp /etc/krb5.conf.d/${MY_DOMAIN%%.*} /fc28/etc/krb5.conf.d
# cp /etc/sssd/sssd.conf /fc28/etc/sssd
Reconfigure sssd to provide authentication services, in addition to the identification service already configured:
# sed -i '/services =/s/$/, pam/' /fc28/etc/sssd/sssd.conf
Also, ensure none of the clients attempt to update the computer account password:
# sed -i '/id_provider/a \ \ ad_maximum_machine_account_password_age = 0' /fc28/etc/sssd/sssd.conf
Also, copy the nfsnobody definitions:
# for i in passwd shadow group gshadow; do grep "^nfsnobody:" /etc/$i >> /fc28/etc/$i; done
Join Active Directory
Next, you’ll perform a chroot to join the client image to Active Directory. Begin by deleting any pre-existing computer account with the same name your netboot image will use:
# MY_USERNAME=jsmith
# MY_CLIENT_HOSTNAME=$(</fc28/etc/hostname)
# adcli delete-computer "${MY_CLIENT_HOSTNAME%%.*}" -U "$MY_USERNAME"
Also delete the krb5.keytab file from the netboot image if it exists:
# rm -f /fc28/etc/krb5.keytab
Perform a chroot into the netboot image:
# for i in dev dev/pts dev/shm proc sys run; do mount -o bind /$i /fc28/$i; done
# chroot /fc28 /usr/bin/bash --login
Perform the join:
# MY_USERNAME=jsmith
# MY_HOSTNAME=$(</etc/hostname)
# MY_DOMAIN=${MY_HOSTNAME#*.}
# MY_REALM=${MY_DOMAIN^^}
# MY_OU="cn=computers,dc=${MY_DOMAIN//./,dc=}"
# adcli join $MY_DOMAIN --login-user="$MY_USERNAME" --computer-name="${MY_HOSTNAME%%.*}" --host-fqdn="$MY_HOSTNAME" --user-principal="host/$MY_HOSTNAME@$MY_REALM" --domain-ou="$MY_OU"
Now log out of the chroot and clear the root user’s command history:
# logout
# for i in run sys proc dev/shm dev/pts dev; do umount /fc28/$i; done
# > /fc28/root/.bash_history
Install and Configure PAM Mount
We want our clients to automatically mount the user’s home directory when they log in. To accomplish this, we’ll use the “pam_mount” module. Install and configure pam_mount:
# dnf install -y --installroot=/fc28 pam_mount
# cat << END > /fc28/etc/security/pam_mount.conf.xml
<?xml version="1.0" encoding="utf-8" ?>
<!DOCTYPE pam_mount SYSTEM "pam_mount.conf.xml.dtd">
<pam_mount>
<debug enable="0" />
<volume uid="1400000000-1499999999" fstype="nfs4" server="$MY_HOSTNAME" path="/home/%(USER)" mountpoint="/home/%(USER)" options="sec=krb5" />
<mkmountpoint enable="1" remove="0" />
<msg-authpw>Password:</msg-authpw>
</pam_mount>
END
Reconfigure PAM to use pam_mount:
# dnf install -y patch
# cp -r /fc28/usr/share/authselect/default/sssd /fc28/etc/authselect/custom
# echo 'initgroups: files' >> /fc28/etc/authselect/custom/sssd/nsswitch.conf
# patch /fc28/etc/authselect/custom/sssd/system-auth << END
@@ -12 +12,2 @@
-auth        sufficient                                   pam_sss.so forward_pass
+auth        requisite                                    pam_mount.so {include if "with-pammount"}
+auth        sufficient                                   pam_sss.so {if "with-pammount":use_first_pass|forward_pass}
@@ -35,2 +36,3 @@
 session     required                                     pam_unix.so
+session     optional                                     pam_mount.so {include if "with-pammount"}
 session     optional                                     pam_sss.so
END
# patch /fc28/etc/authselect/custom/sssd/password-auth << END
@@ -9 +9,2 @@
-auth        sufficient                                   pam_sss.so forward_pass
+auth        requisite                                    pam_mount.so {include if "with-pammount"}
+auth        sufficient                                   pam_sss.so {if "with-pammount":use_first_pass|forward_pass}
@@ -32,2 +33,3 @@
 session     required                                     pam_unix.so
+session     optional                                     pam_mount.so {include if "with-pammount"}
 session     optional                                     pam_sss.so
END
# chroot /fc28 authselect select custom/sssd with-pammount --force
Also ensure the NFS server’s hostname is always resolvable from the client:
# MY_IP=$(host -t A $MY_HOSTNAME | awk '{print $4}')
# echo "$MY_IP $MY_HOSTNAME ${MY_HOSTNAME%%.*}" >> /fc28/etc/hosts
Optionally, allow all users to run sudo:
# echo '%users ALL=(ALL) NOPASSWD: ALL' > /fc28/etc/sudoers.d/users
Convert the NFS Root to an iSCSI Backing-Store
Current versions of nfs-utils may have difficulty establishing a second connection from the client back to the NFS server for home directories when an nfsroot connection is already established. The client hangs when attempting to access the home directory. So, we will work around the problem by using a different protocol (iSCSI) for sharing our netboot image.
First chroot into the image to reconfigure its initramfs for booting from an iSCSI root:
# for i in dev dev/pts dev/shm proc sys run; do mount -o bind /$i /fc28/$i; done
# chroot /fc28 /usr/bin/bash --login
# dnf install -y iscsi-initiator-utils
# sed -i 's/nfs/iscsi/' /etc/dracut.conf.d/netboot.conf
# sed -i '/^node.conn\[0\].timeo.noop_out_interval /s/=.*$/= 0/' /etc/iscsi/iscsid.conf
# sed -i '/^node.conn\[0\].timeo.noop_out_timeout /s/=.*$/= 0/' /etc/iscsi/iscsid.conf
# sed -i '/^node.session.timeo.replacement_timeout /s/=.*$/= 86400/' /etc/iscsi/iscsid.conf
# echo 'omit_drivers+=" qedi "' > /etc/dracut.conf.d/omit-qedi.conf
# echo 'blacklist qedi' > /etc/modprobe.d/blacklist-qedi.conf
# KERNEL=$(ls -c /lib/modules | head -n 1)
# INITRD=$(find /boot -name 'init*' | grep -m 1 $KERNEL)
# dracut -f $INITRD $KERNEL
# logout
# for i in run sys proc dev/shm dev/pts dev; do umount /fc28/$i; done
# > /fc28/root/.bash_history
The qedi driver broke iscsi during testing, so it’s been disabled here.
Next, create a fc28.img sparse file. This file serves as the iSCSI target’s backing store:
# FC28_SIZE=$(du -ms /fc28 | cut -f 1)
# dd if=/dev/zero of=/fc28.img bs=1MiB count=0 seek=$(($FC28_SIZE*2))
(If you have one available, a separate partition or disk drive can be used instead of creating a file.)
Next, format the image with a filesystem, mount it, and copy the netboot image into it:
# mkfs -t xfs -L NETROOT /fc28.img
# TEMP_MNT=$(mktemp -d)
# mount /fc28.img $TEMP_MNT
# cp -a /fc28/* $TEMP_MNT
# umount $TEMP_MNT
During testing using SquashFS, the client would occasionally stutter. It seems that SquashFS does not perform well when doing random I/O from a multiprocessor client. (See also The curious case of stalled squashfs reads.) If you want to improve throughput performance with filesystem compression, ZFS is probably a better option.
If you need extremely high throughput from the iSCSI server (say, for hundreds of clients), it might be possible to load balance a Ceph cluster. For more information, see Load Balancing Ceph Object Gateway Servers with HAProxy and Keepalived.
Install and Configure iSCSI
Install the scsi-target-utils package which will provide the iSCSI daemon for serving our image out to our clients:
# dnf install -y scsi-target-utils
Configure the iSCSI daemon to serve the fc28.img file:
# MY_REVERSE_HOSTNAME=$(echo $MY_HOSTNAME | tr '.' "\n" | tac | tr "\n" '.' | cut -b -${#MY_HOSTNAME})
# cat << END > /etc/tgt/conf.d/fc28.conf
<target iqn.$MY_REVERSE_HOSTNAME:fc28>
  backing-store /fc28.img
  readonly 1
</target>
END
The leading iqn. is expected by /usr/lib/dracut/modules.d/40network/net-lib.sh.
Add an exception to the firewall and enable and start the service:
# firewall-cmd --add-service=iscsi-target
# firewall-cmd --runtime-to-permanent
# systemctl enable tgtd.service
# systemctl start tgtd.service
You should now be able to see the image being shared with the tgtadm command:
# tgtadm --mode target --op show
The above command should output something similar to the following:
Target 1: iqn.edu.example.server-01:fc28
    System information:
        Driver: iscsi
        State: ready
    I_T nexus information:
    LUN information:
        LUN: 0
            Type: controller
            SCSI ID: IET     00010000
            SCSI SN: beaf10
            Size: 0 MB, Block size: 1
            Online: Yes
            Removable media: No
            Prevent removal: No
            Readonly: No
            SWP: No
            Thin-provisioning: No
            Backing store type: null
            Backing store path: None
            Backing store flags:
        LUN: 1
            Type: disk
            SCSI ID: IET     00010001
            SCSI SN: beaf11
            Size: 10488 MB, Block size: 512
            Online: Yes
            Removable media: No
            Prevent removal: No
            Readonly: Yes
            SWP: No
            Thin-provisioning: No
            Backing store type: rdwr
            Backing store path: /fc28.img
            Backing store flags:
    Account information:
    ACL information:
        ALL
We can now remove the NFS share that we created in part one of this series:
# rm -f /etc/exports.d/fc28.exports
# exportfs -rv
# umount /export/fc28
# rmdir /export/fc28
# sed -i '/^\/fc28 /d' /etc/fstab
You can also delete the /fc28 filesystem, but you may want to keep it for performing future updates.
Update the ESP to use the iSCSI Kernel
Update the ESP to contain the iSCSI-enabled initramfs:
$ rm -vf $HOME/esp/linux/*.fc28.*
$ MY_KRNL=$(ls -c /fc28/lib/modules | head -n 1)
$ cp $(find /fc28/lib/modules -maxdepth 2 -name 'vmlinuz' | grep -m 1 $MY_KRNL) $HOME/esp/linux/vmlinuz-$MY_KRNL
$ cp $(find /fc28/boot -name 'init*' | grep -m 1 $MY_KRNL) $HOME/esp/linux/initramfs-$MY_KRNL.img
Update the boot.cfg file to pass the new root and netroot parameters:
$ MY_NAME=server-01.example.edu
$ MY_EMAN=$(echo $MY_NAME | tr '.' "\n" | tac | tr "\n" '.' | cut -b -${#MY_NAME})
$ MY_ADDR=$(host -t A $MY_NAME | awk '{print $4}')
$ sed -i "s! root=[^ ]*! root=/dev/disk/by-path/ip-$MY_ADDR:3260-iscsi-iqn.$MY_EMAN:fc28-lun-1 netroot=iscsi:$MY_ADDR::::iqn.$MY_EMAN:fc28!" $HOME/esp/linux/boot.cfg
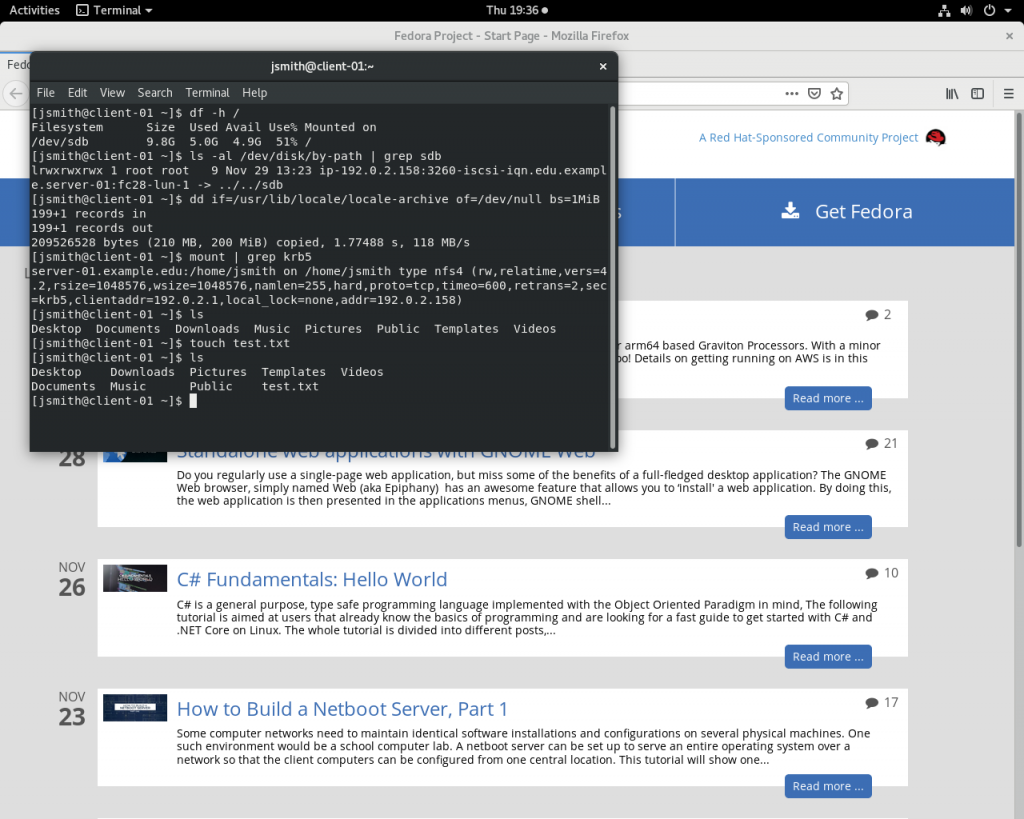
Now you just need to copy the updated files from your $HOME/esp/linux directory out to the ESPs of all your client systems. You should see results similar to what is shown in the below screenshot:
Upgrading the Image
First, make a copy of the current image:
# cp -a /fc28 /fc29
Chroot into the new copy of the image:
# for i in dev dev/pts dev/shm proc sys run; do mount -o bind /$i /fc29/$i; done
# chroot /fc29 /usr/bin/bash --login
Allow updating the kernel:
# sed -i 's/^exclude=kernel-\*$/#exclude=kernel-*/' /etc/dnf/dnf.conf
Perform the upgrade:
# dnf distro-sync -y --releasever=29
Prevent the kernel from being updated:
# sed -i 's/^#exclude=kernel-\*$/exclude=kernel-*/' /etc/dnf/dnf.conf
The above command is optional, but saves you from having to copy a new kernel out to the clients if you add or update a few packages in the image at some future time.
Clean up dnf’s package cache:
# dnf clean all
Exit the chroot and clear root’s command history:
# logout
# for i in run sys proc dev/shm dev/pts dev; do umount /fc29/$i; done
# > /fc29/root/.bash_history
Create the iSCSI image:
# FC29_SIZE=$(du -ms /fc29 | cut -f 1)
# dd if=/dev/zero of=/fc29.img bs=1MiB count=0 seek=$(($FC29_SIZE*2))
# mkfs -t xfs -L NETROOT /fc29.img
# TEMP_MNT=$(mktemp -d)
# mount /fc29.img $TEMP_MNT
# cp -a /fc29/* $TEMP_MNT
# umount $TEMP_MNT
Define a new iSCSI target that points to our new image and export it:
# MY_HOSTNAME=$(</etc/hostname)
# MY_REVERSE_HOSTNAME=$(echo $MY_HOSTNAME | tr '.' "\n" | tac | tr "\n" '.' | cut -b -${#MY_HOSTNAME})
# cat << END > /etc/tgt/conf.d/fc29.conf
<target iqn.$MY_REVERSE_HOSTNAME:fc29>
  backing-store /fc29.img
  readonly 1
</target>
END
# tgt-admin --update ALL
Add the new kernel and initramfs to the ESP:
$ MY_KRNL=$(ls -c /fc29/lib/modules | head -n 1)
$ cp $(find /fc29/lib/modules -maxdepth 2 -name 'vmlinuz' | grep -m 1 $MY_KRNL) $HOME/esp/linux/vmlinuz-$MY_KRNL
$ cp $(find /fc29/boot -name 'init*' | grep -m 1 $MY_KRNL) $HOME/esp/linux/initramfs-$MY_KRNL.img
Update the boot.cfg in the ESP:
$ MY_DNS1=192.0.2.91
$ MY_DNS2=192.0.2.92
$ MY_NAME=server-01.example.edu
$ MY_EMAN=$(echo $MY_NAME | tr '.' "\n" | tac | tr "\n" '.' | cut -b -${#MY_NAME})
$ MY_ADDR=$(host -t A $MY_NAME | awk '{print $4}')
$ cat << END > $HOME/esp/linux/boot.cfg
#!ipxe

kernel --name kernel.efi \${prefix}/vmlinuz-$MY_KRNL initrd=initrd.img ro ip=dhcp rd.peerdns=0 nameserver=$MY_DNS1 nameserver=$MY_DNS2 root=/dev/disk/by-path/ip-$MY_ADDR:3260-iscsi-iqn.$MY_EMAN:fc29-lun-1 netroot=iscsi:$MY_ADDR::::iqn.$MY_EMAN:fc29 console=tty0 console=ttyS0,115200n8 audit=0 selinux=0 quiet
initrd --name initrd.img \${prefix}/initramfs-$MY_KRNL.img
boot || exit
END
Finally, copy the files from your $HOME/esp/linux directory out to the ESPs of all your client systems and enjoy!

Oscar
Thanks a lot for this very complete and informative post!
One question, though…Do you think using NBD (nbd-server, nbdkit…) instead of iSCSI would be a valid solution? Would there be any problem? Thanks!
Gregory Bartholomew
Hi Oscar. You should be able to use NBD. I considered using it at one point myself, but I chose iSCSI after reading a comment saying that iSCSI was better at re-establishing connections in case of a temporary network interruption. I don’t know if the comment is valid to current versions of NBD, but it might be something to verify and consider when making your decision.
fmiz
What made you choose Fedora for this setup?
Gregory Bartholomew
Hi fmiz. The real reason that I use Fedora for most everything that I run is because the systems that I inherited when I started working here at Southern Illinois University Edwardsville in 1998 were already running Red Hat’s operating system. I found other BSD-based distros to be just different enough in their package management tools and config file locations to be frustrated when working on them. I would inevitably end up thinking, “I could do this in 5 seconds on Fedora” because I was already so familiar with Red Hat’s distros. So, it is really just because that is what I am familiar with. I can’t really comment as to which is “better” because I am not really that familiar with the BSD derivatives.
fmiz
I asked because Fedora does not strike me as the first distro to run this kind of setup on. I think of fedora as somewhat less flexible in comparison to debian, but you just prove otherwise. Reading again your articles, this setup is a lot of work and there are a few details that seem to have required quite some time to troubleshoot, but it does not look like fedora gets in your way, the only default you had to change is selinux, everything else is just configuration.
Thanks for your answer and your interesting series.
imsedgar
I think it’s not a good idea to use “firewall-cmd –runtime-to-permanent”, because it may save firewalls rules that the user may not be aware at that time.
Why not use just the same rule as in the previous line of your instruction, but with “–permanent” added? It is not so much longer than the other, but has a clear and clean result – it only add this rule to the permanent rules.
firewall-cmd –permanent –add-service=iscsi-target
There should be also checked if there should be used another firewall zone than the default zone. One may put some network devices in another zone, for example zone “work”, and apply the rules to that zone.
Gregory Bartholomew
Hi imsedgar. Really, I’ve been using the “–runtime-to-permanent” parameter because another commenter recommended it in a previous post (see the Nov. 15th comment here: https://fedoramag.wpengine.com/never-leave-irc-znc/).
I kind of agree with you about the longer form being clearer about what it is doing. If the reader has been following this guide though, there shouldn’t be any unexpected things committed to the firewall. And if the reader has been doing other things or has started from a different base configuration, then they are really on their own to figure out what does and doesn’t need to be done (including using –permanent instead of –runtime-to-permanent).
“firewall-cmd –list-all” is a good thing to run every once in a while if you are worried about it.