


In this article you will see how we are using Accessibility as an automation tool to test desktop applications just like a real user would using keyboard key presses and mouse clicks.
Although this topic and all of its parts can be talked about for hours to exhaust everything, I will attempt to describe how we are dealing with automation testing in a more digestible form.
For those interested there is a link to a full technical solution at the end of this post, with all of our tools and how to use them. We also provide our full GNOME Terminal testing suite for anyone to try.
Let us start with the very core of our ability. Accessibility.
What is Accessibility
Accessibility (AT-SPI) in software development aims to make software products available to people of all abilities. While being used for various tools present throughout many distributions, it can be used for other purposes.
We are using Accessibility through Python.
Specifically we utilize Python module GObject introspection that holds Python bindings and support for GTK toolkit and GNOME applications, namely the Atspi module.
While Atspi is already providing useful functions, in general this is not enough, we need quite a few more tools to do our job effectively.
With that in mind lets go over our automation stack.
Automation stack
We do not have a single project that we could utilize. No such project that would fulfill all of our criteria exists, to our knowledge.
Therefore, we are using multiple open source projects together to achieve our goal of testing desktop applications. We are maintainers and contributors to most of the following projects.
- The API – dogtail
- Usage on Wayland – gnome-ponytail-daemon
- The project template – behave
- Gathering results – behave-html-pretty-formatter
- Library of tools – qecore
The API – dogtail
dogtail is a GUI test tool and automation framework written in Python. It is an extension and wrapper around Atspi and pyatspi2 python libraries.
Atspi provides almost everything we need. The dogtail framework, however, is more user friendly in matters of usage.
dogtail is how we obtain positions and sizes of various widgets. It also provides functions to press single keyboard keys, do key combinations, typing of text, and mouse button clicking.
Usage on Wayland
Another piece of the stack is the gnome-ponytail-daemon project.
This is a helper daemon intended for dogtail on Wayland. Wayland does not expose desktop coordinates so gnome-ponytail-daemon uses remote-desktop and screen-cast APIs in order to work around that.
Working with gnome-ponytail-daemon is not trivial. Fortunately, most of what we need from it is hidden behind dogtail which uses gnome-ponytail-daemon functions when needed. This enables seamless work without the need to change API calls.
Let us continue to the structure of our automation code.
The project template – behave
behave provides a way to connect natural language, which serves as our step by step suite definition, to an implementation in Python. To illustrate a more specific example, here are behave‘s feature files that contain natural language…
@showing_off_behave
Feature: Showing off behave

  Scenario: Run a simple test
    Given we have behave installed
    When we implement 5 tests
    Then behave will test them for us!
… which is implemented in Python as you can see below…
from behave import given, when, then, step

@given('we have behave installed')
def step_impl(context):
    pass

@when('we implement {number:d} tests')
def step_impl(context, number):
    assert number > 1 or number == 0
    context.tests_count = number

@then('behave will test them for us!')
def step_impl(context):
    assert context.failed is False
    assert context.tests_count >= 0
We also use behave‘s file structure as a project template for our testing suites. Therefore, our suites are started by behave in all of our cases.
Starting a single test:
$ behave -kt showing_off_behave
There is more that behave does for us but that is not relevant here.
Lets explore how we gather the results of our testing.
Gathering result – behave-html-pretty-formatter
behave provides results, after execution, in user specified format. There are a lot of built-in formats but none of them are useful for us. We are testing GUI applications after all, so we need a lot more than what behave provides.
While behave‘s formats are not useful for us, it does provides us with a way to add a new one as a module.
We wrote our own formatter for behave called behave-html-pretty-formatter. This formatter returns the output as HTML which we can direct to a file. We have functions specified in our module that enable us to embed data into the HTML file as links, strings, screenshots and videos.
The following is an example of starting a test, specifying what the output format will be, and what file to output the data to.
$ behave -kt <test> -f html-pretty -o test.html
Library of tools – qecore
With the tools above we have a way to implement our test, have the steps written in natural language, have them executed, and obtain the output of this execution in an HTML file for review. In spite of having all of that, we still need more, much more.
For that reason we have a library of tools that is present in all of our automation suites. It provides everything else we might need in our solution. When we need a new feature, we will add it to this project.
To list a few examples of what qecore is used for:
- System configuration.
- Video recording.
- Data gathering.
- Debugging on error.
- Image matching.
Summary of parts
- qecore will start a session and execute behave.
- behave starts executing its parts.
- qecore initiates and executes commons functions.
- Test will execute.
- Automation testing via dogtail /ponytail.
- Test finishes.
- Test will execute.
- qecore gathers all data and lets behave know how to include them in our file.
- qecore initiates and executes commons functions.
- behave finishes its parts and provides results in HTML format.
- behave starts executing its parts.
- qecore may or may not terminate the session based on user setup.
Starting the entire solution for a single test:
$ qecore-headless “behave -kt <test> -f html-pretty -o test.html”
The “headless” in the name of the script is historical, now it serves as a session configuration tool.
Examples
- Click on System menu – Video of the execution
#!/usr/bin/python3
from dogtail.tree import root
from time import sleep

# Load application root to variable.
shell = root.application("gnome-shell")

# Search the application tree for objects.
system_menu = shell.child("System", "menu")
# Click it.
system_menu.click()
- Open Terminal form Overview – Video of the execution
#!/usr/bin/python3
from dogtail.rawinput import typeText, pressKey
from time import sleep

# Start the application.
# Open overview.
pressKey("Super")
# Give overview a little time to show.
sleep(1)

# Search application.
typeText("Terminal")
# Confirm by Enter.
pressKey("Enter")
- Scrolling the terminal – Video of the execution
#!/usr/bin/python3
from dogtail.tree import root
from dogtail.rawinput import typeText, pressKey
from time import sleep

# Start the application.
# Open overview.
pressKey("Super")
# Give overview a little time to show.
sleep(1)

# Search application.
typeText("Terminal")
# Confirm by Enter.
pressKey("Enter")

typeText("seq 100")
pressKey("Enter")

scroll_bar = terminal.findChild(
    lambda x: x.roleName == "scroll bar"
)
s_min = int(scroll_bar.minValue)
s_max = int(scroll_bar.maxValue)

for i in range(s_max, s_min, -1):
    scroll_bar.value = i
    sleep(0.05)

for i in range(s_min,s_max):
    scroll_bar.value = i
    sleep(0.05)
- Start Terminal and execute a command in New Tab – Video of the execution
#!/usr/bin/python3
from dogtail.tree import root
from dogtail.rawinput import typeText, pressKey
from time import sleep

# First open the application.
pressKey("Super")  # Open overview.
sleep(1)  # Give overview a little time to show.

# Search application.
typeText("Terminal")
# Confirm by Enter.
pressKey("Enter")

# Load application root to variable.
app = root.application("gnome-terminal-server")

# Search the application tree for objects.
terminal = app.child("Terminal", "terminal")
# Right click in the terminal.
terminal.click(3)
# Give menu some time to show.
sleep(1)

# Find the item Show Menubar that is showing
show_menubar = app.findChild(
    lambda x: x.name == "Show Menubar" and
    x.roleName == "check menu item" and
    x.showing
)
# Click it if the option is not checked.
if not show_menubar.checked:
    show_menubar.click()
else:
    # Close the menu if option is checked.
    pressKey("Esc")

sleep(1)

app.child("File", "menu").click()
app.child("New Tab", "menu").click()
app.findChild(lambda x: "1." in x.name).click()
sleep(1)

# Execute the command.
typeText("echo Hello World")
pressKey("Enter")
- Start a Calculator and do a simple calculation – Video of the execution
#!/usr/bin/python3
from dogtail.tree import root
from time import sleep
import dogtail.rawinput

# Load application root to variable.
shell = root.application("gnome-shell")

# Search the application tree for objects.
shell.child("Activities", "label").click()
sleep(2)  # Give overview a little time to show.

shell.child("Show Apps", "toggle button").click()
sleep(2)

shell.child("Calculator", "label").click()
sleep(2)

# Load the Calculator Atspi object to a variable.
calculator = root.application("gnome-calculator")

# For calculator we have to account for shadows.
def _update_coords(coords):
    return (coords[0] + 40, coords[1] + 40)
dogtail.rawinput.update_coords = _update_coords
# Or you can disable box-shadow for gtk4 css.

# Simple calculation.
calculator.child("3").click()
calculator.child("+").click()
calculator.child("5").click()
calculator.child("=").click()

# Simple check.
assert calculator.child("3+5").showing
assert calculator.child("8").showing
Examples of an automation suite output files
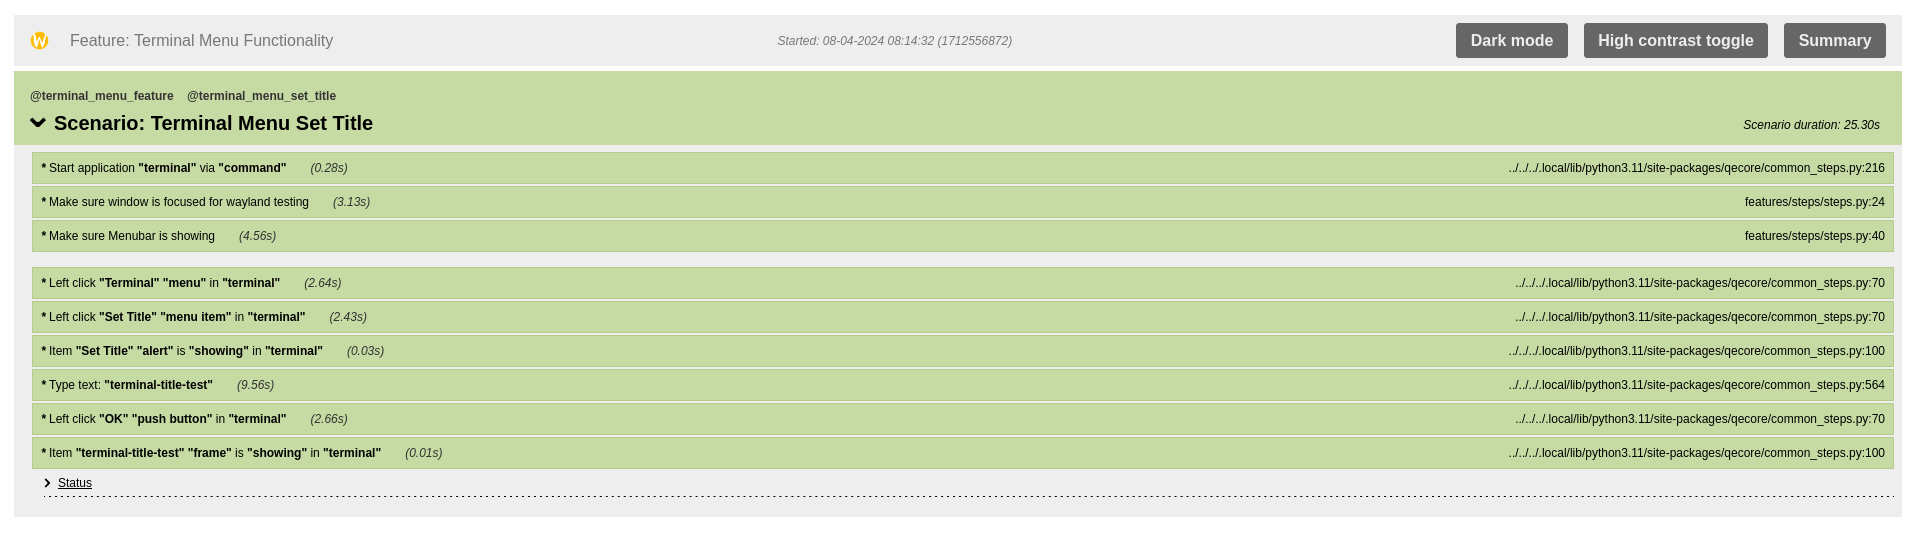
- Passed test in GNOME Terminal Suite
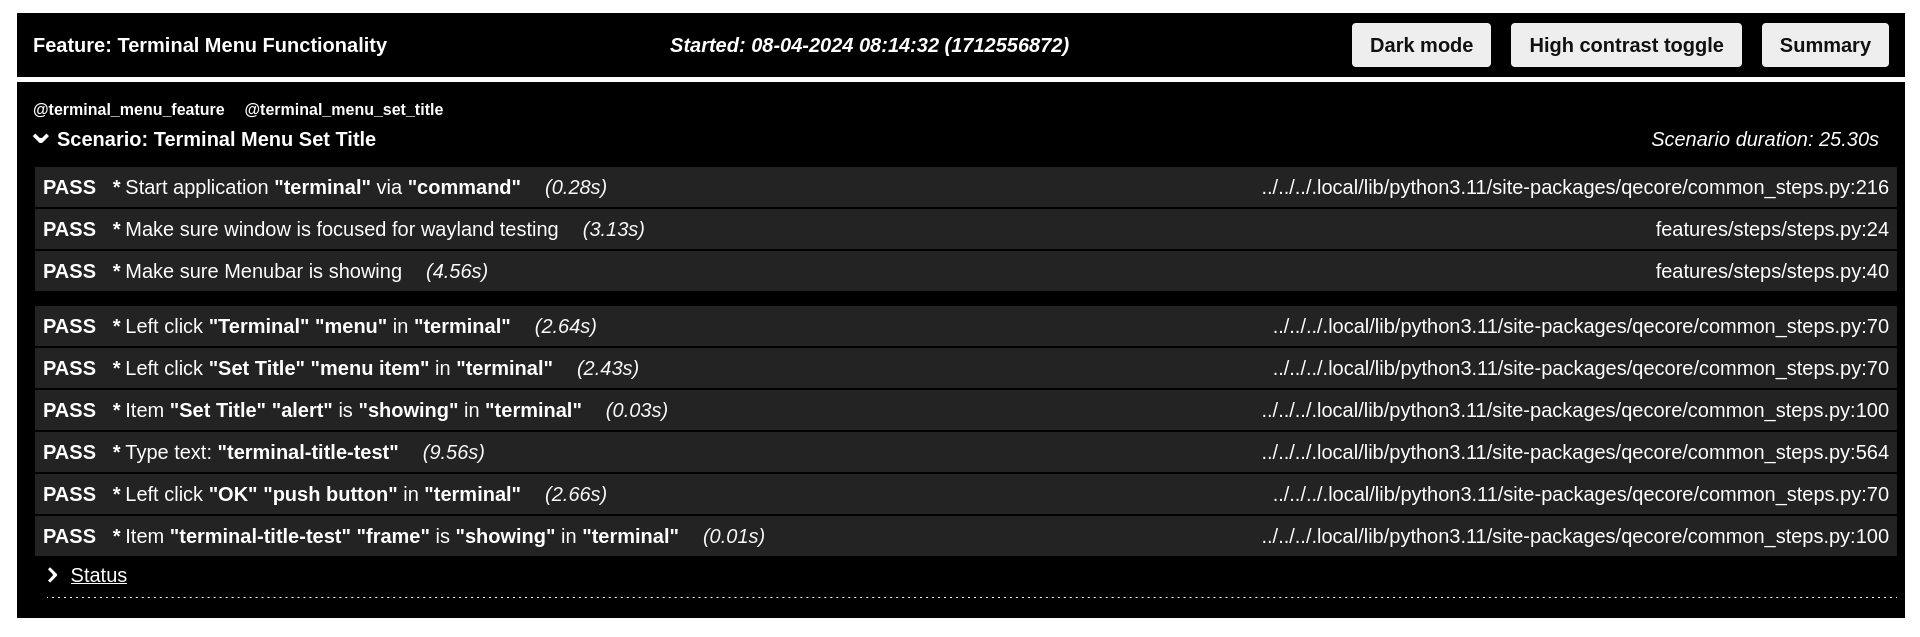
- Passed test in GNOME Terminal Suite in High Contrast.
We have teammates with visual impairment. While designing the output format we thought about a button that would remove all color as a core feature.
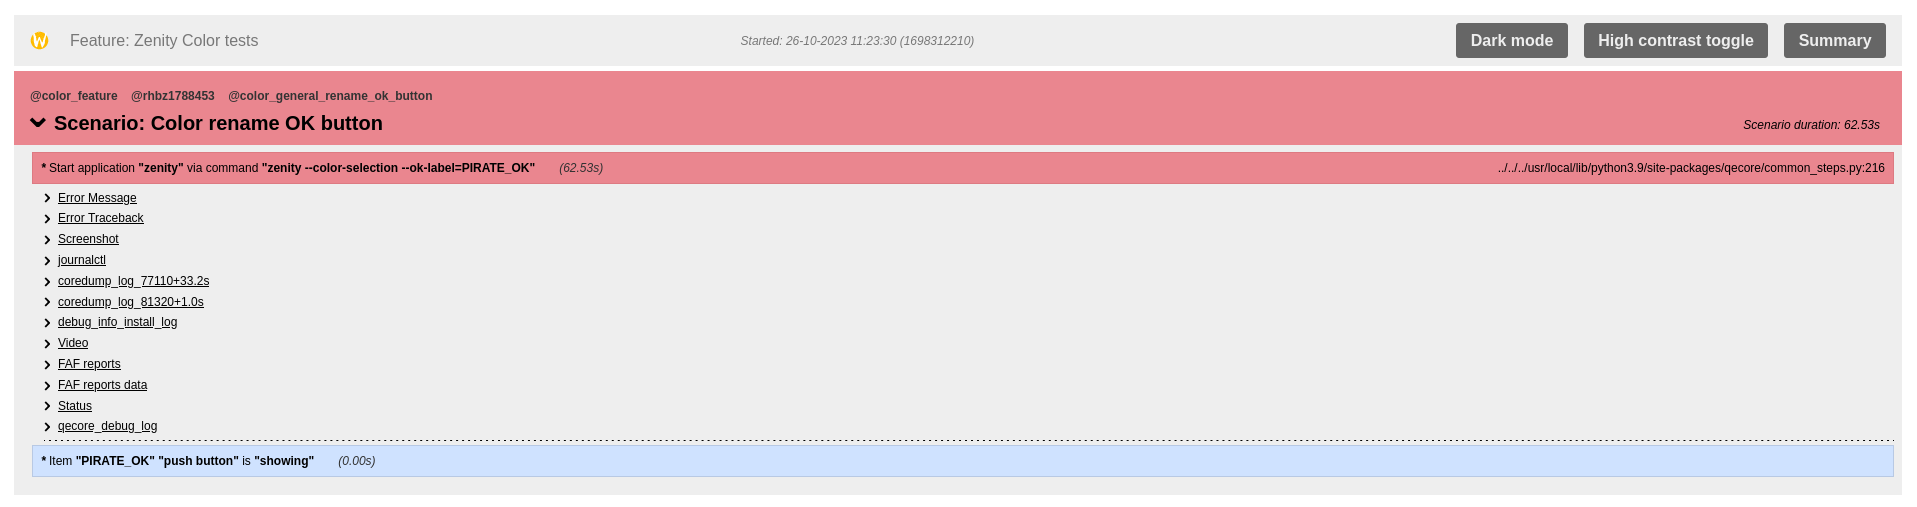
- Failed test in a Zenity Testing Suite
Our automation solution will provide as much data as possible after any error.
You will notice the amount of data present in a failed page. This page has everything a developer will need to debug a problem.
- Set of steps taken to reproduce the issue.
- Screenshot at the moment of the failure.
- Video of the reproducer.
- Journal logs.
- Full backtrace from coredumps – all relevant debuginfo/debugsource packages are installed.
- Status shows what version of an application is tested.
- We also have debug logs for our own tools to verify we did not introduce the issue.
Advantages of our solution
- It does not matter what theme is in use.
- It does not matter what font is in displayed on the screen.
- It does not matter where on the screen the application is located.
- In GNOME Control Center we can enable Zoom, Large Text or High Contrast and the automation will still work.
- If the application is in the Atspi tree in can be tested:
- Evolution
- Firefox
- GNOME Control Center
- GNOME Shell
- GNOME Software
Disadvantages of our solution
- Accessibility is primarily not meant to be used for automation.
- Most applications we test have the Accessibility layer in imperfect/incomplete state.
- Wrong coordinates.
- Incorrect or missing names, roles or attributes.
- Widgets for scroll bars have their limit set to 0 and cannot be changed even if a user can scroll in the GUI with no issues.
- While most of the issues we find have relatively simple workarounds they still exist and have to be dealt with.
- Problems with Accessibility in context of an automation are not a priority and might not get the attention they would need.
Full technical solution
For those interested in more details I am providing full technical solution for automation testing of GNOME Terminal on Fedora 38 with Wayland.
The article will guide you to fully functional Automation Testing solution.

Darvond
Is this in response to the recent concerns that Wayland wasn’t accessibility ready?
Michal
The article was not written with that in mind.
This article is a showcase of how we are able to do automation testing using the accessibility.
I believe the concerns are valid. There are still areas where the accessibility could be improved. We are trying to contribute to this issue though so it is getting better.