


This article shows how to use cloud-init on the oVirt management platform. With cloud-init, you can start up a Fedora Cloud Base Image template, configured for network and logins, without logging into the virtual machine.
What is oVirt?
oVirt is a free, open-source virtualization management platform with an easy web interface.
What is cloud-init?
The cloud-init tool provides early initialization and setup of a virtual machine (VM). This usually happens during the startup of the guest operating system on the VM.
What can I do with cloud-init in oVirt?
oVirt allows you to configure:
- an initial user account including password and your SSH key
- a hostname
- the timezone of the VM
- DNS settings and networks on the VM
Additionally, it allows you to pass a custom cloud-init script. That script gives you even more control over the VM.
Virtual machine requirements
To use cloud-init with a virtual machine, the cloud-init package must be installed on the VM in question. Packages for cloud-init are available in most distributions’ package repositories, including Fedora.
The VM you’re booting should have the cloud-init package preinstalled and configured to start automatically on boot.
cloud-init configuration within oVirt
There are two ways to configure the cloud-init parameters:
- Permanent: Saves a configuration, which is useful for stateless VMs that discard all changes after shutdown.
- Temporary: Passes configuration via the run once dialog used only for the current run of the VM.
How to permanently setup cloud-init parameters for a VM in oVirt
- Log in to the user portal or the administration portal of your oVirt instance.
- In case of the user portal, select the Extended link in the upper left corner to get the list of your VMs. (This step is not required for the Administration portal.)
- Select the VM in the list you want to configure.
- Select the Edit link which is now active in the list header.
- The Edit Virtual Machine dialog then opens. Now choose the Initial Run section on the left hand side of the dialog. This is usually the third entry from the top. (Note: If the Initial Run section is not present, select the Show Advanced Options in the bottom left area of the dialog to reveal hidden options.) Mark the check box Use Cloud-Init/Sysprep. This will reveal the available options.
Now configure the options as desired and select OK. oVirt applies the configuration to the VM the next time it’s started.
How to temporarily setup cloud-init parameters for a VM in oVirt via Run-Once
- Log in to the user or administration portal of your oVirt instance.
- If using the user portal, select the Extended link in the upper left corner to get the list of your VMs. (This step is not required for the administration portal.)
- Select the VM you’d like to configure in the list.
- Select the Run-Once link in the list header. The Run Virtual Machine(s) dialog appears.
- Now choose the Initial Run section.
- Mark the check box Use Cloud-Init. This will reveal the available options.
Now configure the options as desired and select OK. The VM starts with these options configured and applied. The information entered is not persistent. It’s discarded on shutdown of the VM. However, changes you apply inside the VM persist, as long as the VM isn’t stateless.
Hands on with the Fedora Cloud Base Image
From the oVirt administration portal, one imports a virtual machine disks from an predefined image. oVirt comes with a glance repository with many Linux distribution images. Several versions of CentOS 7, Ubuntu, and Fedora are included.
Importing the image
This example uses the Fedora 25 Cloud Base Image. Within the Storage section of the administration portal, select the ovirt-image-repository entry in the table. A list of available images to import appears in the lower pane.

Image selection in the oVirt Administration Portal
Right click on the entry to setup the import. You can import to the datacenter and storage domain of choice as a new disk or template. This example imports as a disk.
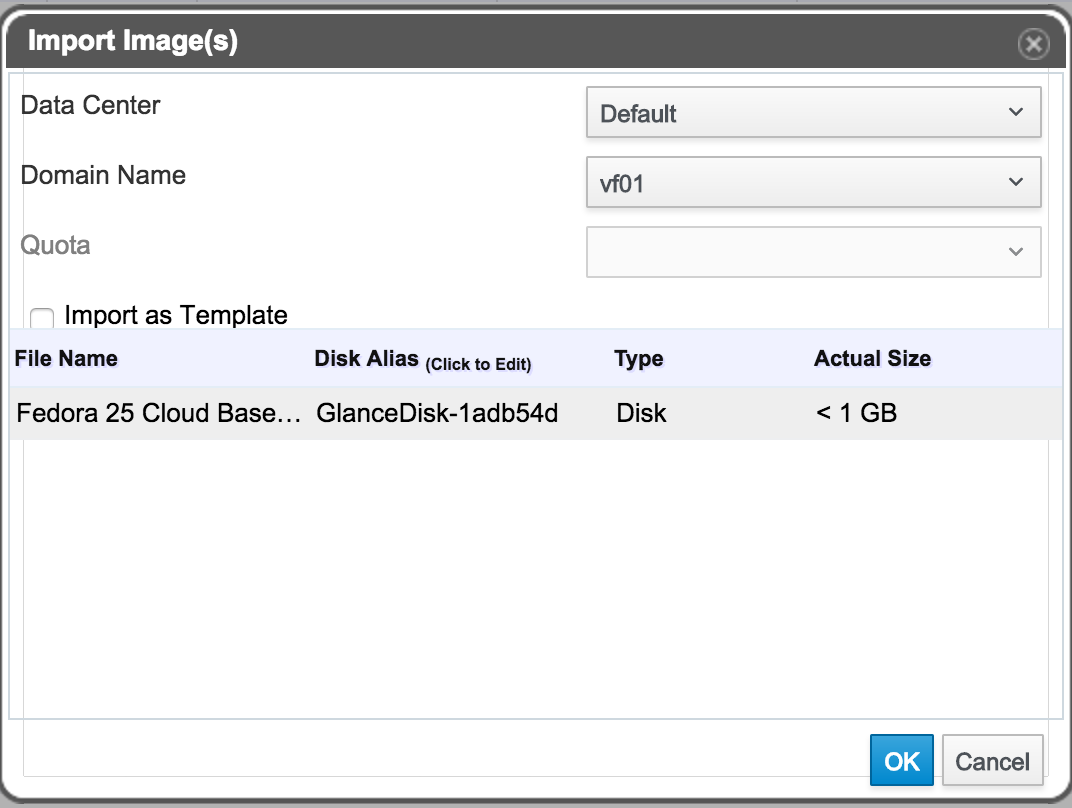
Import Image Dialog in oVirt
Setting up the virtual machine
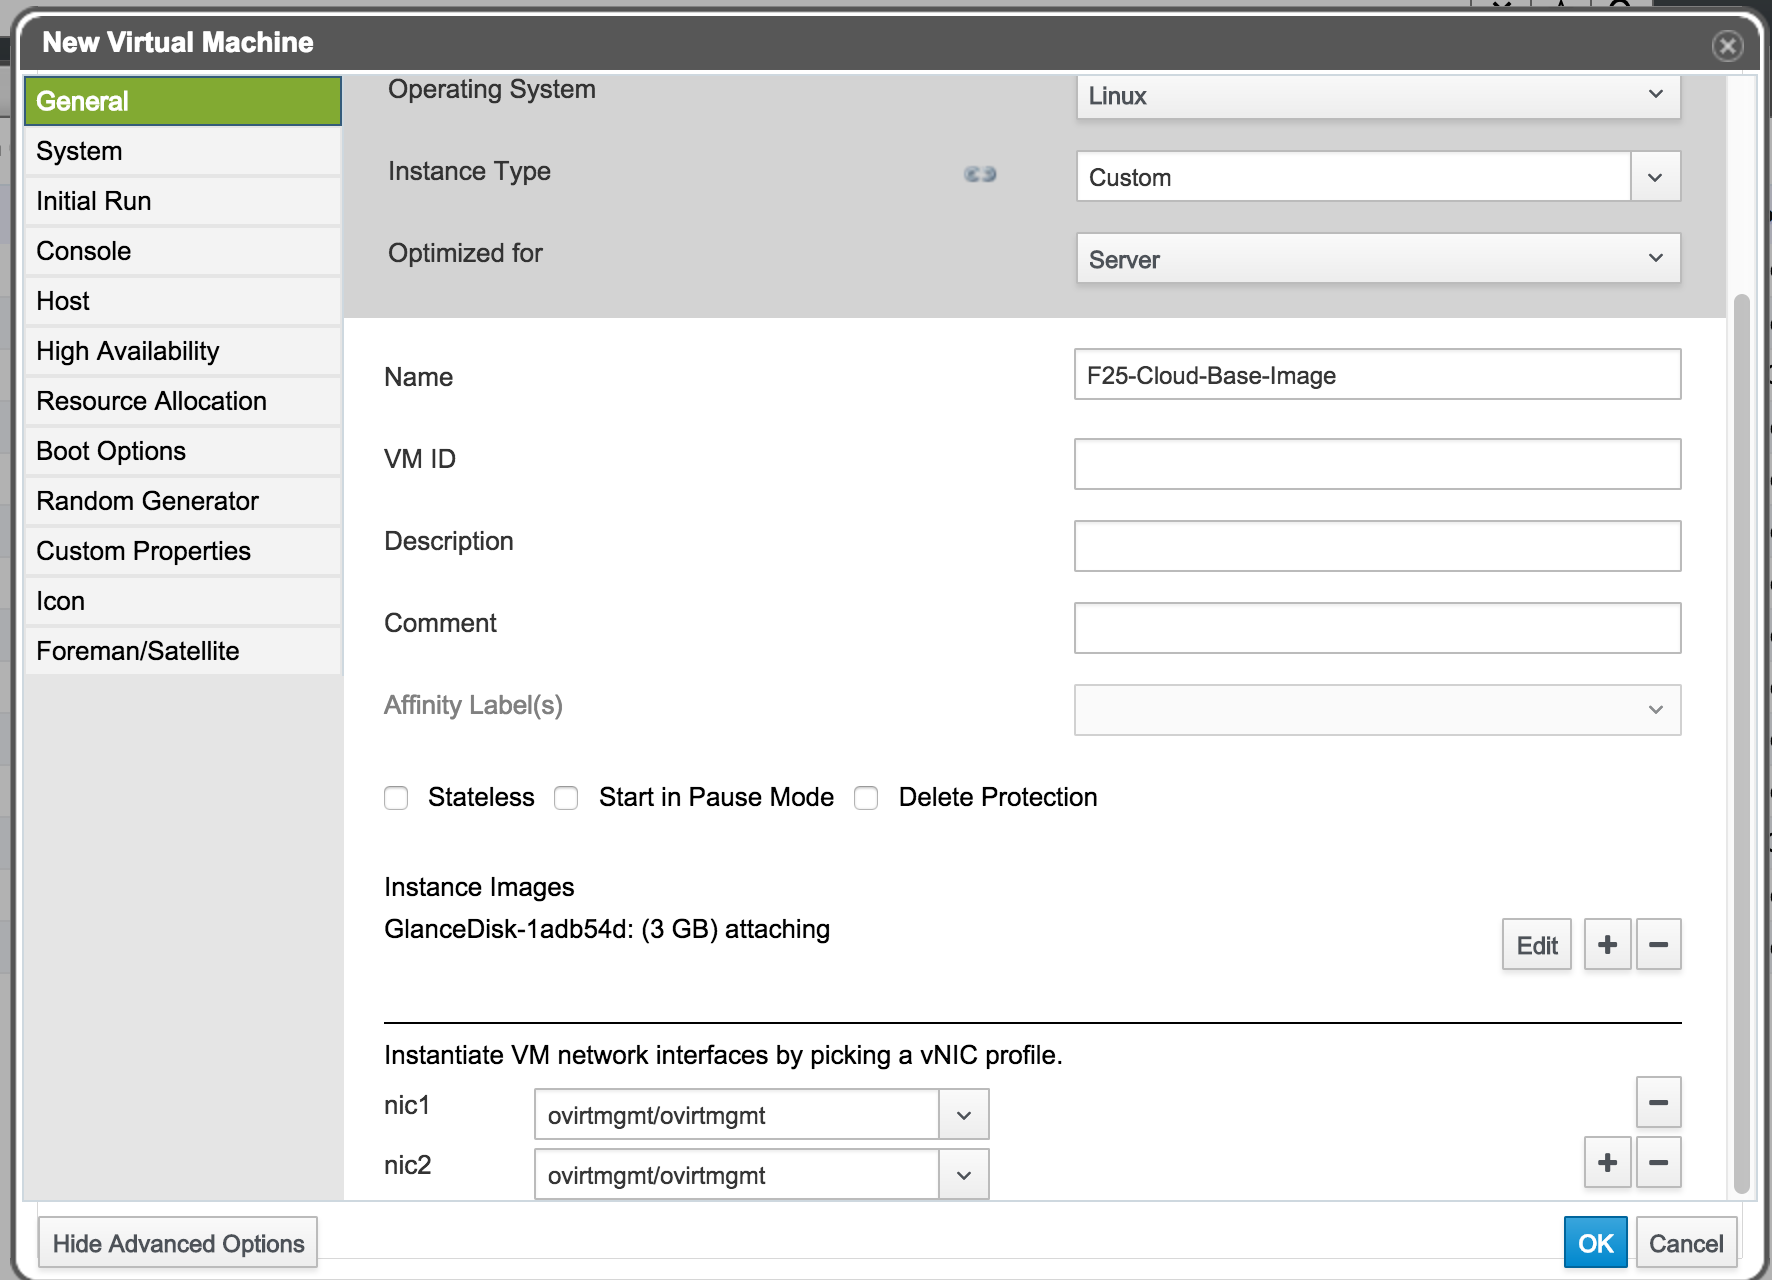
After the disk image has been imported, switch to the Virtual Machines section and create a New VM. In the dialog choose Linux as the operating system. Configure it to be optimized for Server usage. Next, set a name for the virtual machine. The name of virtual machines in oVirt may not contain spaces.
Next attach the disk image to the virtual machine in the Instance Images section. The imported disk image should be called GlanceDisk followed by a dash and some numbers and letters. However, if you opted to rename it in the import dialog, look for the name you assigned there.
New Virtual Machine Dialog in oVirt
Now, configure the network interfaces. For this scenario add two adapters and set them to the appropriate network. The correct network depends on your configuration. By default the network is called ovirtmgmt/ovirtmgmt. In your environment, or in more complex scenarios, this might be different.
Change the amount of memory and number of CPUs in the System section of the dialog as needed.
Getting started with cloud-init
Now you can configure the virtual machine details from the Initial Run section of the dialog. Check the Cloud-Init/Sysprep checkbox to make the options visible.
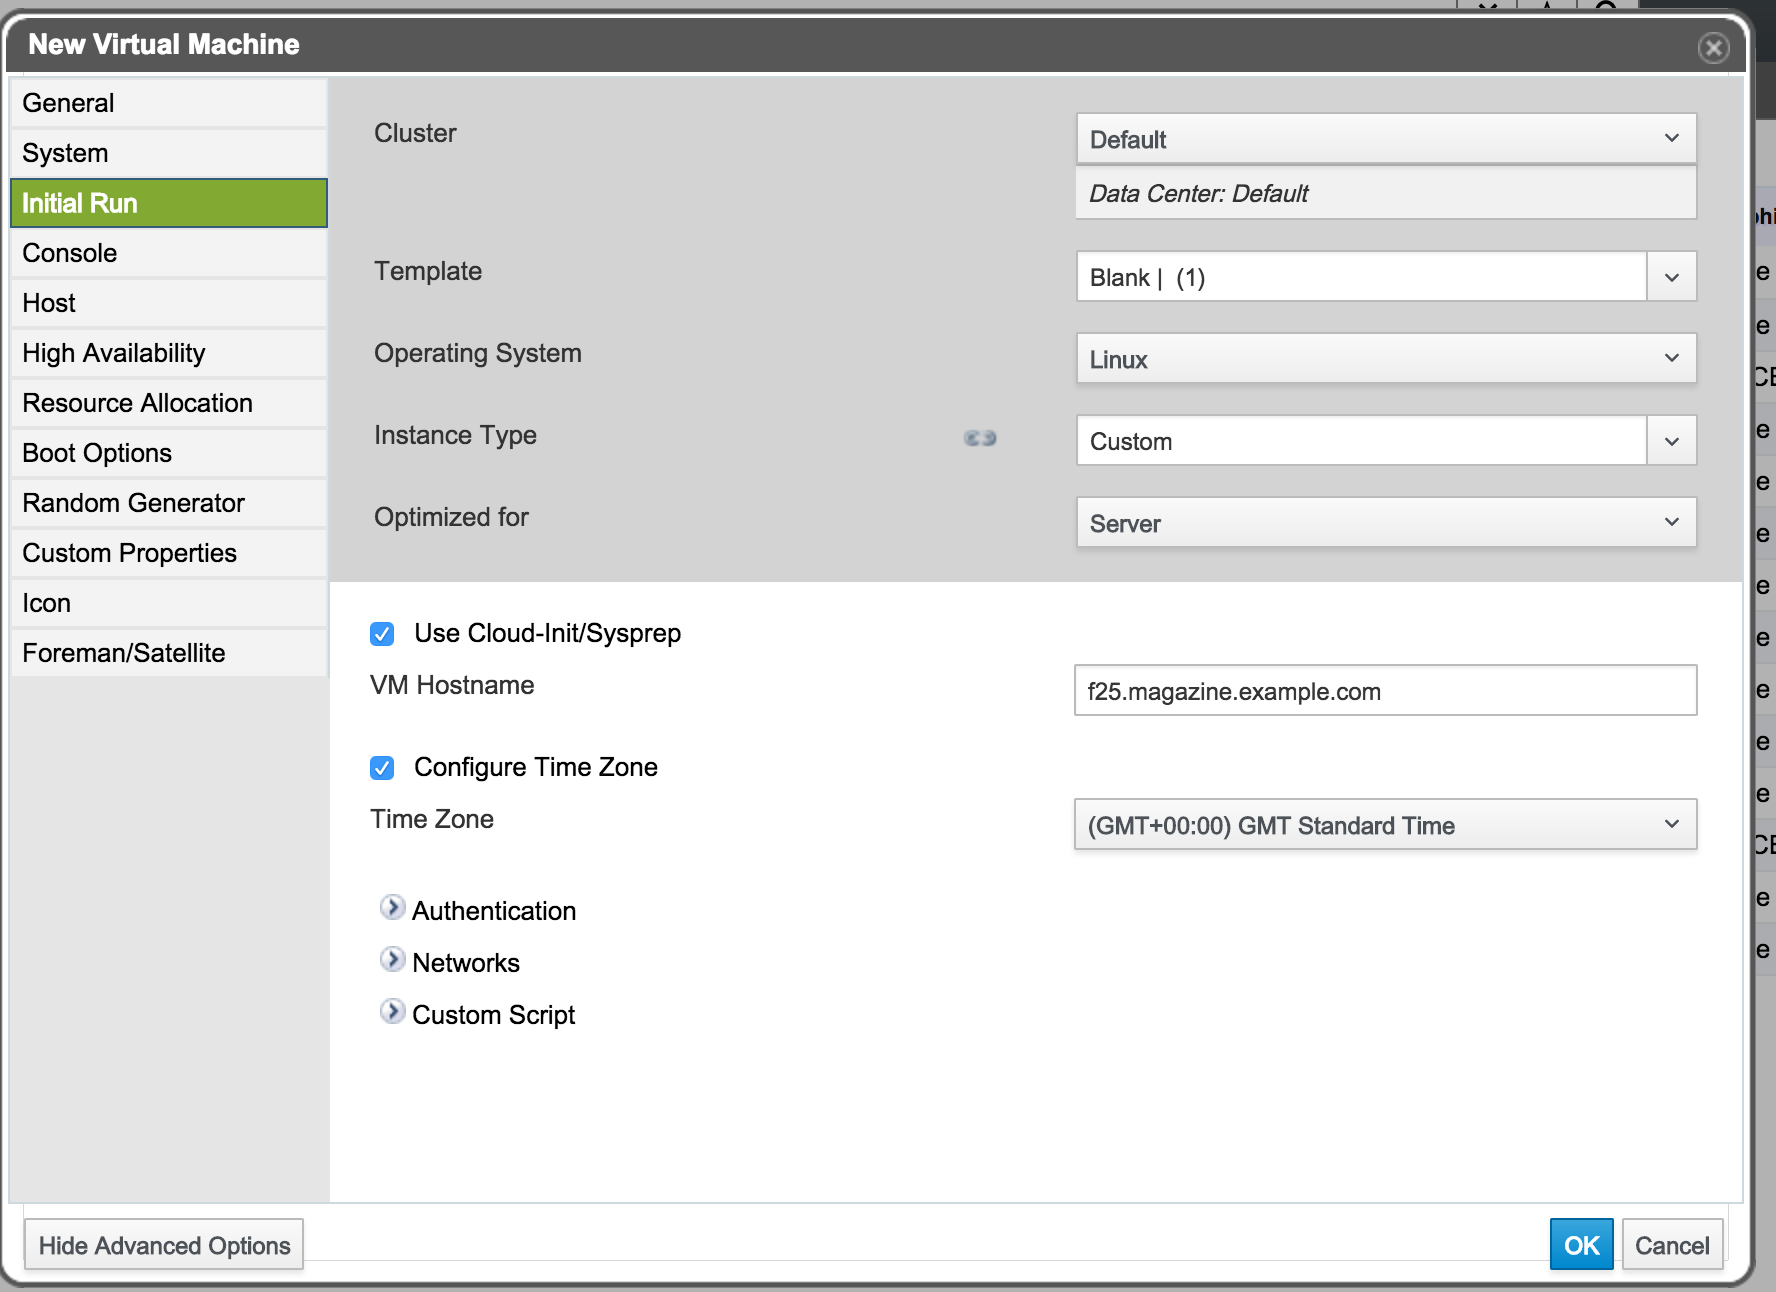
Setting up cloud-init in the oVirt ‘New Virtual Machine’ dialog
Set a hostname as desired. This example uses f25.magazine.example.com. Next, set up a time zone by checking the Configure Time Zone checkbox and choosing the appropriate time zone.
Setting up authentication
The oVirt Cloud-Init configuration dialog lets users create new users and set their password. Additionally it lets you supply a SSH key for the root user. This key is added to the authorized-keys so you can establish a password-less SSH connection to the VM.
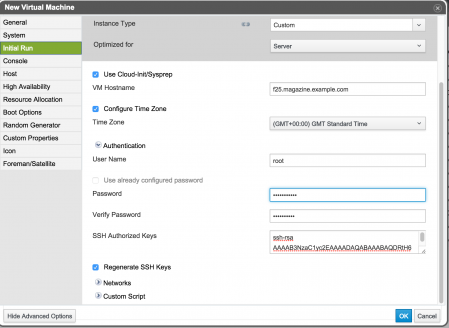
VM edit dialog – Cloud Init options – Adding authentication options
Networking options
oVirt offers a straightforward way to configure networks via cloud-init. To use the functionality, check the Network checkbox. Here you can set up DNS servers, DNS search domains, and network interface configurations.
To add an interface configuration, click the Add new button. Give the network a name, which may not contain spaces or special characters.
You may choose a dynamic network configuration, which is usually the default. It’s a good idea to check the Start on Boot checkbox, so the network configuration will be processed when the VM boots.
If you have no DHCP available, or if you prefer a fixed IP, choose the Static option from the Boot Protocol drop down. Then edit the IP address, Netmask and Gateway for your interface.
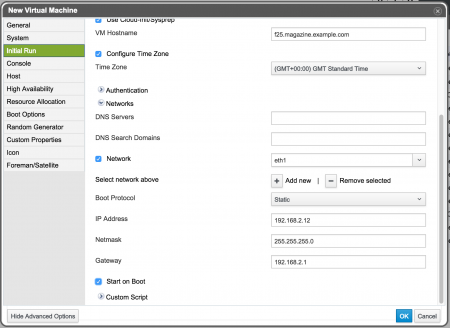
VM dialog – Cloud Init options – Network configuration
Finishing up
Once all information is configured, select OK and start the VM. If the VM is configured correctly and the cloud-init package is enabled to start on boot, it will find the configuration and apply all the settings.
In case of persistent information, oVirt marks a VM as initialized after the VM’s first runM. Once it is marked as initialized, the cloud-init information is no longer passed to the VM. This is not the case if the VM is stateless. A stateless VM discards all changes applied after the run, and therefore the VM won’t be marked as initialized.

Rodehoed
Hi,
Nice read. I was wondering why tot use cloud init when u have kickstart. Just curious!
Rodehoed
evilissimo
First of all kickstarts work only with a subset of distributions.
Also they are meant for installation time modifications where as cloud-init assumes a preconfigured system which just needs some minor adjustments. It’s most useful use case lays in the fact that it has multiple ways of acquiring metadata (such as passwords, etc) from various sources, some more secure some more convenient.
Also the preconfigured use case with cloud-init usually is much faster.